As a long-time SysAdmin, one of the core tasks I’ve always had to tackle is managing users and groups on Linux systems. Whether you’re running a personal server or managing an entire fleet of Linux boxes, understanding how to efficiently handle user and group permissions is essential for maintaining a secure and organized system. In this post, we’ll dive into the nuts and bolts of user and group management on Linux, walking through practical examples and providing some handy commands to keep in your toolbox!
Why User and Group Management Matters
Before we jump into the command line, let’s talk about why user and group management is so crucial. Linux is a multi-user operating system, meaning that it allows multiple users to work on the same machine simultaneously. Each user has their own unique environment, including their files, processes, and settings. Proper management of users and groups ensures that everyone has the right access to the resources they need while keeping sensitive data protected.
Adding Users: The Basics
Let’s start with the basics—adding a new user. In Fedora Linux, which I am using as my distribution, the command to add a user is useradd. Here’s a simple example:
sudo useradd eric
This command adds a new user named “eric” to the system. However, this is just the beginning. By default, useradd creates a user with a locked password and no home directory. To make the user account functional, you’ll want to add a few more options.
Creating a Home Directory and Setting a Password
To create a home directory for the user and set a password, you can use the -m option to create the home directory and passwd to set the password:
sudo useradd -m eric
sudo passwd eric
The -m option ensures that a home directory (/home/eric) is created automatically. The passwd command then prompts you to set a password for the new user, which is crucial for allowing them to log in.
Assigning a User to a Group
In Linux, groups are used to manage permissions for multiple users at once. Each user can belong to one or more groups. By default, when you create a user, they are assigned a private group with the same name as their username. However, you can also add them to additional groups as needed.
To add the user “eric” to a specific group, say “developers,” you can use the usermod command:
sudo usermod -aG developers eric
The -aG options append the user to the group without removing them from any other groups they might already belong to. This is important—forgetting the -a option will remove the user from all other groups, which could cause unintended access issues.
Creating and Managing Groups
Creating a new group is straightforward with the groupadd command. Let’s say you want to create a group called “admins”:
sudo groupadd admins
Once the group is created, you can add users to it using the usermod command, as we discussed earlier. You can also assign group ownership of files and directories, which is useful for collaborative environments. For example, to change the group ownership of a directory:
sudo chgrp admins /opt/project
The chgrp command changes the group ownership to “admins” for the /opt/project directory.
User and Group Management Best Practices
Managing users and groups efficiently isn’t just about knowing the right commands—it’s about understanding best practices to keep your system secure and organized. Here are a few tips to keep in mind:
Use Groups for Permissions: Instead of assigning permissions directly to individual users, assign them to groups. This makes it easier to manage access as your user base grows.
Limit Root Access: Only grant administrative privileges to users who absolutely need it. For others, use the sudo command to allow them temporary access to elevated privileges when necessary.
Regularly Review Group Membership: Periodically check which users belong to which groups. Over time, users might change roles, and their access needs will change too. Keeping group memberships up-to-date helps prevent unnecessary access.
Use Strong Password Policies: Ensure that all users have strong, unique passwords. You can enforce password complexity and expiration policies using tools like chage and pam_pwquality.
Wrapping Up
Managing users and groups on Fedora Linux—or any Linux distribution—is a foundational skill for any SysAdmin. By understanding and applying the commands and best practices we’ve covered in this post, you’ll be well on your way to maintaining a secure and efficient Linux environment.
If you found this guide helpful, be sure to check out more content on The IT Guy Blog and tune in to my podcast, where I dive deeper into topics just like this one. Whether you’re just getting started with Linux or you’re looking to refine your skills, there’s always something new to learn.
The Apple Vision Pro stands to be one of the next innovations that changes how we use technology. Is it there yet? Not quite, but read on to see what I discovered.
I’ve been in IT since before it was my chosen career path. When I first started out in my career, I was just an enthusiast. I enjoyed getting the latest gadgets, learning about them, and playing with them. I remember being a senior in high school and buying a Palm Pilot. I may have even played Hearts during our science class.
A lot of days, it’s a slog. If you are a SysAdmin, like I was, it takes many days to work to keep the lights on. You try to learn and grow your toolbox, but most days, it’s resetting that same user’s password for the third time this month.
Now and then, you have those days where you sit back and go, “This could be something!” I did that today. I’m in the grind of getting video and presentation content ready for the following Red Hat Enterprise Linux release ready to go out the door, as well as our upcoming Red Hat Summit conference. I needed a break.
I’ve heard people talking about Apple’s first steps into the VR world, and I wanted to see them for myself. While I bleed Linux, I am an undying Apple Fanboy. I have most of their tech somewhere in my house. So, why not!?
You can reserve a slot online for an in-person, 30-minute guided demonstration of how to fit, calibrate, and use the device. Wear prescription glasses? No problem; they can scan your lenses and fit your unit with inserts to match.
I have only played with Meta Quest 2 for a couple of days, so I had little more experience to go on for my demo. I initially thought it was a sleek-looking headset, but how heavy would this be?
Once you put on the device, you adjust a knob on the side of the headband. You can tighten it to wear it; it’s solid yet comfortable. My initial fear was that it would be too heavy, not so! Yes, it has some weight, but it took a little time to get used to it.
For my demo, I wanted the full experience. I wanted to be guided through the basics – you can customize your tour, but I wanted to avoid going in with any preconceptions. We started with hand gestures and the home screen.
Apple Watch users will be familiar with the crown that twists and clicks. However, the main interaction isn’t with hand gestures or the crown; it’s with your eyes! Tiny cameras line the inside of the visor and track your eye’s movements. You look at an icon, and it will highlight. Then, all you have to do is pinch two fingers together to select.
We looked at pictures from standard images to iPhone-based panoramas to something new called immersive mode (available now on iPhone 15 Pros and Max Pros). I won’t spoil anything, but it looked like I was in the room!
We moved to playing a pinball game, watching movie trailers, and searching the internet. Moving windows around, resizing, and scrolling was a breeze! I got tripped up a little when it came to typing.
Ultimately, it was an exciting experience. I really enjoyed the digital tour. I can see many use cases for travel and taking my books, studies, and multimedia.
Is it a daily driver? I do online research, work on Linux servers, and interact with an office suite all day. I recommend not. Is it worth the price tag to not be a daily driver? No.
However, that is today. The hardware and interactivity were far beyond my expectations. I count this as a public beta, version 1.0. The Vision Pro has come a very long way since its release. Third-party and iOS mobile apps are getting better support all the time.
So, when it’s released, the Apple Vision Pro 2 will be hard to say no to!
I get asked on a regular basis how I got my start in Linux; over the last couple of days, I put together my most comprehensive list yet and I wanted to share it with all of you!
Where do I start!?
One of the best ways to get comfortable with Linux is to utilize it everywhere you are. The first place I think about is your daily computer driver. I learned so much by working in Linux on a daily basis. Linux-powered laptops are far more prevalent than they were a decade ago. I can recommend a few companies that I know are dedicated to Linux: System76, Lenovo, and Slimbook to name a few. Of course, you can buy a lot of these second hand on eBay or similar.
What distribution do I pick?
(Disclaimer, I work for Red Hat, so I maybe a bit biased.) I talk to Sysadmins regularly who are split between different distribution families. For instance, Ubuntu and Red Hat-based distributions are very different in terms of operation, commands, and…we’ll call them “ idiosyncrasies”. I would recommend if your work uses Red Hat, to focus on learning Red Hat based distros. I, myself, came up in much the same way: I learned Red Hat as a Linux Systems Administrator, so, that’s what I primarily use even at home.
What advice can you give for someone interested in learning more about Linux distributions? Where should I start?
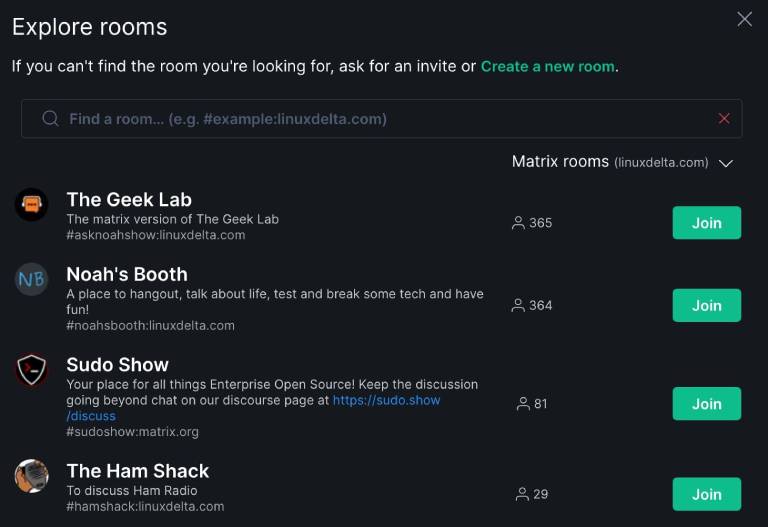
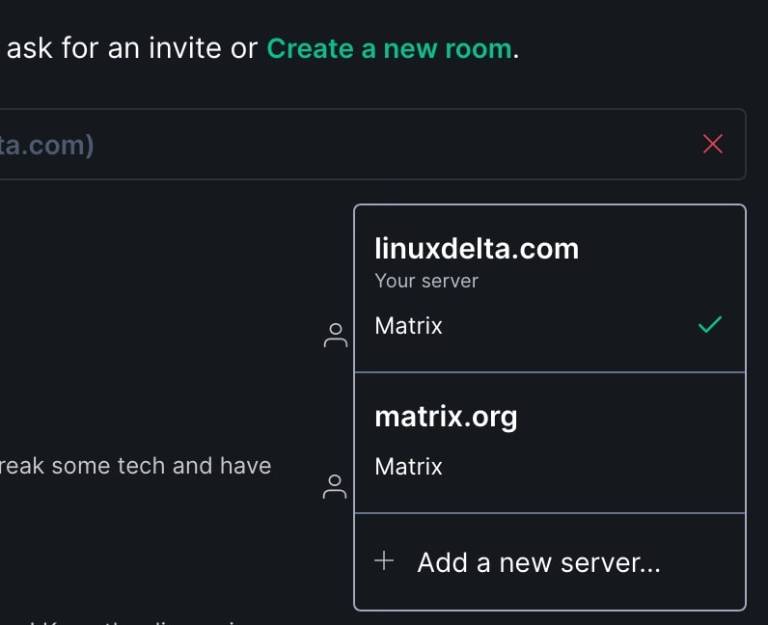
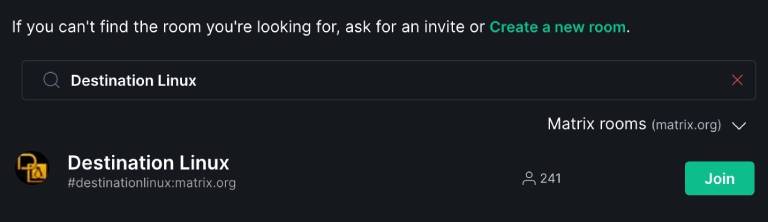
Linux is one of the most studied topics online. There are countless YouTube videos, blogs, and podcasts. I started learning about Linux and Open Source through a podcasting community called Jupiter Broadcasting. They have Matrix channels, live podcasts, and an amazing community of people to help new members learn and grow. I actually got my start podcasting on Linux Unplugged, one of their shows.
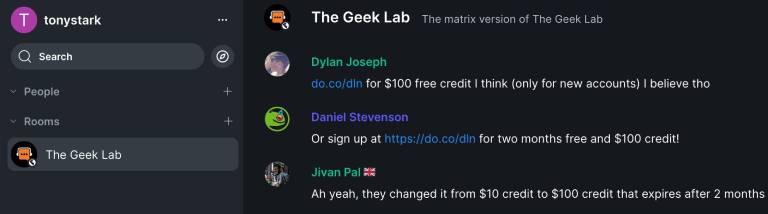
If you want to get your hands dirty, I would also recommend a Linux laptop and get comfortable with virtual machines and cloud providers. You can get a free credit when you sign up for Digital Ocean (FYI, that’s a referral link tied to my account.) You can spin up all sorts of servers, distros, and play with different applications. Their documentation and walkthroughs are next level! I also help support a series of labs for learning on RHEL (Red Hat Enterprise Linux). There are some Admin 101 and Developer 101 labs that are great at teaching the basics of Linux and moving into more complex topics: https://lab.redhat.com. (They are free to use!)
Number one thing I can recommend here is to find a community of people to learn and grow with.
How did you discover that you wanted to focus on System Administration, and do you have any insights for someone interested in this specialization?
Great question. Since I was 5, I had an interest in computers. I learned how to change my Dad’s desktop wallpaper on an old Mac PC and never stopped learning from there. Once I graduated high school and started college at DeVry University, I did the obvious thing: I signed up for a computer science degree. A couple of semesters in, I was taking a C# class and knew I would never survive as a developer. I got so lost with arrays, ha ha! So, I distinctly remember walking by this lab with racks of hardware, cables, and flashing lights. I knew that was where I needed to be. I went to my school advisor and switched my major to Network Communications Management. I started learning Cisco, firewalls, switching, and my favorite – operating systems.
Around the same time, I got a job as an IT Support Intern for a local municipality. I got to do desktop support, help desk, and even some Active Directory management. I loved what I was doing. After college, I got a job doing IT support – desktop and servers. After a couple of years, I was managing all sorts of servers and working on desktop refresh programs – new hardware every few years, desktop imaging and the like. I helped manage a handful of Linux servers that no one else really wanted to touch; I had tinkered with Linux in my college days, and decided I wanted to specialize.
I pursued a new job that would allow me to focus on Linux Systems Administration and started studying for my RHCSA (Red Hat Certified Systems Administrator). Over almost a decade, I was a Linux Systems Administrator, a Linux Systems Engineer, then a Solutions Architect (pre-sales Sysadmin basically), then finally about 2 1/2 years ago moved into Technical Marketing for RHEL where I really hit my stride!
What experiences and skills would be helpful for someone entering this field?
In today’s computer-driven resume world, its important to check as many boxes as you can. Have a “home lab” (like Digital Ocean or a PC at home you use as a “server”). Showing that you are constantly learning is huge. A bachelors degree is a huge plus as well as a technical certification in a field related to what you are interested. You don’t have to have all this up front but every step you take makes it easier to get the next job then the next and so on.
In your opinion, where’s the best place for me to find out about openings within this field?
Now, its been 6+ years since I had to job hunt… However, from what I’ve kept my eye on, LinkedIn is a HUGE place to get started. In fact, LinkedIn Premium is a good way to go. You can use their “AI” to help you write a title and about sections. LinkedIn has job postings, but you can also mark yourself as “open to work” and job recruiters will find you and match you to jobs they have available. (The link above will give you 2 months of Premium for free, after that it gets really expensive but you can cancel at any time.)
There are still other sites like Monster and Dice, but I haven’t had good luck there. Though if you are really eager to start your IT career you can never send out enough resumes!
Do you know of any programs or webinars that you think could be helpful to someone looking to enter the IT Support field?
Do you know of other individuals in the field whom I could contact?
I’d start with posting questions on LinkedIn or Mastodon and using hashtags, like #linux. Get invovled with podcasting communities like the Ask Noah Show or Jupiter Broadcasting. They are on Discord, Mastodon, Telegram, and others!
I hope these questions and answers help you in your journey. I’d love to know what other topics you’d like me to cover or what other questions you may have. My virtual door is always open!
I know a lot of these resources have my name attached to them in some way, but one of the reasons I moved from Systems Administration to Technical Marketing was to build tools and resources I could have used when I was in your place – to learn and grow into a field I was very interested in.
Teach others some systems administration good practices.
Automate my homelab as much as possible.
The first article covered my goals and the process for building a new “non-production” RHEL 9 virtual machine to act as a jump server and collection point for different configuration files, scripts, and the like.
I built a basic server and added only a few tools, such as the web console and Image Builder. In this article, I will focus on building a customized template that:
I can deploy repeatedly.
I can automate its upkeep.
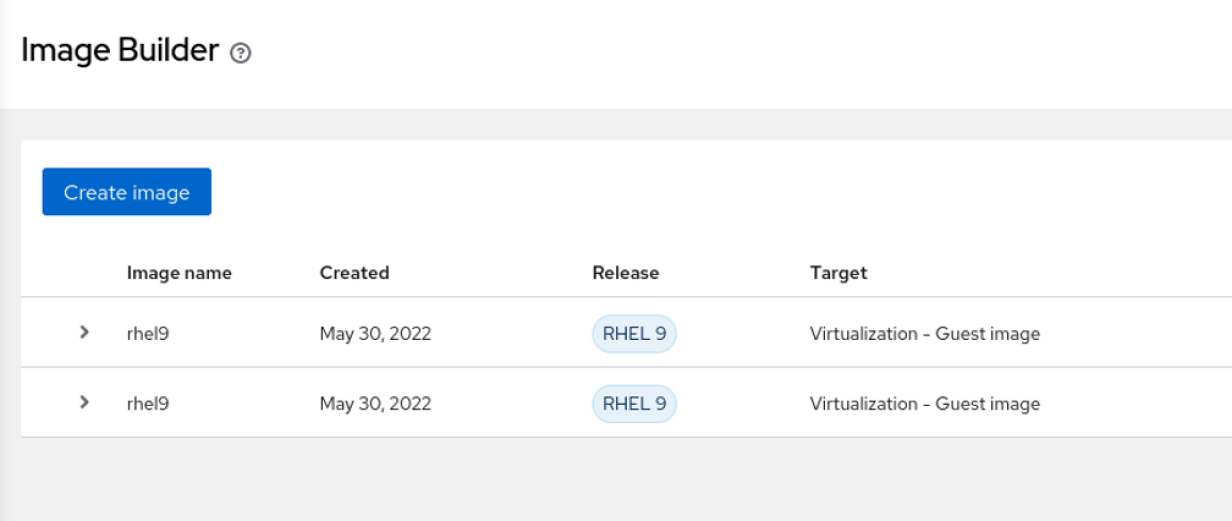
What is Image Builder?
The short version is that Image Builder is the intended future installation experience for RHEL. Image Builder is not a product but a feature within the distribution.
With Image Builder, administrators can deploy different RHEL versions on different platforms (hardware, virtual, cloud) with different configurations. There are three ways to interact with Image Builder:
A vanilla image should be enough to get started. This image undoubtedly will be one of many I create throughout this project. I’m starting with the web console (Cockpit) Image Builder application to get the ball rolling. The URL to connect to it is: https://{hostname}:9090/composer.
If you don’t have Image Builder installed yet, you can install it with DNF:
# dnf install -y cockpit-composer.noarch
Then enable the socket to start automatically:
# systemctl enable --now osbuild-composer.socket
Now you can access Image Builder using the web console:
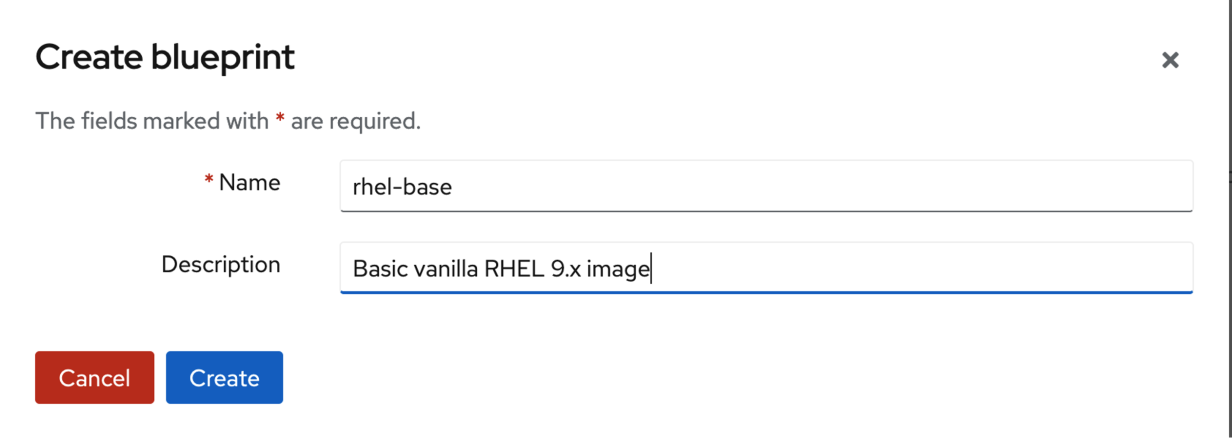
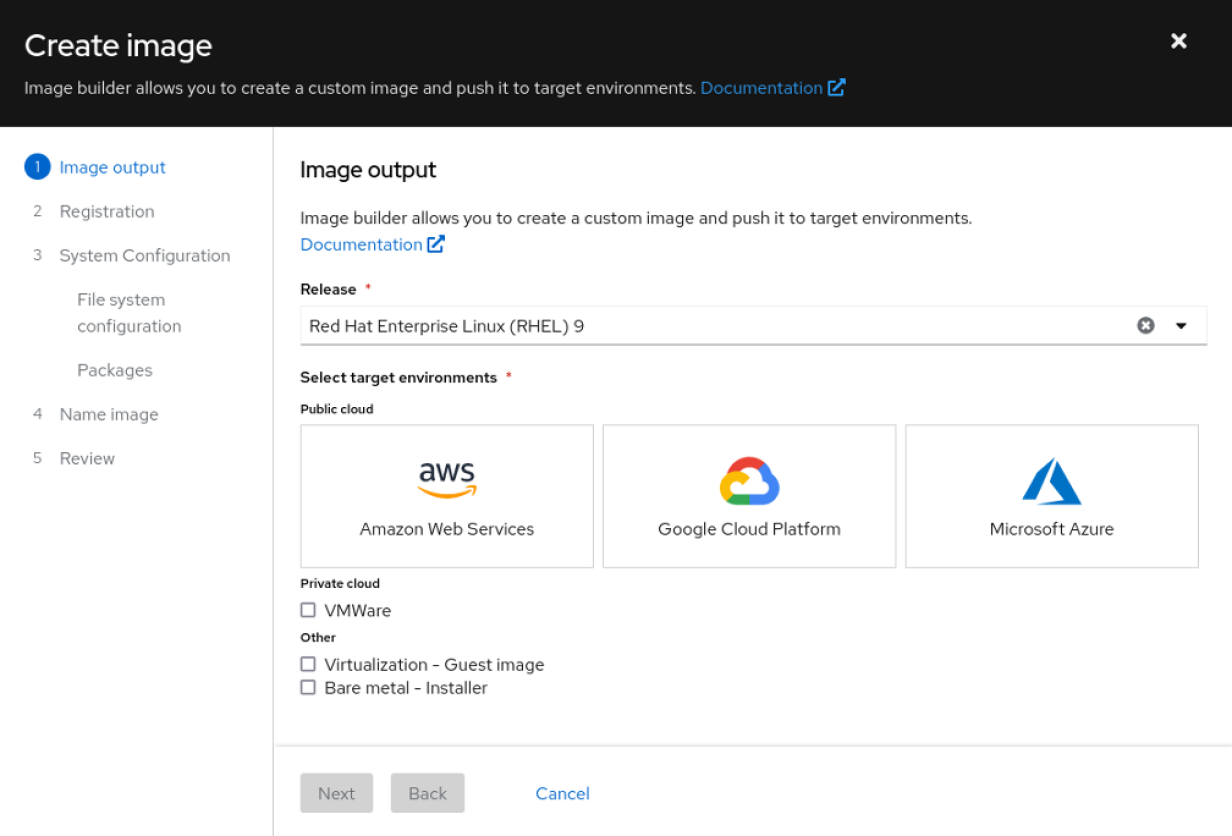
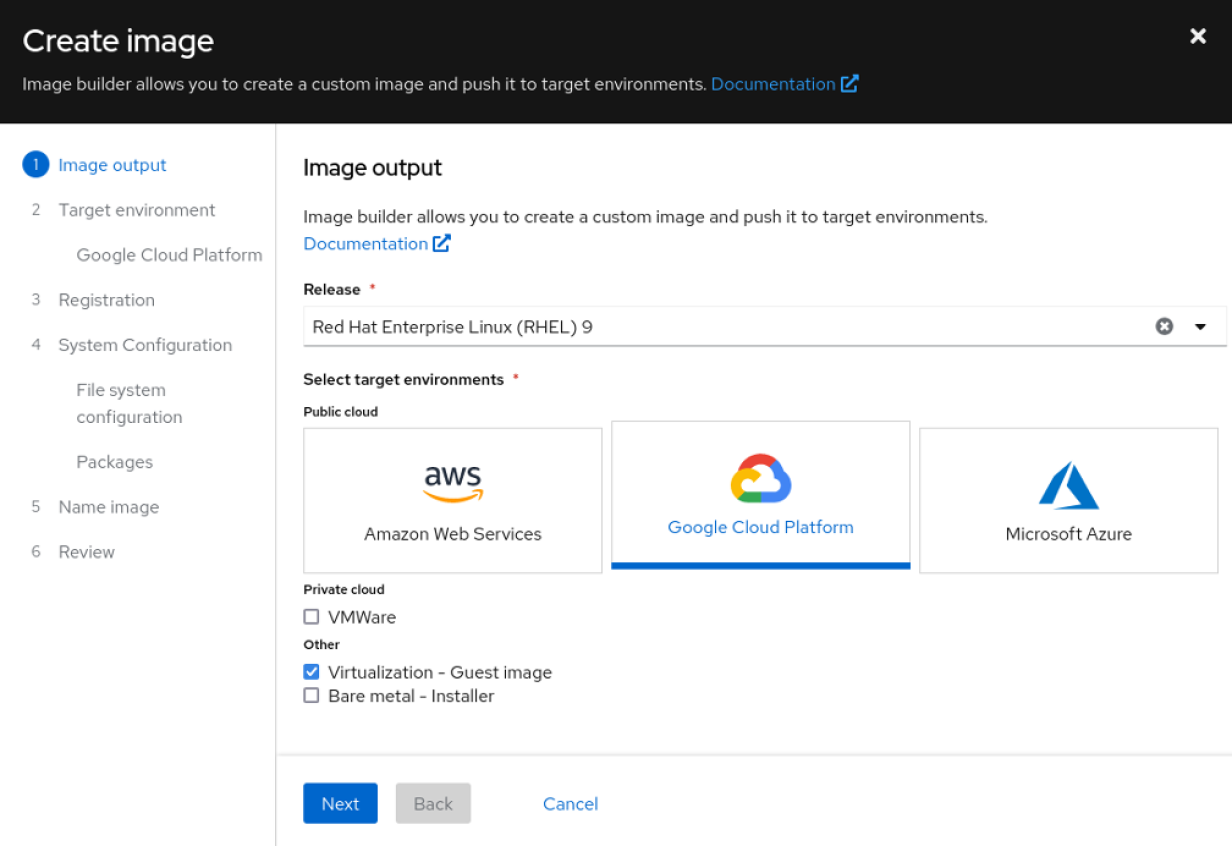
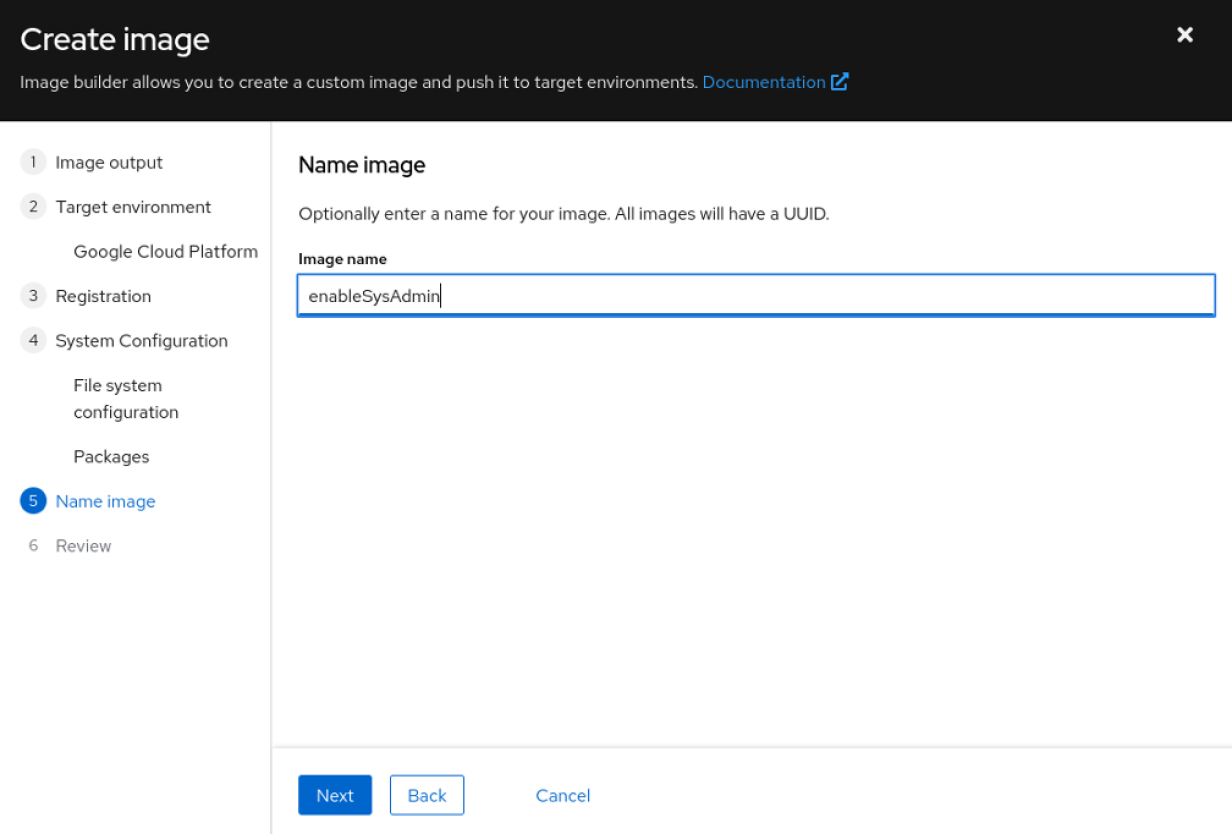
Use the Create blueprint wizard to define what the initial image should look like. Start by giving the image a helpful name and description:
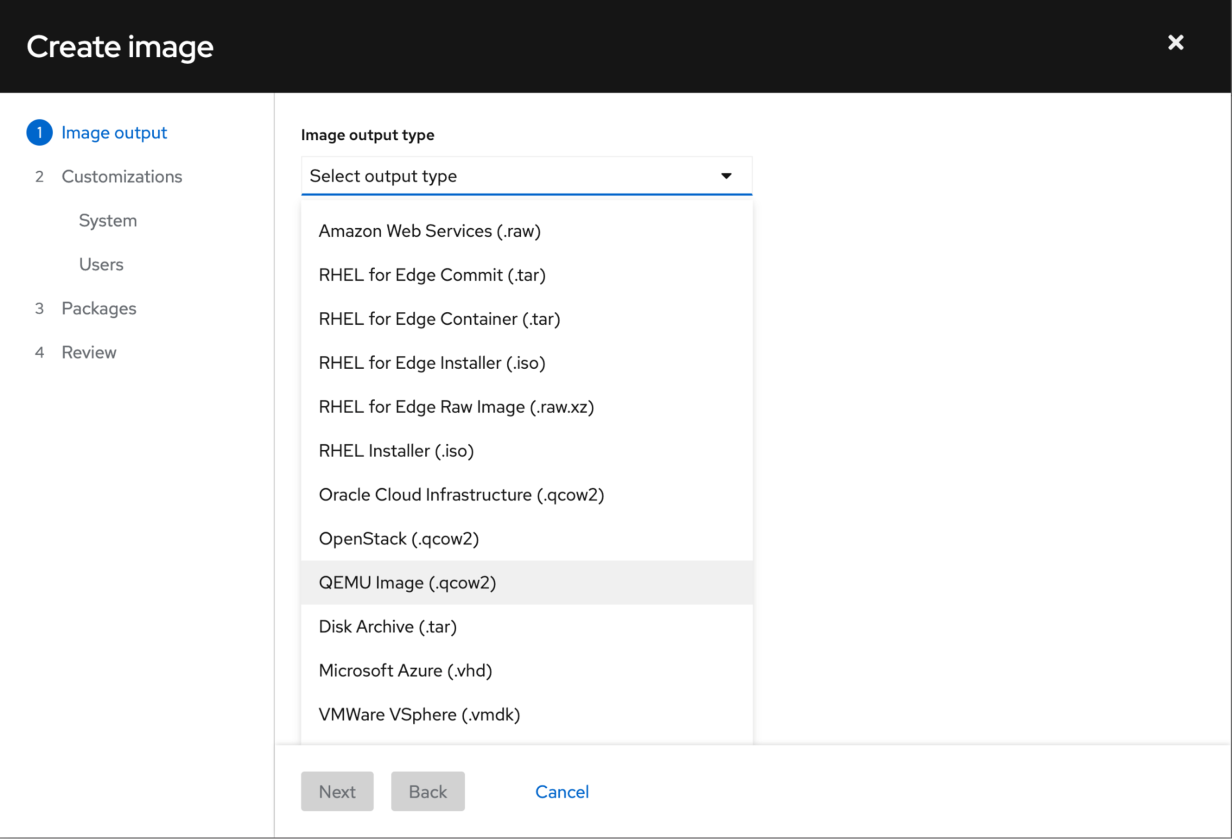
The next step is to decide what output format the image should be. Since my bare-metal server will be a hypervisor for my rebuilt lab, a QEMU-based qcow2 image makes the most sense; your environment may dictate differently.
The first step in the wizard also asks what the Image Size should be. The default and minimum are 2GB. For now, this should be fine.
I’ll move on to customizations. The next screen shows the option to pick a hostname. I will leave this blank and assign a hostname later when I deploy these images.
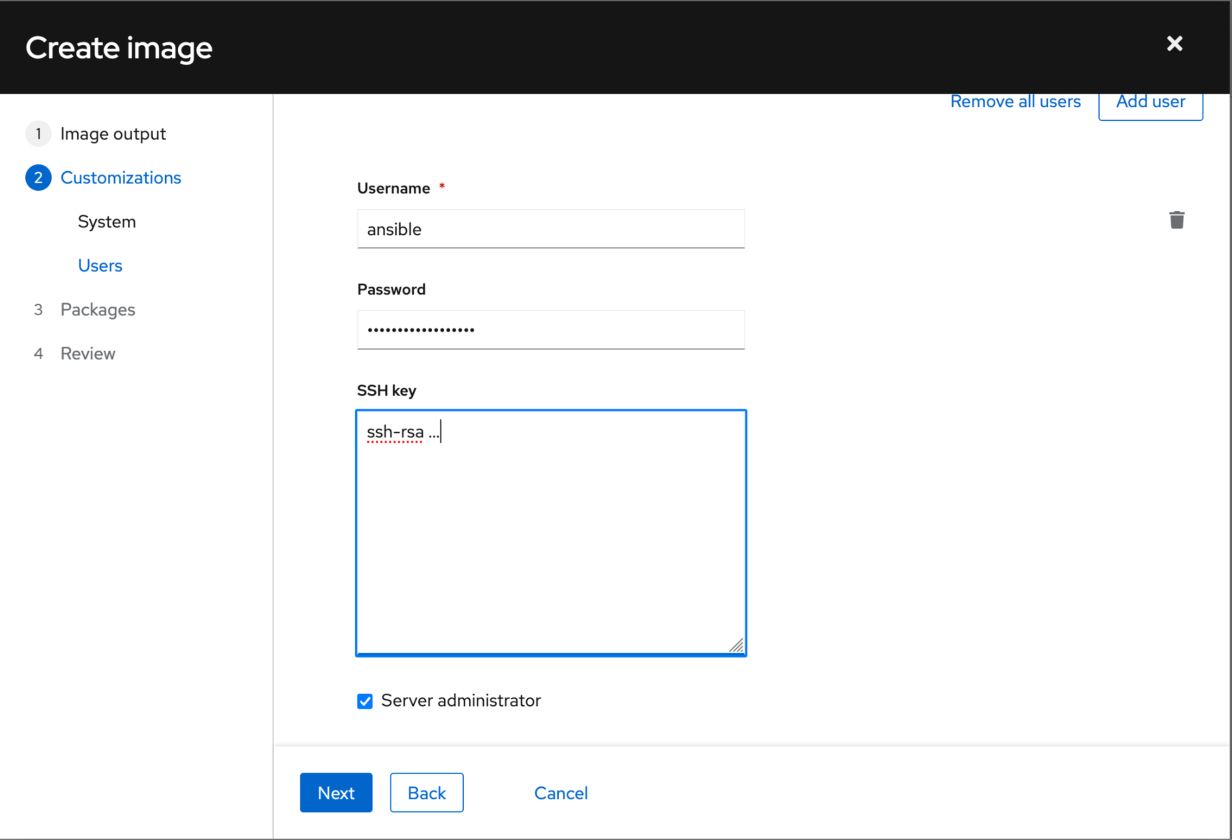
Next, define a user. I will create a service account named ansible so that I can easily deploy system roles across a small test environment (as I’ll do in the next article in this series).
Don’t forget to assign a password and create an SSH key. Adding a key here provides everything needed to use the ansible account across the fleet. Also, check the Server administrator box to add the ansible account to the wheel group.
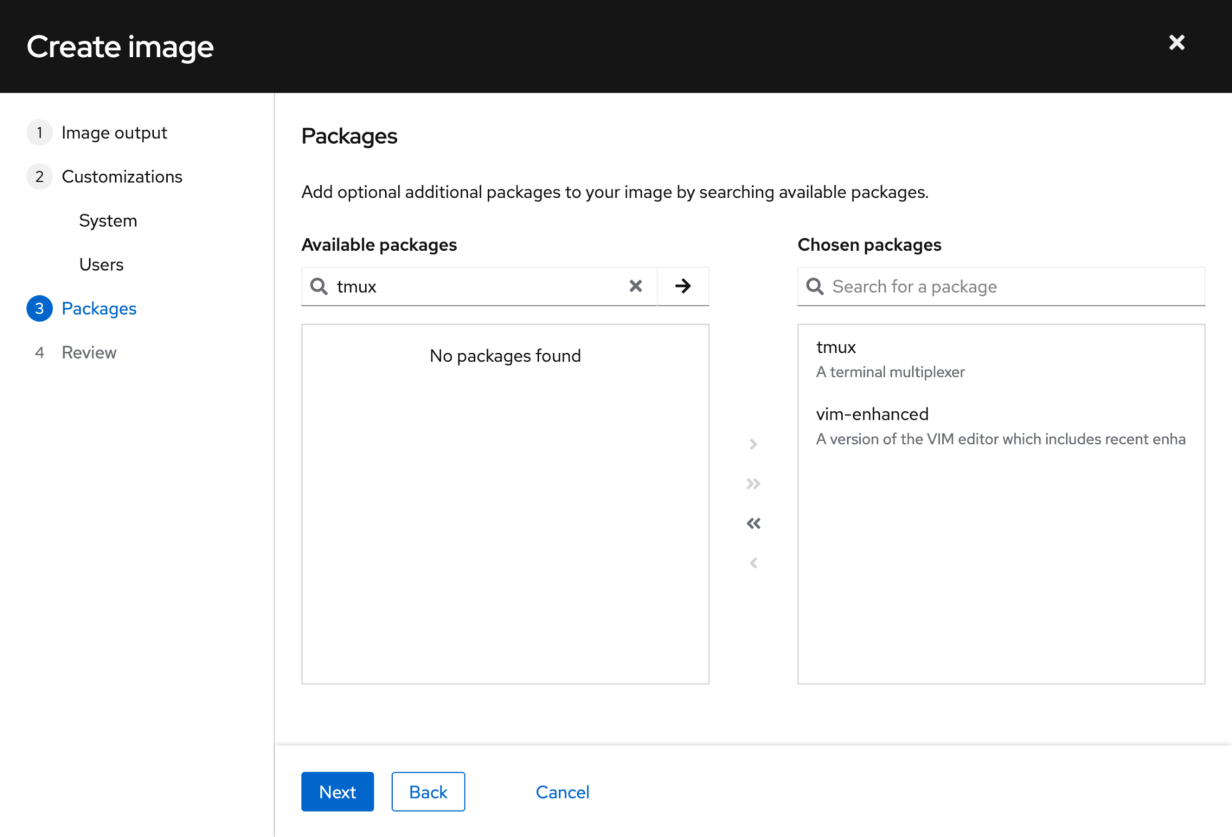
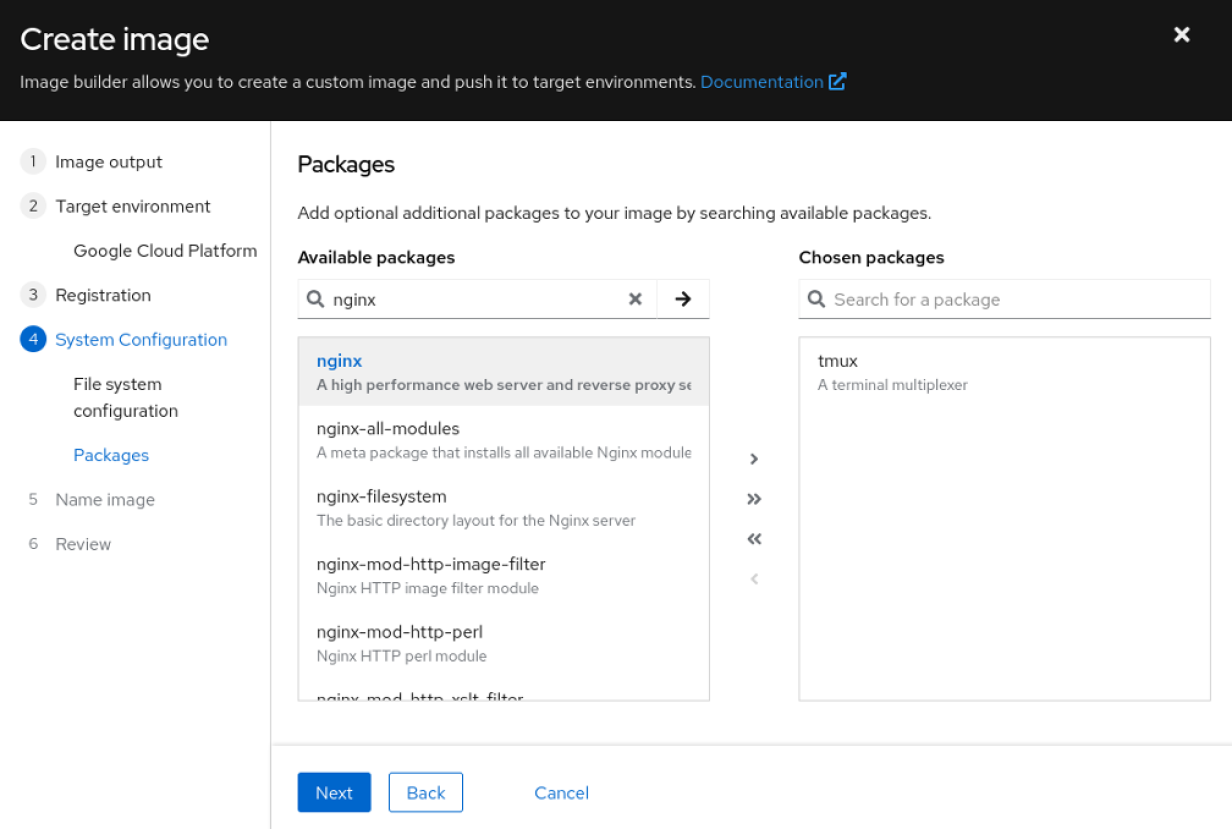
Next, I’ll add a few packages I want across my fleet. Again, your choices here may vary. I’ve only added a couple for now, such as tmux and vim-enhanced.
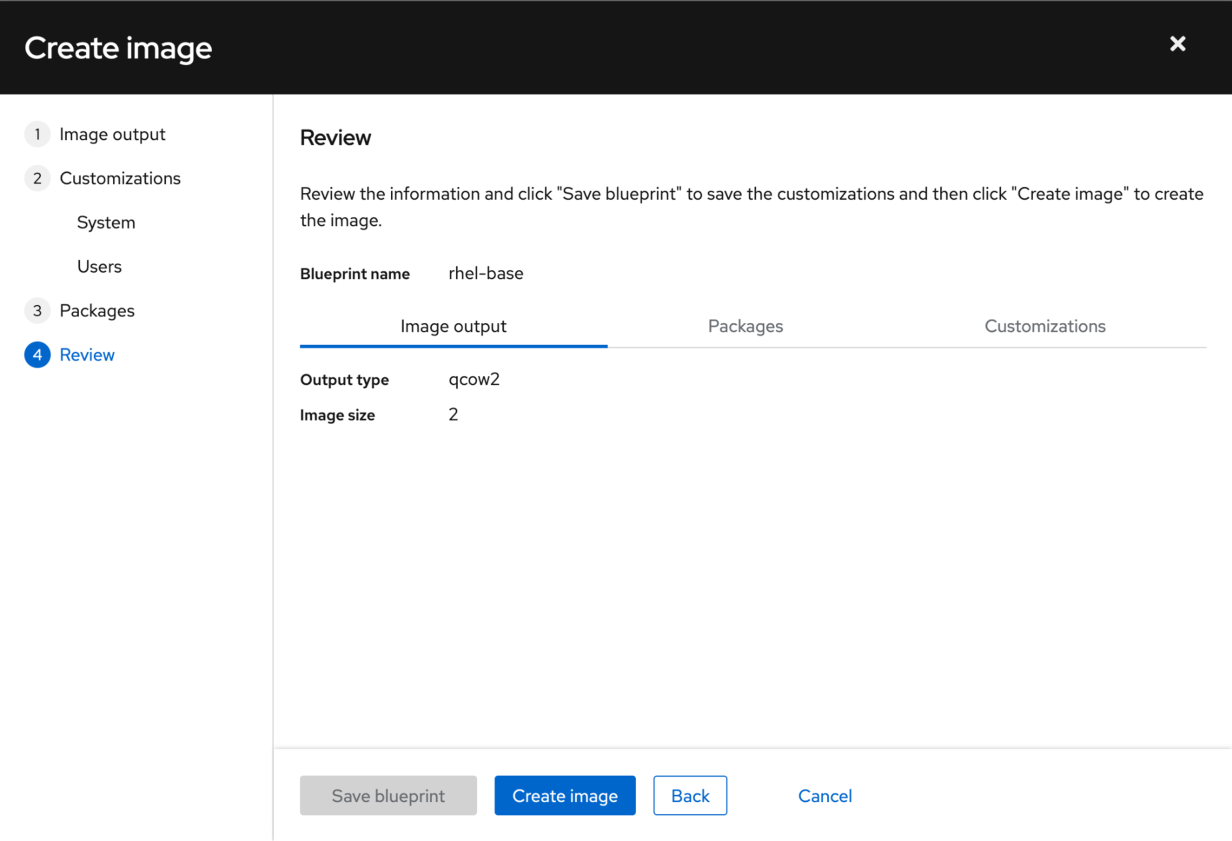
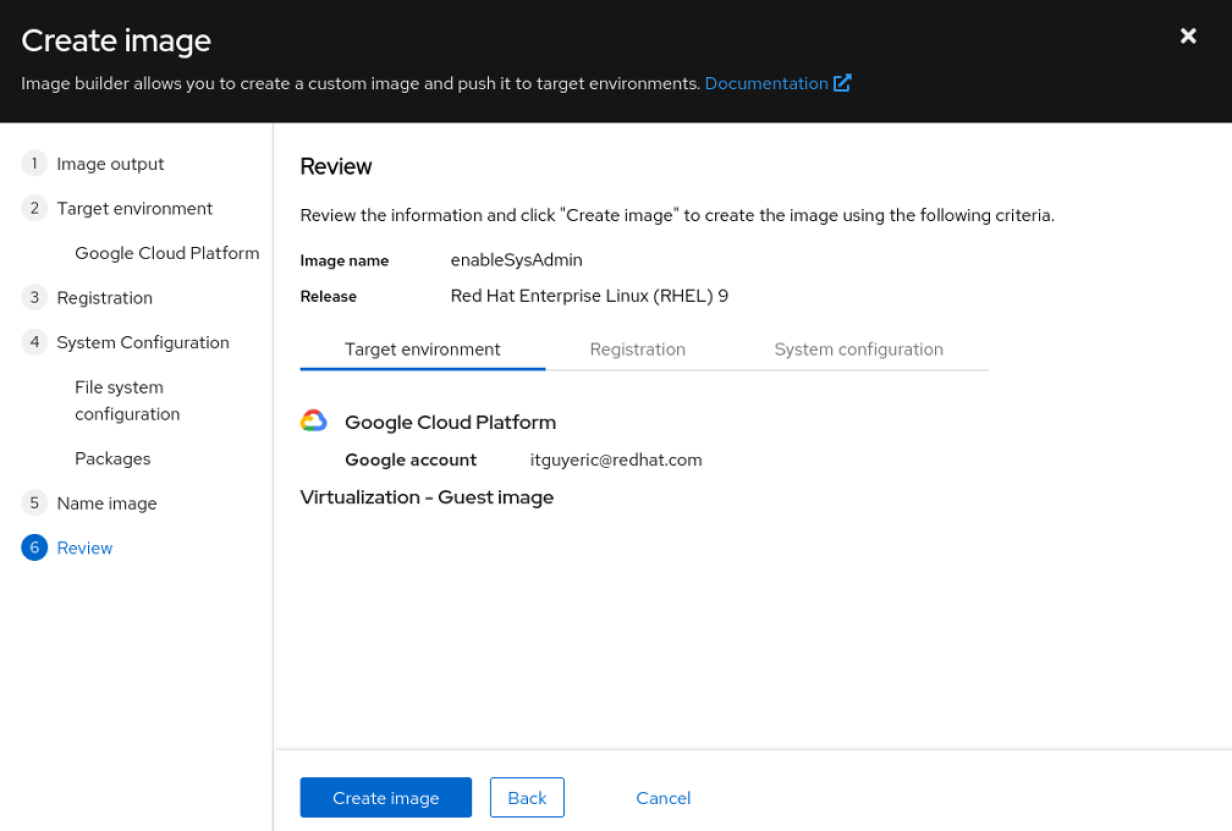
Finally, review the configuration and save the blueprint.
Create an image
You just created a blueprint for a RHEL 9 virtual machine (VM). Think of this as a recipe for a meal you will prepare. It’s time to try it.
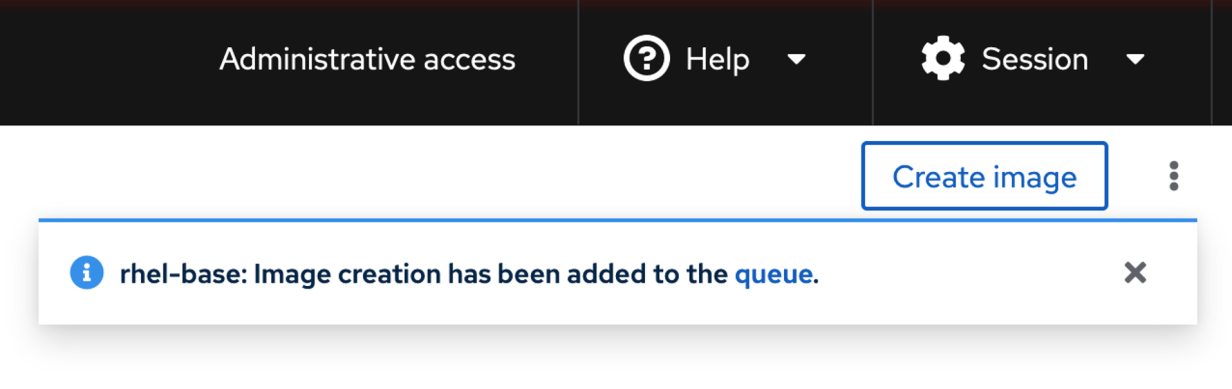
Either from the wizard you just walked through or from the main page of the Image Builder app, select Create image to begin the build process.
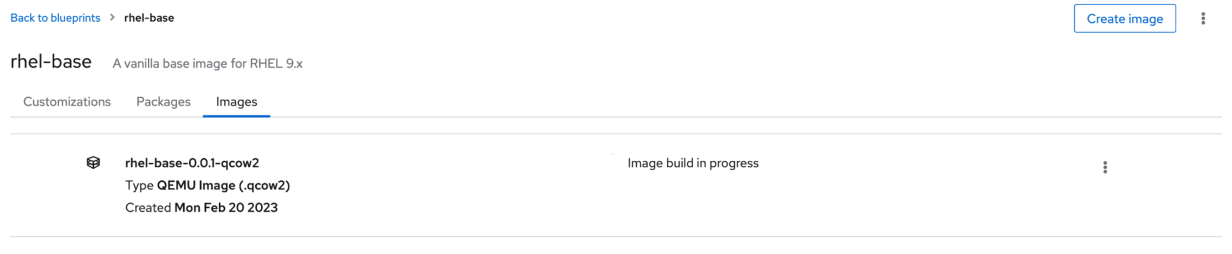
In the background, Image Builder pulls all the relevant packages from the Red Hat Content Delivery Network (CDN), defines the filesystem layout, and builds the boot image.
Depending on your hardware and internet connection, this process takes a few minutes. But when the image is complete, you won’t immediately have to go in and update all your packages.
Once the image finishes, you can use the qcow2 artifact to build the first test client machine. The easiest way is to use your browser’s Download functionality to grab the qcow2 file and upload it to your test environment.
However, I want to make additional changes to my image before deploying it.
Add features to the vanilla image
I want to ensure I have a well-defined image before deploying it repeatedly. To do this, I will switch tools.
The local, web-based Image Builder tends to be the slowest to get new features due to its ties to the RHEL release development process. It currently lacks a built-in mechanism for updating templates regularly. Remember, the goal for this lab is to operate as hands-off as possible.
I’ll use SSH to connect to the jump server for this step. I don’t plan on this jump server living a long life, so I don’t have to worry about creating a user account or importing any of the preferences. This approach is not advisable for production or long-lived servers, but I’ll fix this later with the golden image.
I pulled some knowledge from a couple of different tools for this next part:
(In this industry, it is often not what you know, but whether you know how and where to find the knowledge you need.)
Next, install the tools:
# composer-cli blueprints list
rhel-base

# composer-cli blueprints save rhel-base

# vim rhel-base.toml

name = "rhel-base"
description = "Vanilla RHEL 9.x"
version = "0.0.2"
modules = []
groups = []
distro = ""

[[packages]]
name = "tmux"
version = "*"

[[packages]]
name = "vim-enhanced"
version = "*"

[customizations]

[[customizations.user]]
name = "ansible"
description = "Ansible Service Account"
password = " <redacted> "
key = " <redacted> "
groups = ["wheel"]
Make a few additions:
name = "rhel-base"
description = "Vanilla RHEL 9.x"
version = "0.0.2"
modules = []
groups = []
distro = ""
[[packages]]
name = "tmux"
version = "*"
[[packages]]
name = "vim-enhanced"
version = "*"
[[packages]]
name = "cockpit"
version = "*"
[customizations]
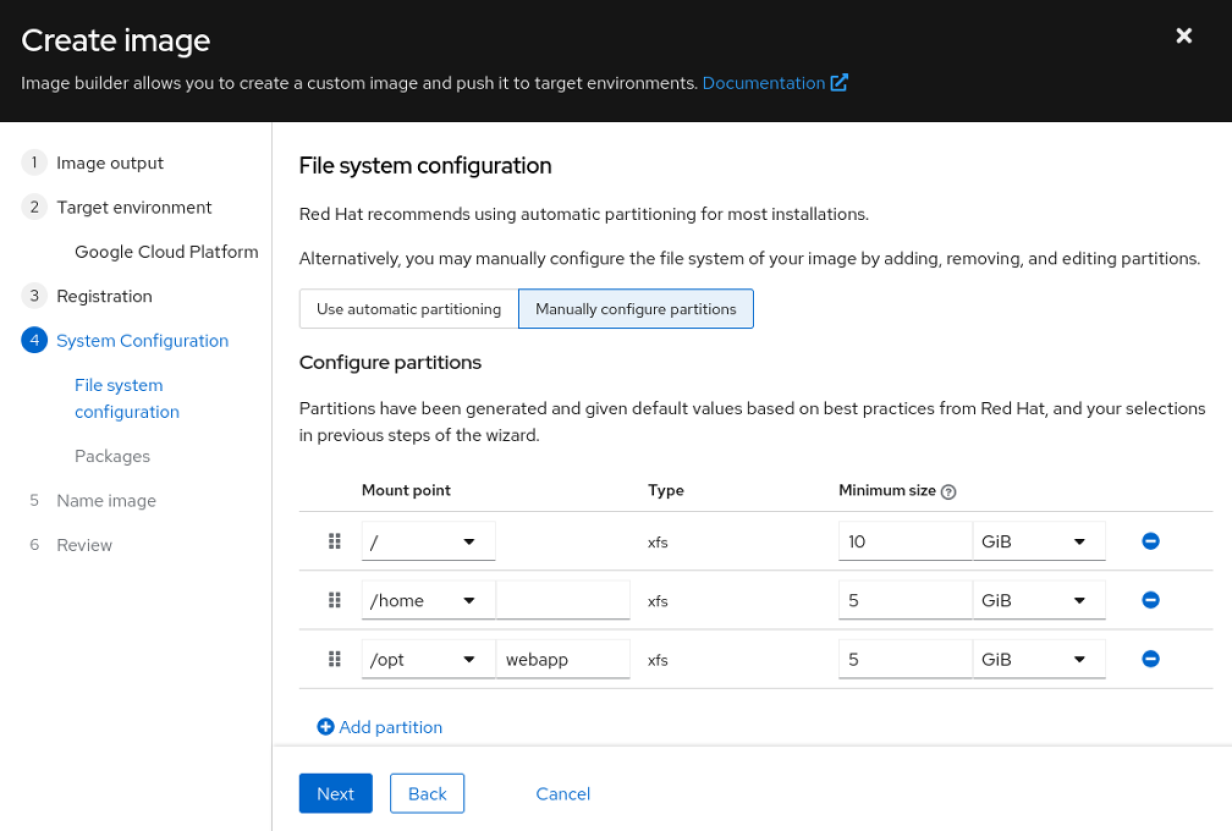
[[customizations.filesystem]]
mountpoint = "/var/log"
size = "4 GiB"
[customizations.services]
enabled = ["cockpit"]
[[customizations.user]]
name = "ansible"
description = "Ansible Service Account"
password = <redacted> "
key = " <redacted> "
groups = ["wheel"]
I added stanzas for Cockpit (the web console) and an enabled services section to ensure the web console starts on boot.
You can add a 4GB filesystem for /var/log. (You can always add more later.)
Finally, add a user description for the Ansible service account. You can also check the documentation for additional customization ideas.
For now, though, import the modified blueprint and execute a build:
# composer-cli blueprints push rhel-base.toml

# composer-cli compose start rhel-base qcow2
Compose bb259a2e-cbd6-4fe9-99bf-3a9b28e2cbcf added to the queue
You can keep an eye on the build by running the status command:
# composer-cli compose status
bb259a2e-cbd6-4fe9-99bf-3a9b28e2cbcf RUNNING  Mon Feb 20 15:50:14 2023 rhel-base   	0.0.3 qcow2
209cfd00-a57b-4458-8de0-df0942e2cc65 FINISHED Mon Feb 20 15:05:26 2023 rhel-base   	0.0.1 qcow2        	2147483648
Once done, the build will show a FINISHED status like when the job kicked off from the web console earlier. I’ll hold onto the finished qcow2 image for the next article.
Automate future builds
Now I have a good image I can duplicate to build and test what will eventually become my golden image. This planned image will have as many of the latest updates as possible, the preferred packages, user data, and filesystems.
From there, I’ll be able to add more layers of packages and configurations to the base image to build out the different services I’ll be hosting in the lab.
However, I don’t want to worry about creating a new image manually. As the tool evolves, there will be better options for this, but for today, I plan on using systemd timer to build an updated image on a scheduled basis.
I’m adding a systemd timer to trigger a rebuild every Sunday night. (Did you know about creating your own systemd timers? I didn’t! I found the article Use systemd timers instead of cronjobs during my research!)
First, you need to create a systemd service to call the composer command:
# vim /etc/systemd/system/composerBuild.service

	[Unit]
	Description=Rebuilds a vanilla RHEL template through image builder
	Wants=composerBuild.timer

	[Service]
	Type=oneshot
	ExecStart=/bin/composer-cli compose start rhel-base qcow2

	[Install]
	WantedBy=multi-user.target
Second, create a systemd timer to call the service:
# vim /etc/systemd/system/composerBuild.timer

	[Unit]
	Description=Timer to rebuild vanilla RHEL template using image builder
	Requires=composerBuild.service

	[Timer]
	Unit=composerBuild.service
	OnCalendar=Sun

	[Install]
	WantedBy=timers.target

# systemctl enable composerBuild.timer
As a paranoid sysadmin, I want to verify that the timer is working:
# systemctl status *timer

… output truncated …

● composerBuild.timer - Timer to rebuild vanilla RHEL template using image builder
 	Loaded: loaded (/etc/systemd/system/composerBuild.timer; enabled; vendor preset: disabled)
 	Active: active (waiting) since Thu 2023-02-23 12:04:13 CST; 2min 14s ago
  	Until: Thu 2023-02-23 12:04:13 CST; 2min 14s ago
	Trigger: Sun 2023-02-26 00:00:00 CST; 2 days left
   Triggers: ● composerBuild.service
Keep in mind this is a “quick-and-dirty” approach. As I add tools like Ansible Automation Platform and Red Hat Satellite, I’ll have better options for automating the process of providing up-to-date templates to deploy.
Wrap up
I covered a lot of ground in this article. I am enjoying the process and looking forward to seeing what the lab looks like on the other side of this series!
Here, I talked about the ideas of a golden image and took steps toward building the first couple of client systems that I’ll use in the next article.
Next time, I will take the test systems and add RHEL system roles to the golden image. System roles are a codified method of configuring Linux subsystems such as firewalls and SSH using ansible-core and deploying these configurations at scale.
If you follow this series, I would love to connect with you. You can easily find me online.
In 5 changes to help grow your IT career, I discussed establishing a learning mindset and forming daily habits to build your mental muscles. Learning will help you grow as a person (and hopefully as an employee), but work is not the extent of our existence.
People need people—in technology as much as anywhere else. So, how do you take your daily learning habits and use them to help others? I have a few thoughts on the topic. (I know. That likely won’t surprise anyone who knows me.)
1. Share your knowledge in the workplace
You can probably relate to this: When I was only a few years into my Linux career, I took a contract working for a company that had seen many turnovers in the preceding years.
The infrastructure was understandably behind in terms of refreshes and security patches. In and of itself, that would be a difficult task to overcome. However, that wasn’t the worst of it.
Several generations of systems administrators came and went after the original architecture was developed and implemented. I’m sure you can guess what comes next: Their documentation was… lacking. The original sysadmin was also a huge fan of scripting, custom compiling applications, and finding ways to over-engineer solutions.
Hoarding knowledge doesn’t make you a better operations person, nor does it keep your job more secure. Sharing information and ideas is essential to a healthy organization.
Even if you are a one-person IT shop, do you think you can remember every facet of every decision you make? For that matter, do you remember what you ate for breakfast yesterday?
How do you overcome this problem? Start an internal wiki, a Git repo, or at the very least, a text document on a shared drive.
Yes, that’s a lot of work, but take it from a recovering sysadmin; it’s worth it. Start with one process or one application at a time. Set a goal each week to add a little more. You’ll be amazed at how much knowledge you accumulate over a month.
2. Contribute to a publication
Guess what? Enable Sysadmin articles aren’t written by a highly trained team of bloggers who sit around a table at an undisclosed location and make this fantastic content. A small core team manages the site, reviews the content, and makes suggestions. The real heart of Enable Sysadmin is the community of dozens of volunteers who have a passion for a topic and write about it. (Yeah, I am not getting paid to write this blog. I am just passionate about growing and seeing others grow as well.)
3. Join a community
Some of my best ideas come in the wake of a conference or a meetup where I sit around a dinner table for hours chatting with fellow nerds and techies.
Inevitably, we talk about a problem one of us is facing, and someone else has a solution. I am just a person who loves writing and telling stories. However, I couldn’t grow without the help of those more competent individuals around me. (Yes, it’s usually me trying to do something dumb in my home lab and someone else bailing me out.)
Look online. Look in your city. There are meetups and communities for just about every conceivable interest. Some of my favorites are DevOps Days or Linux user groups (LUGs).
Can’t find one? Start a community! It’s not as complicated as it seems. Find a place to meet, pick a time, find something to talk about for 15 minutes, and invite your friends and or coworkers.
4. Volunteer
Many charitable organizations need help. Find an organization that focuses on an issue you care about and email them or call their office. Tell them what you have to offer and see what happens.
Not only can you make a real difference in your community, but you can also sharpen your skills in the process. (Yeah, that also looks good on a resume.)
5. Be a mentor
If you’ve been in IT for a few years, find someone new to the field and take them under your wing. If you are new to IT, find someone doing something you find interesting and introduce yourself.
Talk to your mentee. Form a relationship. Get to know their interests and their drives. You have more to say than you think you do. I owe much of my career to having trusted relationships around me, guiding me.
Many companies (Red Hat is one of them) have mentorship programs where you are matched with someone you can lead—or who can lead you—in a particular career path or technology.
Wrapping up
I am writing this on an international flight home from Tech Exchange, an internal Red Hat conference where technologists meet to learn about our product portfolio, grow their skills, and get to know one another. I got the chance to speak about many of the resources that the Red Hat Enterprise Linux (RHEL) technical team produces.
During one of the team dinners, a solutions architect came up to thank me for the work I was doing. Content I produced made an impact on his career. He felt more confident as a technologist and as a Red Hatter.
That moment was humbling to me. It wasn’t but a few years ago that I was on the other end of that conversation, where I was guided into my current career path by friends and co-workers. Busy and intelligent people saw more for me than I saw for myself.
Step out of your comfort zone. Make some human connections with people. The impact you have on them will also impact you.
Change is an intentional, methodical process. You don’t need to wait for a specific date, like New Year’s Day, to resolve to change something—you just need to make a list, and start making small changes today.
To do so, make a minor change, stick to it, then make another change. This builds momentum, and you can make even more changes. If you start making slow, intentional changes to your career now, when you look at 2023 in the rear view mirror, you’ll be amazed at how far you’ve come.
Disclaimer: I have been a Red Hat Enterprise Linux (RHEL)-focused sysadmin for most of my career, and I currently work for Red Hat. So there will undoubtedly be some bias on my list; even so, I am confident that the information below will be applicable no matter where you find yourself.
1. Broaden your horizons
As I mentioned above, start small. Make a simple change and stick with it.
Download an RSS reader (something like Inoreader or Newsify)
Find some blogs that cover topics you find interesting
One part of my daily routine is skimming the headlines of several news sites. This keeps me in the loop of what is happening in the technology industry. A few examples are Ars Technica, Opensource.com, and the New Stack.
I also review product and technical blogs. As a Red Hat-focused Linux sysadmin, I follow the Red Hat blog, especially the RHEL channel, and Enable Sysadmin.
While news sites help me keep up with the tech industry, these more technical sources help me learn about new releases or new skills.
Try to read a little bit each day. Do that for a week or so and try not to miss a day. This will help you build up your learning muscles and form a daily learning habit.
2. Learn a new task or feature
You are learning a little bit each day. Bite off a little more! Tech folks usually learn by doing, and luckily, there are tons of tools to help you learn how to do new things. The better news is a lot of them don’t cost a thing!
One of the best examples is the new Red Hat self-paced lab experience. This site provides dozens of labs you can spin up on demand for RHEL, Red Hat OpenShift, and Ansible.
For each technology, you’ll find everything from beginner labs to more complex labs. New to Linux? Learn how to create a new user. Want to install Red Hat Ansible Automation Platform? There’s a lab for that too.
These labs include instructions, links to additional resources, and a live terminal to try tasks out without needing a cloud subscription or homelab. They typically are self-contained and last 10 to 15 minutes. If you have a 60- or even a 30-minute lunch break, take 15 minutes and learn something new while you eat!
3. Take a class
Once you’ve made the first two skills part of your regular routine, I suggest it’s time to try something even crazier: Take a class.
It doesn’t have to be at a college or technical school. Plenty of online academies provide courses in topics across all platforms and disciplines.
Not sure where to start? Red Hat provides its Red Hat Enterprise Linux Technical Overview class at no charge. (See the disclaimer above regarding my admitted bias towards Red Hat.) Learn the basics of Linux and find out what learning is like within the Red Hat ecosystem.
4. Teach others
One of the best ways to really learn a concept is to teach it to someone else.
Take it from my experience; I didn’t realize how limited my knowledge and expertise were until I started podcasting about technology. Even now, years into my life as “The IT Guy,” I still learn something new almost every episode.
This is one of the more complex methods to implement. You could teach your kids about Linux and open source. Minecraft has a fantastic community around it to introduce coding concepts.
Join a Linux user group (LUG) or meetup; they often take turns sharing different topics and concepts with the group. (In fact, LUGs should probably be a point of their own.) Today, user groups exist in both physical and virtual formats.
5. Get certified
Many people find careers in technology because it keeps them close to the interests and hobbies we formed earlier in life. Others come to IT as a means of earning an income. Regardless of what brought you to technology, it helps to have a way to show others how much you’ve learned.
That is where certification comes into play. Now, I have to admit another bias here (although this one predates my time at Red Hat by at least a decade). Many certifications are multiple choice exams. When it comes to practical knowledge, they aren’t always a fair assessment of your skills. For hands-on tasks, a hands-on exam is the best way to go.
You’re probably thinking, “Eric, what about?” or “Did you forget?” These are just a few ideas to get you started. I also wanted to focus on an aspect of these steps without overloading you with ideas while trying to establish a habit of learning.
Focus on one of these items at a time. Make them a habit. Add the next item to the list. See how that goes. When you look back on this process a year from now, I am confident you will be shocked at how far you’ve come.
I believe in you. If you are reading this article, you’ve already taken the most challenging step: You’ve admitted something needs to change. Keep at it; if you ever need any encouragement, my virtual door is always open.
In my next article, I’ll cover a related subject: making an impact. One of the most significant ways we learn is by teaching others, but we grow as human beings in community. This article focused inward, my next will focus outward and discuss how to impact, connect, and help others in their journey.
As a recovering sysadmin, the last thing I want is to end up being technical support at home. I often tell people that I wish I had the tools available in Red Hat Enterprise Linux (RHEL) now when I was a fresh Linux sysadmin.
So I’ve set a challenge for myself: to implement some of the best practices in our industry using only Red Hat or Red Hat “adjacent” tools, whether upstream or partner software.
My goals here are simple: I want to build out a homelab that:
Allows me to spin up virtual machines (VMs) in an unattended fashion
Provides demo-ready RHEL systems for topics I cover regularly (for example, in-place upgrades, Image Builder, and more)
Is capable of self-healing my home “production” services (including Plex, Valheim, and Home Assistant)
I hope this series will help you either with your homelabs or think differently about how you administer your employer’s infrastructure.
My old homelab setup
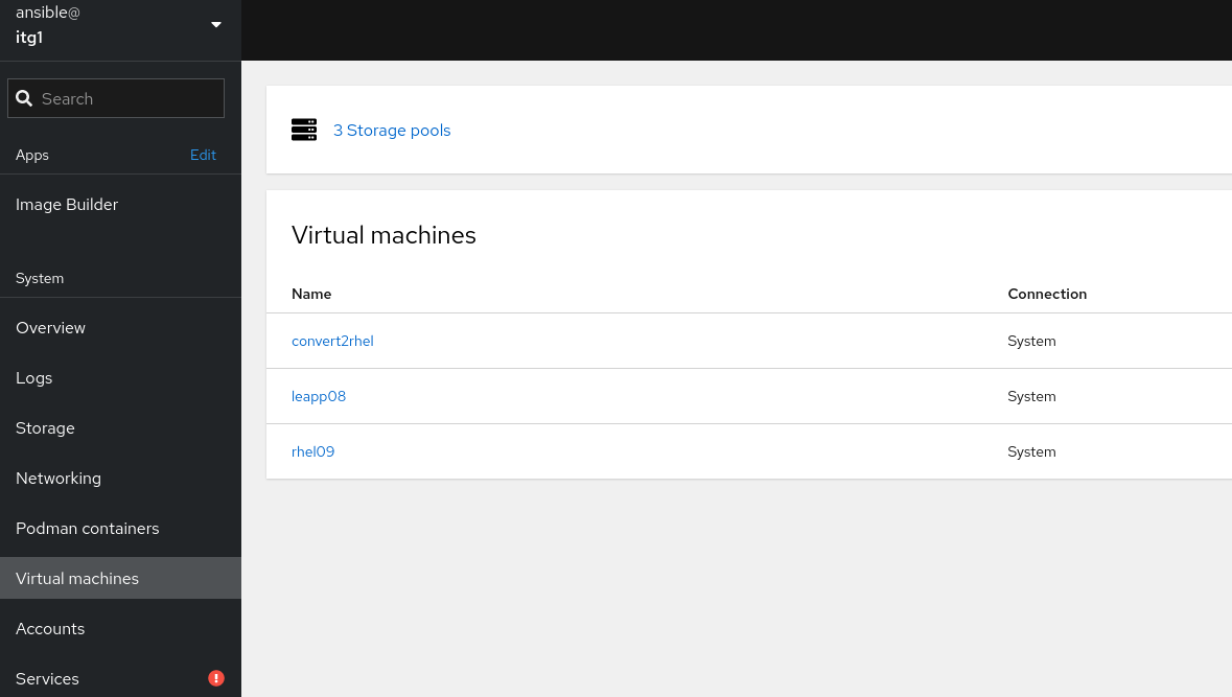
Currently, I have a single-node server running RHEL 9.1. Eventually, I need to rebuild this server from scratch. It’s packed with several TB of storage, 24 cores, and 128GB of RAM.
I have several RHEL virtual machines that I set up for demos I do at conferences, webinars, and live streams. These include a Convert2RHEL demo, in-place upgrades, and a sandbox system. I also have several Podman pods running that constitute my “production” services: Home Assistant, WordPress, Minecraft, and others.
I make copies of the qcow2 files for my VMs. My container pods are running as root. I have no offsite backups. The ol’ sysadmin inside me screams when I think about how inefficient this is.
Building my new homelab
Now, I’ve got some objectives; I have a plan (sort of). It is time to get started.
My existing server host needs to remain in place until I’m confident I can rebuild the services (and their applicable data) in an automated fashion. This bodes well for the project because I can build out the “next generation” of servers in isolation before introducing it into production.
In all the environments I worked in, I tended to build a jump or utility server to store all my tools and act as a single point to administer the rest of my environment. That is where I am going to start.
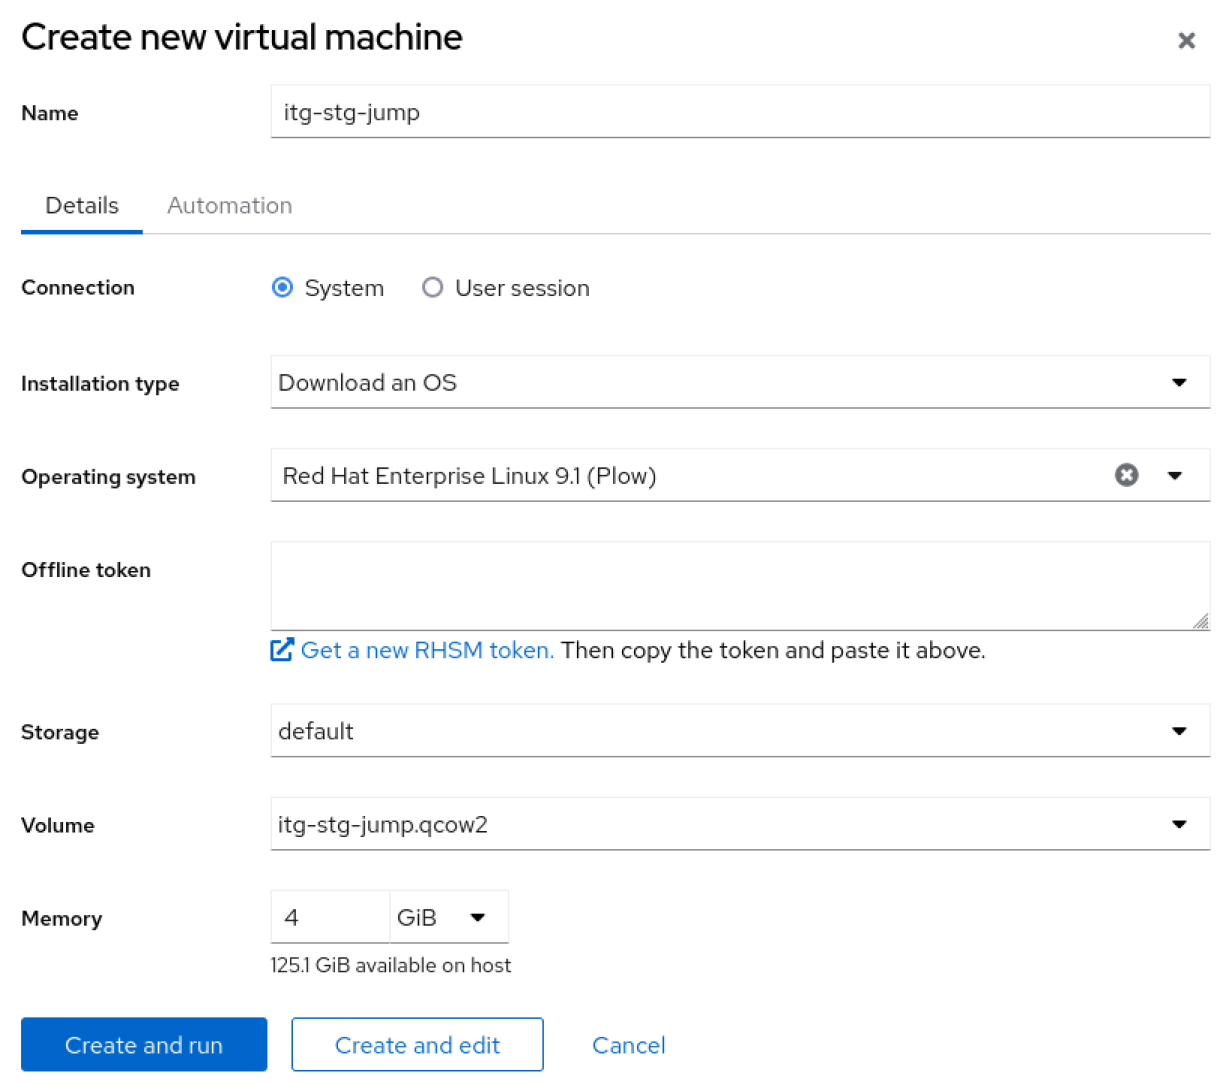
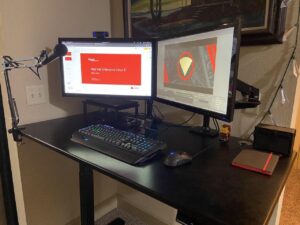
Since this utility server will be temporary, I want the quickest route to the live system. For me, that’s using the web console (the downstream of Cockpit) with the VM tool and a RHEL 9.1 ISO.
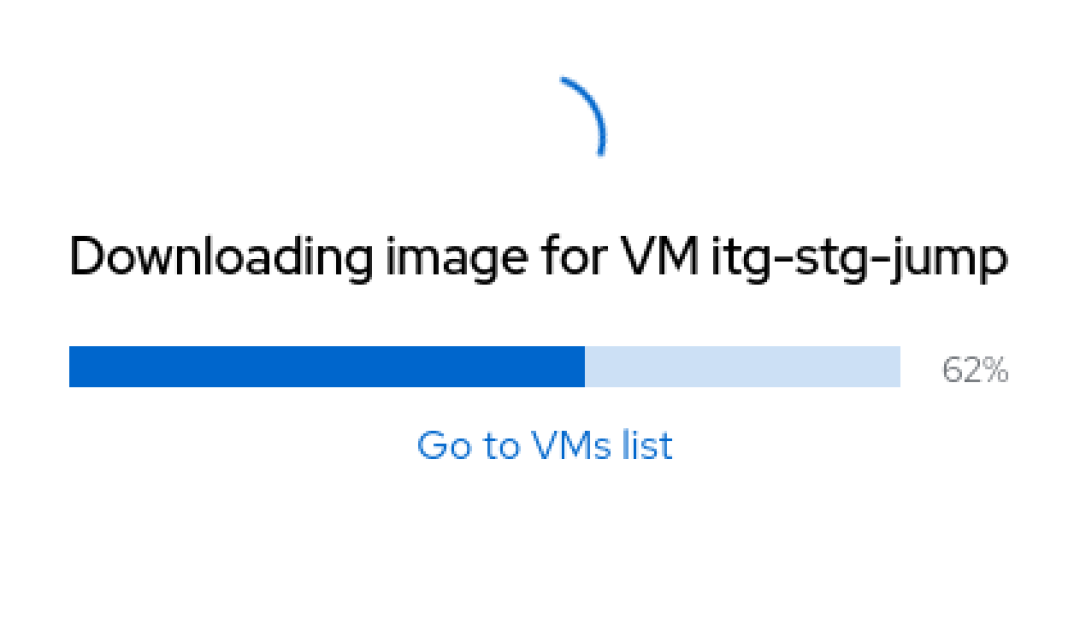
I’ll select Create VM. Luckily, the web console makes it incredibly easy to spin up a new VM: Fill out a few fields and wait.
What’s with the hostname, itg-stg-jump? Well, old habits die hard. Back in the day, I worked for a company that had servers in multiple datacenters. So the first stanza (itg) is the location. In this case, my homelab: the IT Guy. The second stanza (stg) is the environment, in this case Stage. Finally, the last stanza (jump) is the application it is running.
(Eric “IT Guy” Hendricks, CC BY-SA 4.0)
If you are wondering, yes, I took all the defaults and the simplest configuration possible. There is no fancy filesystem layout or security profile. I will add all that to later iterations of my golden image.
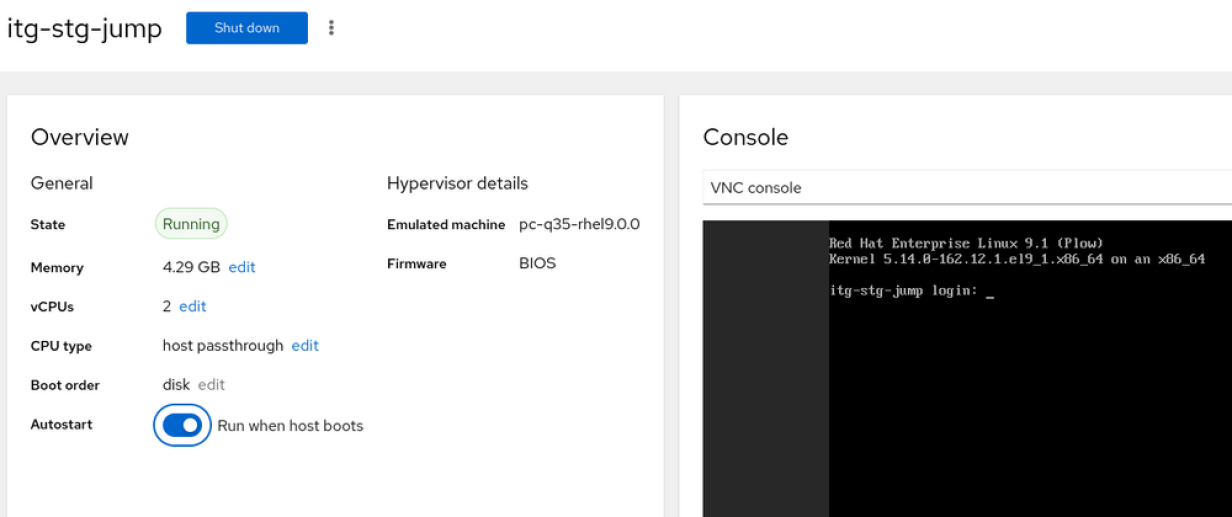
While the system is booting up, I am going to go ahead and mark this VM to start on boot.
Bingo, I have a jump server ready for use. I am going to go ahead and install any available updates, install Git and Vim, and enable the web console.
I hope this article becomes a series of posts (and maybe some live coding events). In the next edition, I will revisit our utility server and build the first Image Builder blueprint. That will be the basis of all the other images and servers I will use in future posts.
There, I said it! Containers won’t fix every application, they won’t replace your server farm, and sadly they won’t do your laundry.
Someone needed to say something in this world of marketing buzzwords and hype machines. “I volunteer as tribute.”
I work with a lot of container tools and platforms, and I have to say the technologies are fantastic! However, I was a SysAdmin for about a decade and worked in the MidWest to boot. (I say that because technology in the United States seems to start on the coasts and works its way to the middle of the country.)
Containers DO serve a great purpose: they isolate a running application into isolation and only give access to host resources that are absolutely necessary.
Containers DO make it easy to try out new technologies and applications. My home lab runs several web hosting tools (like WordPress and Hugo), gaming platforms, and home automation tools. To figure out which ones I liked best, I could spin up a basic image with a couple of commands.
Containers DO allow you to create applications that are self-healing, that can be deployed through automated pipelines, and provide for a dense application population.
However…
Containers DON’T replace the operating system. Guess what? The code running in containers is still Linux (and some are a few Windows images too). The orchestrator or operating system running underneath your container… an OS! The only question is how deeply that OS is obfuscated away.
Containers DON’T have a migration path like P2V (physical-to-virtual) did in the dawn of virtualization.
Containers AREN’T designed to absorb your 100GB legacy application that runs on an antiquated code base.
However…again…
I will say container technologies have come a long way in the last few years. The routes to production have become much more straightforward and more opinionated.
Container technologies are no longer the Wild West. So, while containers may not be a one-size-fits-all solution like the hype machine would have you believe, I do think there are a growing number of use cases.
I picture a long highway that stretches past the horizon. Each exit is a different stopping-off point for an individual workload. For instance:
Exit 1) Maybe you are a small business with a web server, a sales portal, and a backend database. Do you really need a 6-node Kubernetes cluster hosted on a cloud provider? I’d say not.
In this scenario, running a single server (with automated backups, of course) and running your workloads in a series of Podman pods would make sense.
Exit 2) At some point, you decide you want to start adding features to your sales application. Now, you may add 2 or 3 more servers to serve as Dev and QA environments.
This exit is a little more crowded, but you can still get by with managing your container infrastructure by hand.
Exit 8A) Let’s say your small sales company expands at a rapid and unanticipated rate. Your 3-4 pods with a couple of containers each are now at over a hundred pods with multiple containers each. You have measurable ebbs and flows of traffic throughout the day.
Do you really want to run each pod by hand? Do you really want your applications to run at peak capacity at 3 AM when you get no traffic to your web properties?
Now we start talking about container orchestration. Now we start discussing bringing in Kubernetes. Now you can build each of dozens of components by yourself, or you can look at the next exit:
Exit 8B) Each cloud provider has their own managed (read opinionated) implementation of Kubernetes, where all the hard decisions are made for you.
All your operations teams have to do is spin them up, instantiate some users, and start deploying (grossly over-simplified, but you get the idea).
In fact, my company, Red Hat, has one of the coolest (in this dude’s opinion) container platforms out there: OpenShift!
While I am just a Linux SysAdmin at heart, I can genuinely appreciate what containers and platforms like Kubernetes and OpenShift are trying to accomplish.
I host a live stream on Twitch and YouTube to talk about Red Hat Enterprise Linux. This next week, January 11th, we’re having some of the OpenShift team on to talk about running virtual machines on their platform! (See the comments for the link.)
I am in love with containers; my home lab lives by them. I believe it is necessary to take a realistic approach to move into the container space. One size does not fit all.
——
Disclaimer: This is an opinion piece of my own making. It is neither sponsored nor commissioned by Red Hat.
For a systems administrator, it seems like every project brings new complexity, more servers, and more sprawl to manage. I will assume that your messes are a lot like mine: On one server, you’re running CentOS Linux 7 from a project several years ago. Over here, you have a handful of Red Hat Enterprise Linux (RHEL) 9 servers from a recent project. Over there, you have an Oracle RAC database running on Oracle Linux 8.
No matter where you look, you have a mix of different distributions on different major and minor versions. What is a hard-working sysadmin to do? Never fear; the IT Guy is here, and as Terry Bowling and I did in our 2022 Red Hat Summit talk, I will walk you through a couple of tools to help you bring some order to the chaos in your infrastructure.
Why I standardized on Red Hat Enterprise Linux
In all my years as a sysadmin, I’ve never had a better experience managing a Linux operating system than with RHEL. I know what you are thinking: “This guy works for Red Hat; of course, he would say that operating system is the best.” Rest assured, my love for RHEL long predates ever receiving a paycheck with a red fedora.
One reason is that RHEL is open source, which is critical to the development and sustainability of the entire Linux ecosystem and, to a real extent, the world of technology we enjoy. For another reason, Red Hat has always been a vendor I love talking to, in contrast to the ones I wanted to get out of the door as quickly as possible because all they cared about was the upsell.
If I were to start a business, manage a large bank, or control a space station, I would put RHEL at the heart of it. The main reasons are security certifications, an unmatched partner ecosystem, and a suite of management tools built right into the subscription in the form of Red Hat Insights.
I could talk about how much I love RHEL all day, but I’ll move along. Assume I have convinced you that RHEL is the way to go, so how do you standardize on it without rebuilding hundreds or even thousands of servers?
That is where the Convert2RHEL tool comes into play. Convert2RHEL is a supported utility that replaces existing packages with Red Hat-signed versions. So you can replace your CentOS Linux kernel with the RHEL kernel and a third-party MariaDB version with the Red Hat version. You get the idea. Modern systems can have anywhere from 500 to 1,000 or more packages, and the Convert2RHEL tool handles the conversion process. It also ties the converted system into your Red Hat Access account, allowing you to install packages, get support, and connect to tools like Insights and Red Hat Satellite.
I mentioned a crucial term in the paragraph above: supported. Convert2RHEL is a supported operation. If you run into issues, you can open a support ticket or even talk to Red Hat Consulting to get advice and build a plan for a standardized platform. Need to carry out a bulk conversion? You can automate the process with Satellite.
Get started with Convert2RHEL
To get started with Convert2RHEL, you can follow the commands and screenshots in this article or watch the complete process in this video:
I will walk through this process with a vanilla CentOS Linux 7 virtual machine (VM). To make life easier, before you do anything, ensure all your packages are up to date:
$ sudo dnf update -y
With that done, run three curl commands to pull down the GNU Privacy Guard (GPG) key, SSL certificate, and repository confirmation necessary to pull the convert2rhel packages from the Red Hat content delivery network (CDN):
$ curl -o /etc/pki/rpm-gpg/RPM-GPG-KEY-redhat-release https://www.redhat.com/security/data/fd431d51.txt
  % Total	% Received % Xferd  Average Speed   Time	Time 	Time  Current
                             	Dload  Upload   Total   Spent	Left  Speed
100  1855  100  1855	0 	0  11393  	0 --:--:-- --:--:-- --:--:-- 11380

$ curl --create-dirs -o /etc/rhsm/ca/redhat-uep.pem https://ftp.redhat.com/redhat/convert2rhel/redhat-uep.pem
  % Total	% Received % Xferd  Average Speed   Time	Time 	Time  Current
                             	Dload  Upload   Total   Spent	Left  Speed
100  7411  100  7411	0 	0  28684  	0 --:--:-- --:--:-- --:--:-- 28724

$ curl -o /etc/yum.repos.d/convert2rhel.repo https://ftp.redhat.com/redhat/convert2rhel/7/convert2rhel.repo
  % Total	% Received % Xferd  Average Speed   Time	Time 	Time  Current
                             	Dload  Upload   Total   Spent	Left  Speed
100   247  100   247	0 	0   1080  	0 --:--:-- --:--:-- --:--:--  1083
Now it’s time for the main event: The conversion. Be forewarned; depending on your underlying hardware and the complexity of your client install, this process could take some time.
I’ll break this command down. First, convert2rhel calls your newly installed tool. The --org flag allows you to specify your Red Hat Access organization ID, and --activationkey allows you to select a key. These two arguments let you register your converted RHEL server to your active Red Hat subscription.
For more information on using org ID and activation keys, check out the documentation.
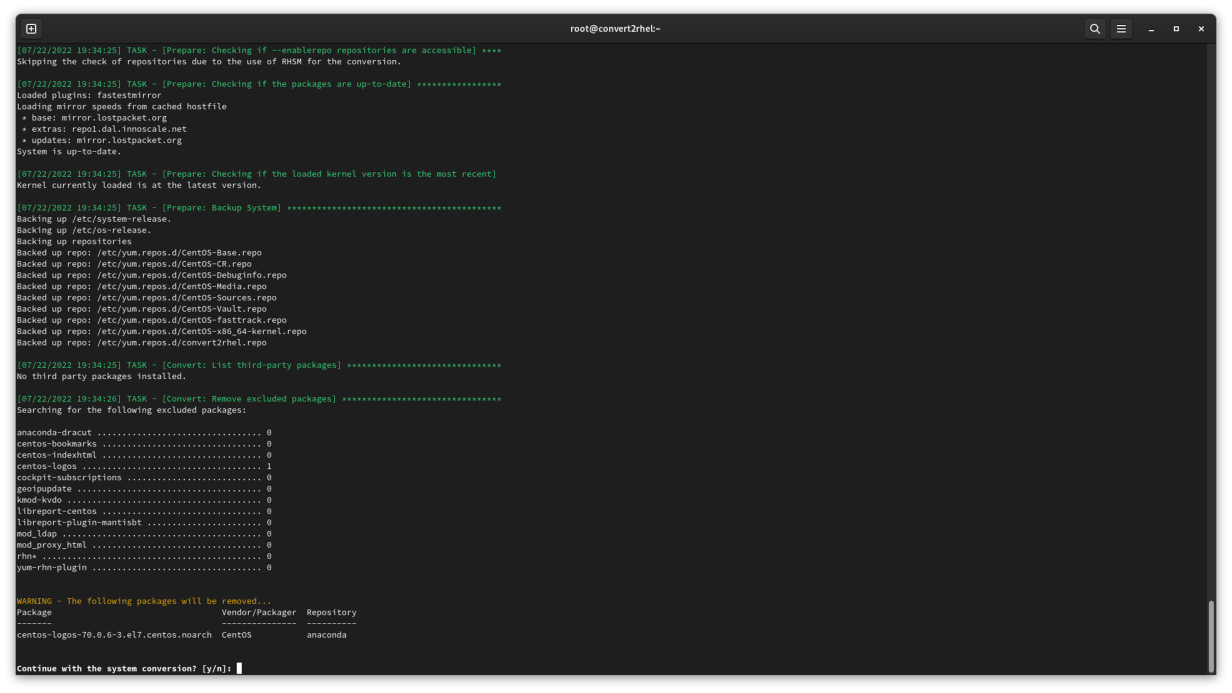
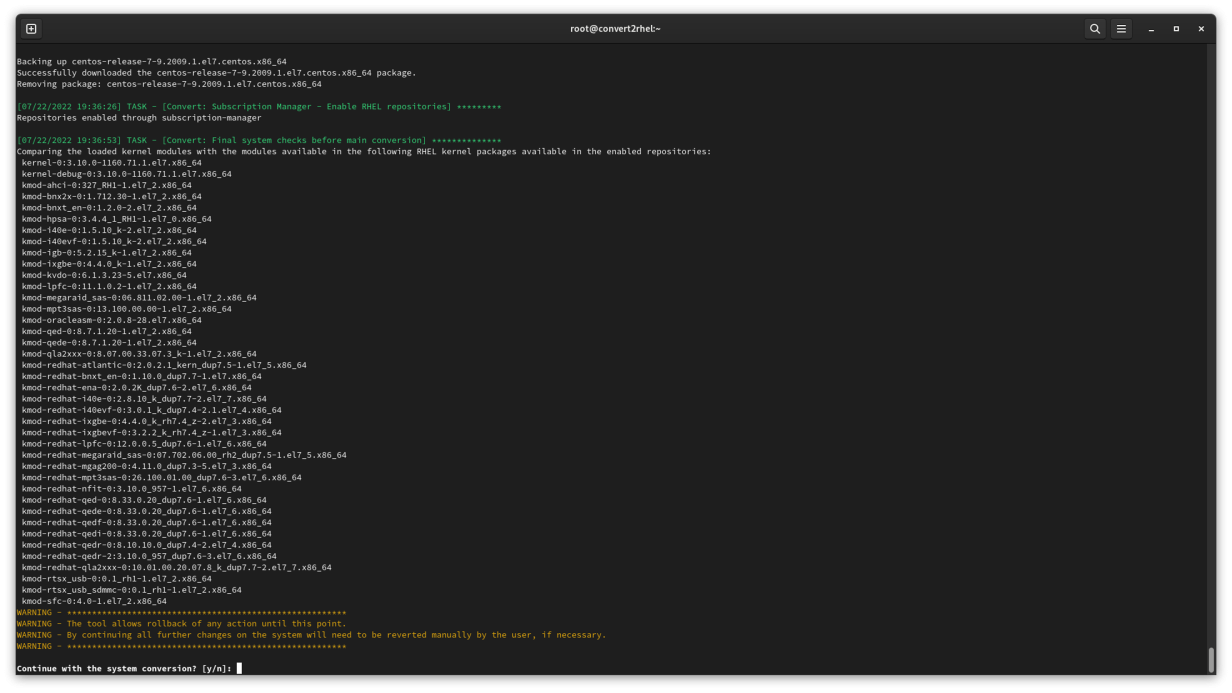
Once you start the conversion process, you are presented with the RHEL end-user license agreement (EULA) and asked if you are sure you are ready to proceed. Once all the preconversion checks are complete and the Red Hat packages staged, you can reboot the system.
Up to this point, no changes have been made to the system. However, once you tell the instance to reboot, everything starts happening.
After you hit Enter, your system boots into a temporary environment. Convert2RHEL will replace all the CentOS-signed packages with their Red Hat-signed equivalents.
Standardize on major versions
That wasn’t so hard, right? Now that you’ve trimmed the number of distributions you have to manage to one, you need to do something about the environment’s version sprawl. You may have 7.9, 8.4, 8.5, 8.6… you get the idea. To give the newly standardized environment the most runway, consider upgrading all of your servers to the latest major version.
For one thing, RHEL 8 and 9 have a predictable lifecycle: five years of full support (such as new features and hardware enablement) followed by five years of maintenance support (for example, bug fixes and security patches). That gives you 10 years total. You can also expect a new minor version every six months and a new major version every three years. Since RHEL 9 was released in May 2022, you can expect RHEL 10 in summer 2025.
However, if the “latest and greatest” gives you pause, Red Hat has an Extended Update Support (EUS) release. This allows you to upgrade to a minor version with two years of support.
A predictable release cadence makes life easier for operations teams. Remember having to make the switch from init to systemd? Yeah, frustrating. What was that command again? Oh, wait, no, that was that other server. Is this server running Podman? Nope, no containers. I feel your pain.
How can you relieve those annoying issues and provide your infrastructure with a steady state of major release cycles?
Do in-place upgrades with Leapp
There is also a supported utility to help sysadmins navigate from one major version to the next. That tool is Leapp, a solution for in-place upgrades.
Why do an in-place upgrade versus a clean install? It’s cheaper, and I don’t mean dollars. I mean your time. Your time and energy have great value. With a new build, you must install all your packages from scratch, create all your users (with passwords), and reapply all the little tweaks and configuration changes. It takes time and effort that you could spend doing so many other things.
The Leapp utility is available from the Base OS repository on RHEL 8 systems and in an add-on repository for RHEL 7 systems with a dnf install command. Leapp is also a supported operation, so if you run into trouble, you can always reach out to Red Hat’s support teams to get a fresh set of eyes.
One other aside: Leapp for RHEL 7 and 8 means you can take a RHEL 7 box, upgrade it to a RHEL 8 box, and then rerun Leapp to get to a RHEL 9 server. Granted, that depends on the workloads, library versions, and other factors you may be running.
Note: If you want to see the upgrade process for RHEL 7 servers, check out this video:
If you already have a RHEL system registered and up to date, it is an easy process to install the Leapp utility:
$ sudo dnf install -y leapp-upgrade
To evaluate that an in-place upgrade will be successful, the tool’s preupgrade assistant audits all your packages, repositories, and configurations to identify potential pitfalls or blockers that may interfere with a successful upgrade. The tool helps you identify issues that could cause failures.
When the preupgrade assistant shows no inhibitors, you can proceed with the upgrade. If it identifies an inhibitor, you can get the details in the /var/log/leapp/leapp-preupgrade.log file. You can also add workarounds or skip certain operations by adding those options to the /var/log/leapp/answerfile. This option makes the upgrade process less manually intensive. Not only will this tool help you identify potential issues, but you can also take those notes and feed them into an answer file to further automate this process.
With the upgrade assessment in the green, start the upgrade. I like to add the --reboot option so that I don’t have to manually reboot the system after the upgrade process begins:
$ sudo leapp upgrade –-reboot
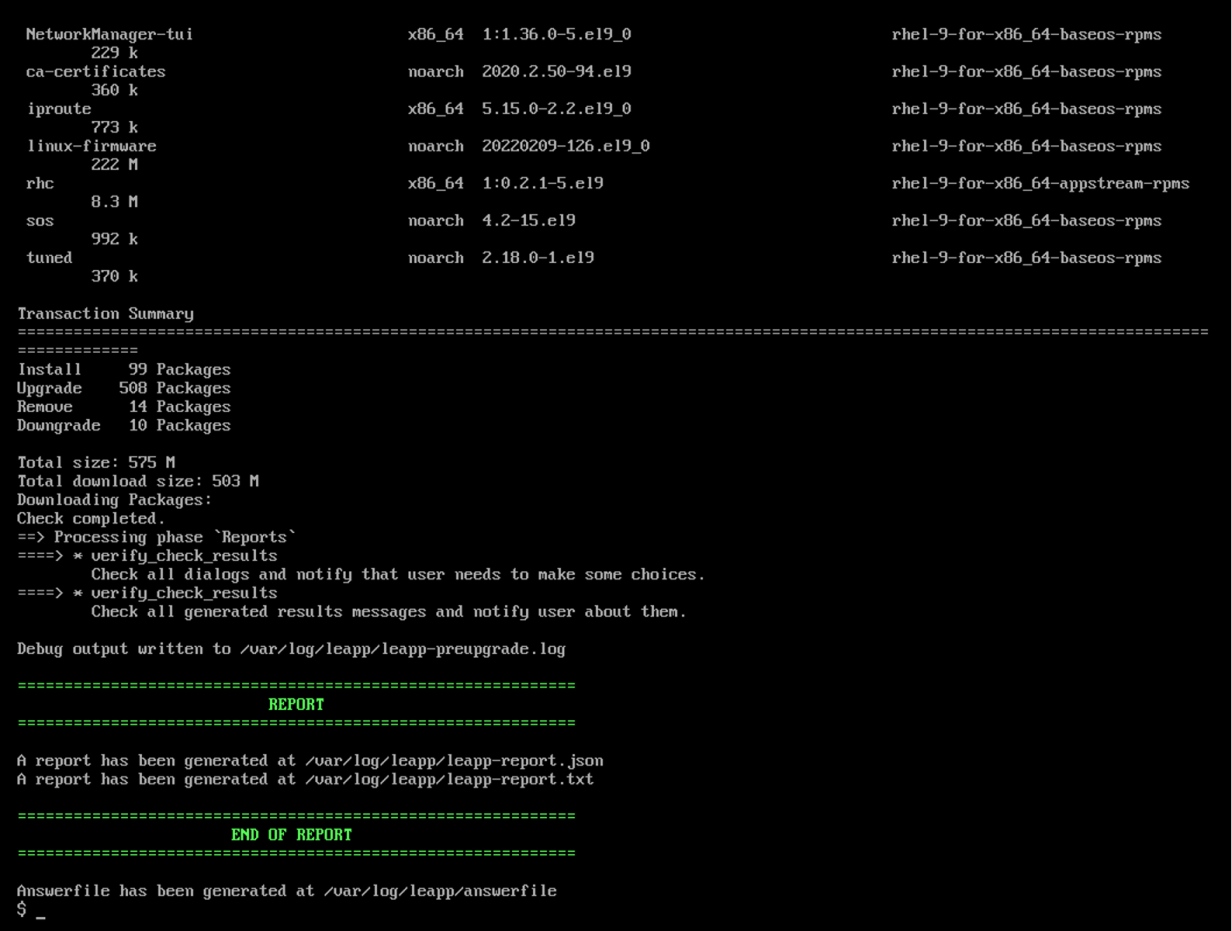
At this point, Leapp gets to work. This process may take some time, depending on the size and complexity of your installation. It downloads all new packages, from the kernel to OpenSSL to Vim and more. It also builds a new boot image to support the new environment.
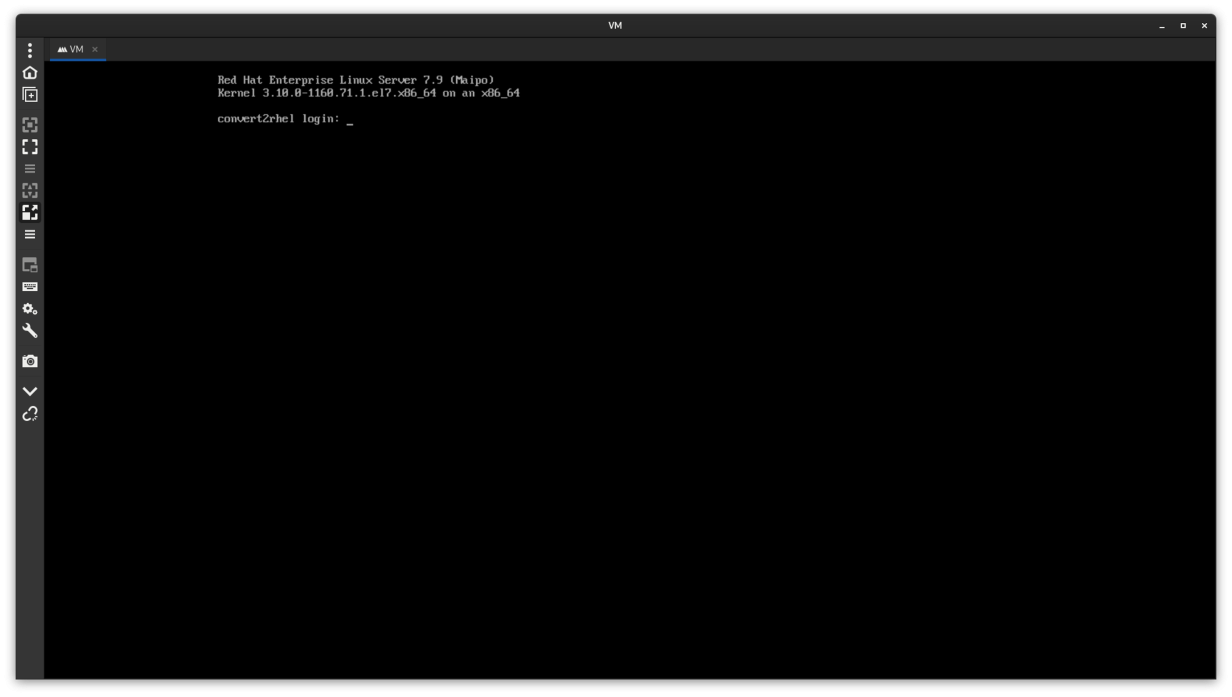
Once the packages are all in place and the new boot image created, all that’s left is for the system to reboot itself. When you return to a login prompt, you are ready to go!
Wrap up
Sitting on the floor next to my desk is a workstation that has been running since Fedora 29. I’ve done in-place upgrades up to Fedora 36, and the process has gotten better, faster, and more accessible. This is the foundation of the Leapp tool for RHEL. Red Hat depends heavily on upstream communities to help shape the future of RHEL.
Convert2RHEL and Leapp have seen a lot of adoption in the community and received a steady amount of engineering attention, making the process faster and easier. These two tools aim to help make your job easier by managing that infrastructure sprawl, cutting down technical debt, and providing a firmer foundation for any workloads thrown your way.
What will you do with all that newfound free time? Will you take that vacation? Learn a new technology? Knock out other projects? Or just take a nap? There is no wrong answer. As sysadmins, it is our job to enable our businesses to be successful, but that doesn’t mean we should have to toil!
Head to the migrations page and start planning your standardization project today!
IT operations folks strive to not only maximize uptime but also keep systems patched. These might seem like competing goals, but we’re here to help with Live kernel patching in Red Hat Enterprise Linux (RHEL) and enjoy some improvements with live kernel patching in RHEL 8.5.
You can use a built-in tool to get update the kernel on RHEL systems with no downtime. That tool is live kernel patching (kpatch). Kpatch has been a part of our operating system for some time now (since RHEL 8.1, 7.7). However, with RHEL 8.5 (and the 9.0 Beta), there are some significant enhancements.
To catch the rest of my article, head over to the Red Hat blog here!
Way back in the day, humanity created computers to help make our lives easier. In a lot of ways, they have; in others, it’s made life much more tedious, especially for the SysAdmin. What used to be a mainframe has turned into hundreds of servers, containers, and virtual machines spread across data centers, clouds, and even laptops!
Never fear, Infrastructure as Code (IaC) is here. Tools like Ansible have been around for over a decade or more but in the past few years they have really picked up speed. Ansible is a simple, efficient approach to automating and standardizing our environments while cutting down on the time, increasing reliability, and removing the human error factor from operations and deployments!
My Story
Probably around 2012 or so, I was a rookie Linux Systems Administrator just making the move away from managing Windows servers and desktops. I remember how much fun patch days were…at first. We got to take the morning off, spend an evening at our off-site data center, order in some Jimmy John’s, and once the corporate office closed, start patching systems. We ran CentOS, RHEL, Oracle Enterprise, and maybe even an Ubuntu system or two.
Looking back, it was actually an unnecessary time suck! Why!? Patch a couple of hundred servers, by hand, rebooting systems manually, and hoping that nothing broke because the application and database administrators were already at home enjoying the end of their workday. The one saving grace at that point was Tmux (an amazing tool to manage multiple terminal sessions at once). At least then I didn’t have to type yum update 200 times!
I guess Charles Dickens might have said of my career: “It was the best of times, it was the worst of times…” I finally got to focus on Linux Servers, bye-bye Windows, but who wants to spend their Thursday nights patching a couple of hundred servers by hand?
That’s not why you’re here, though. You all know I have my SysAdmin scars and I wear them with pride because now, I get to share amazing lessons I learned (or in today’s case should have learned back then). Today, I want to introduce a tool that could have taken our patching times from 6-7 hours down to what could have been less than an hour. Even more, that process could have been completely automated!
What is Ansible?
Ansible is a project bred from the idea that all infrastructure (even security, networking, and cloud) should be code. In other words, if you think of your lab, network, enterprise, whatever as a restaurant, Ansible would be the recipes the cooks used to make every dish. Ansible is written predominantly in Python and utilizes YAML or “YAML Ain’t Markup Language” (who doesn’t love a good recursive acronym?) for its playbooks.
Ansible, not to be confused with the Red Hat product Ansible Automation Platform, is an open-source project that runs across most Linux and Unix systems as well as Mac and Windows and even networking gear, clouds, and security appliances! The list of modules and supported platforms grows with every release.
The name was inspired by Rocannon’s World, a novel by Ursula K. Le Guin. In the 1966 novel, ansible was a fictional, instantaneous communication system. Ansible would later become the name of the open-source tool. Michael DeHann, the original developer decided to build a company around his new tool and with the help of Said Ziouani and Timothy Gerald founded AnsibleWorks Inc. Later, the company was renamed Ansible Inc and eventually was acquired by Red Hat in 2015.
Why Ansible?
Ansible burst onto the field in an age where Infrastructure As Code (IaC) tools seemed to be everywhere. However, Ansible had a few attributes that set it apart from its competition.
For one, Ansible is agent-less. In other words, there is no software to deploy across your enterprise. You could install the Ansible package on your laptop and manage thousands of servers across bare metal, virtual machines, and even the cloud!
Being agentless also opened the door for another advantage: Ansible utilizes OpenSSH to execute remote commands instead of proprietary or platform-specific tools.
Thirdly, Ansible set itself apart by choosing simple, YAML-based text files to define its environments and code. Want to have a pre-defined list of servers to manage? Add it to an inventory file! Want to use Ansible to create a user, set its password, and add an SSH key? Write a playbook. Want to have support for different environments (dev, prod, etc.)? Easy, just create a variable file!
Getting Started
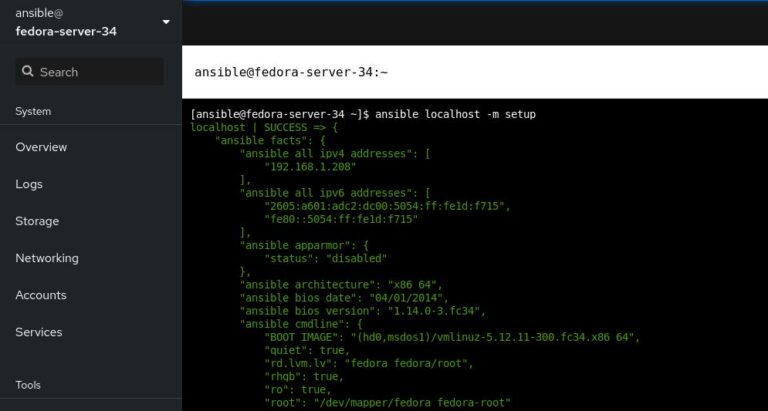
Did I sell you on how easy and awesome Ansible is? Good, because here is the entrée for today’s meal: Let’s install Ansible and use Ansible to add a package on our local system. For the sake of this demonstration, I’ll be using one of my favorite server distros, Fedora Server, specifically Fedora 34. Ansible is available for most major distros, so, consult your package manager to find the correct package.
The first step is to install the required Ansible package and its dependencies:
[ansible@fedora-server-34 ~]$ sudo dnf install -y ansible
Last metadata expiration check: 0:05:30 ago on Tue 22 Jun 2021 04:13:57 PM CDT.
Dependencies resolved.
===============================================================================================================================================================================================================
 Package                                                    Architecture                                Version                                             Repository                                    Size
===============================================================================================================================================================================================================
Installing:
 ansible                                                    noarch                                      2.9.21-1.fc34                                       updates                                       15 M
Installing dependencies:
 libsodium                                                  x86_64                                      1.0.18-7.fc34                                       fedora                                       165 k
 python3-babel                                              noarch                                      2.9.1-1.fc34                                        updates                                      5.8 M
 python3-bcrypt                                             x86_64                                      3.1.7-7.fc34                                        fedora                                        44 k
 python3-cffi                                               x86_64                                      1.14.5-1.fc34                                       fedora                                       244 k
 python3-chardet                                            noarch                                      4.0.0-1.fc34                                        fedora                                       214 k
 python3-cryptography                                       x86_64                                      3.4.6-1.fc34                                        fedora                                       1.4 M
 python3-idna                                               noarch                                      2.10-3.fc34                                         fedora                                        99 k
 python3-jinja2                                             noarch                                      2.11.3-1.fc34                                       fedora                                       493 k
 python3-jmespath                                           noarch                                      0.10.0-1.fc34                                       updates                                       46 k
 python3-markupsafe                                         x86_64                                      1.1.1-10.fc34                                       fedora                                        32 k
 python3-ntlm-auth                                          noarch                                      1.5.0-2.fc34                                        fedora                                        53 k
 python3-ply                                                noarch                                      3.11-11.fc34                                        fedora                                       103 k
 python3-pycparser                                          noarch                                      2.20-3.fc34                                         fedora                                       126 k
 python3-pynacl                                             x86_64                                      1.4.0-2.fc34                                        fedora                                       110 k
 python3-pysocks                                            noarch                                      1.7.1-8.fc34                                        fedora                                        35 k
 python3-pytz                                               noarch                                      2021.1-2.fc34                                       fedora                                        49 k
 python3-pyyaml                                             x86_64                                      5.4.1-2.fc34                                        fedora                                       194 k
 python3-requests                                           noarch                                      2.25.1-1.fc34                                       fedora                                       114 k
 python3-requests_ntlm                                      noarch                                      1.1.0-14.fc34                                       fedora                                        18 k
 python3-urllib3                                            noarch                                      1.25.10-4.fc34                                      fedora                                       175 k
 python3-xmltodict                                          noarch                                      0.12.0-11.fc34                                      fedora                                        23 k
 sshpass                                                    x86_64                                      1.09-1.fc34                                         fedora                                        27 k
Installing weak dependencies:
 python3-paramiko                                           noarch                                      2.7.2-4.fc34                                        fedora                                       287 k
 python3-pyasn1                                             noarch                                      0.4.8-4.fc34                                        fedora                                       133 k
 python3-winrm                                              noarch                                      0.4.1-2.fc34                                        fedora                                        79 k

Transaction Summary
===============================================================================================================================================================================================================
Install  26 Packages

Total download size: 25 M
Installed size: 143 M
Downloading Packages:

<<< Output Truncated >>>

Complete!
[ansible@fedora-server-34 ~]$
Excellent, feel the power yet? Let’s get a little crazy. Let’s write a playbook. Let’s install a package!
I really like htop. It is a “graphical” tool that, in this author’s opinion, makes it much easier to read and understand the output of the top command.
Luckily, it’s available from the default Fedora repos. So, using your favorite text editor, create htop.yml:
What’s all this mean? Let’s break it down line by line. Make sure to start your playbook with three hyphens (-), then name tags are just that, it lets you know what task is being run to make it easier to understand the output (and especially troubleshoot any problems). Next, we have the hosts. For this super-simple example, we are only calling localhost. This could also call any number of hostnames or groups listed in an inventory file. Become is basically your sudo command. If you set Become to yes, Ansible will run with administrative privileges. Otherwise, the playbook will run as whatever user calls the playbook.
Under tasks, we have another name tag. We are calling the package module. This is what is so cool about Ansible; you can actually build playbooks that will run over differing distributions! The package module is intuitive enough to know what your system’s package manager is: apt for Ubuntu, yum for CentOS, dnf for Fedora, and so on. Next, we call the package, in our case, htop. The final line is the state of the package. We can set this to a specific version, to absent (if we don’t want the called package installed), or latest, which (you guessed it!) means the package will be on the latest version.
Now, save your config file, and let’s run our playbook:
[ansible@fedora-server-34 ~]$ rpm -qa|grep htop
[ansible@fedora-server-34 ~]$ ansible-playbook htop.yml
[WARNING]: provided hosts list is empty, only localhost is available. Note that the implicit localhost does not match 'all'

PLAY [installing packages] ************************************************************************************************************************************************************************************

TASK [Gathering Facts] ****************************************************************************************************************************************************************************************
ok: [localhost]

TASK [install htop] *******************************************************************************************************************************************************************************************
changed: [localhost]

PLAY RECAP ****************************************************************************************************************************************************************************************************
localhost                  : ok=2    changed=1    unreachable=0    failed=0    skipped=0    rescued=0    ignored=0

[ansible@fedora-server-34 ~]$ rpm -qa|grep htop
htop-3.0.5-4.fc34.x86_64
[ansible@fedora-server-34 ~]$
You can see htop is not installed before we run our playbook, then after we run it, htop is indeed present!
Wrap Up
So, there you have it. You now have the power to go out and install a package on any SSH-enabled host system. Go forth and blow people’s minds! When you take this simple example and zoom out, you start to see the sheer power that Ansible can bring to a Systems Administrator. Step aside, Luke Skywalker, we don’t need the Force anymore to move your X-Wing. We’ll do it with Ansible!
Okay…That may be over the top. However, I can’t overstate the truth: Build out your playbooks. Grow your Ansible skills. The rule is, if you have to do a task more than once: AUTOMATE IT! Stop installing packages by hand. Quit wasting your time bootstrapping servers by copy-pasting commands out of a shared document. Take those commands, add in some Jinja-variable goodness, and let computers do what they were meant to do: make the lives of humans easier.
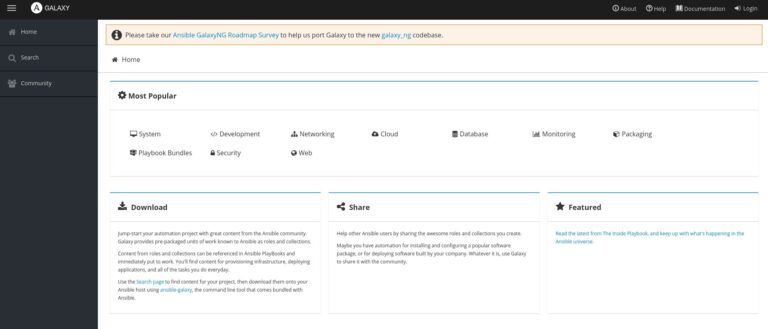
Like a terrible TV infomercial, just wait, there’s more! Have a favorite open source project you like or a system service that you tend to modify? You may not even have to start from scratch! Ansible has galaxies (pun intended) of pre-built roles and playbooks available. Ansible Galaxy is a community-driven effort to provide pre-built code to get your systems up and running fast. They have playbooks for Nextcloud Server, LAMP, and even desktop applications!
I use Ansible every time I build out a new VM. I use Ansible to ensure my user account is configured exactly the same way across all my systems: laptop, desktop, server, VMs, and cloud! Admittedly, my list of Ansible To-Dos is still fairly large, however, I try to spend a little time each month adding to it. Slowly but surely, I am automating and standardizing my home lab and home production systems. You can too!
Let me know below how you are or are planning to use Ansible.
Did you like this post? Let me know in the comments if there is more you’d like to read on this topic. There is SO much more we could talk about from products like Red Hat’s Ansible Tower (or the upstream AWX project) to large-scale use cases, bootstrapping, and more. So, by all means, let me know what you are interested in.
Thank you so much for spending your valuable time to hear my “war stories” and letting me share a tool with you I am quite passionate about.
(This post originally appeared here and is used with permission.)
The approach to work has changed several times over the past three or so years. We all keep hoping to find that “new normal,” and I think we are in it already. At least for now, our new normal will be abnormal.
It’s funny now; it wasn’t then: In early March 2020, I had just gotten back from a team meeting in New York. I was going to be home for a week before embarking on some amazing trips: I was going to finish my sales training in Raleigh; I was going to a telecommunications conference in Chicago; I was going to attend a sales meeting in Texas. Three weeks, three trips…except I didn’t go anywhere!
During that week between trips, the organizers canceled all three. In a matter of four hours or so, The world shut down. I didn’t even leave my state until Summit 2022 in Boston! That was an experience to share in a different blog post. The trip that struck me was a couple of weeks after Summit when the Red Hat Enterprise Linux team met at one of our offices for a week-long strategy session.
At that time, I had been at Red Hat for 2 1/2 years and was a marketing team member for a week shy of a year. I hadn’t met any of my coworkers in person during that time! Let’s be honest, we were there for the strategy sessions, but most of us made the trip for the human connection!
Importance of In-Person
Before the pandemic, I’d had work-from-home days and had been part of remote workforces before I came to Red Hat. I was an all-remote employee before the pandemic. It’s one thing if everyone is remote; it is a mess if you have a hybrid audience.
Before Red Hat, I worked for GitLab, a company that prides itself on being globally distributed. I felt my team of Solutions Architects had a winning pattern: asynchronous communication, regular 1-on-1s, and weekly team meetings. My favorite part then was that we met in person once a quarter. This balance allowed us to maximize working from home while maintaining regular communication with our team. The in-person meetings allowed us to strategize, whiteboard, or grab a drink with the coworkers we spend hours with weekly.
I missed that balance during the pandemic. I think, though, we are moving back in that direction.
Hybrid Meetings
Anyway, back to Boston and the in-person strategy session. We spent the first morning meeting everyone and discussing our plans for the future of RHEL. The difficulty was we had well over 25 people in the room and almost as many on a Google Meet!
Here’s where this blog gets informative: It took us the better part of a day to get most of the bugs worked out. We realized that there were some crucial factors to take into consideration:
1) Keep the room quiet. Anytime a bag would open or someone would fidget through their notebook, it would be annoying to those in the room. But to those hearing everything through earbuds, it was downright awful!
2) Ensure remote attendees can participate. It is effortless to be ignored or for your attention to drift when you are one of the few not on site. We were using Meet for our meeting. It had some beneficial features:
The “raise hand” function allowed people to signal their interest in contributing to the discussion. The raise hand tool even included a queue so people could address their comments in the order they were received.
We found something new: Google Meet had a “companion mode”. For people in the room, we could join the meeting, use the raise hand tool, and be put into a chat room. Side conversations (or, in our case, humorous tangents) are an unavoidable part of meetings, so, at least in the chat room, these conversations were quiet (see point 1 above) and recorded right along with the meeting video!
Something else we ended up doing was ensuring that someone on the remote call got to present or lead group discussions. The giant floating head effect was a little much, but hey, what can you do.
Though, we also realized that it’s still easy to do group breakouts with hybrid meetings. When we would assign people to functional breakouts or ice breakers, the virtual room became one of the groups.
3) Utilize virtual whiteboards or flow charts! Yeah, I know, it’s not as good as everyone circled a physical whiteboard. Still, I was pleasantly surprised by several of the tools we used! There was Miro for virtual whiteboarding and collaboration. We also used Jamboard to do more free-form thinking and capture ideas.
Wrap up
Hybrid isn’t ideal. Nothing beats being in person for strategy sessions, whiteboarding, and building team spirit! Giving a hug (I’m a huge hugger) or a handshake is the best. However, it’s not always possible with family, health concerns, and logistics.
I am very thankful that we live in a society that accepts and acknowledges that fact. We have the right and the support of others to exercise our decisions. While I still have some anxiety around travel, I enjoy it more, knowing it is my choice.
Nowadays, I’m even safer traveling than I was before. I got bronchitis and a sinus infection on a flight right before a cruise! Now, I have a mask with me at all times. If I feel like some folks around me are less than healthy, I can put it on and rest easier.
These are just some thoughts I had after traveling for the first time in several years. These are just a few lessons our team picked up from our first hybrid meeting. I’d love to hear what has worked for you!
Before coming to Red Hat, I spent nearly a decade as a Systems Administrator. After all that time, I’m still continually discovering tools that would make life as a SysAdmin much easier. One of these utilities is the redhat-support-tool. In this post, we’ll walk you through using the tool in some real-world scenarios.
What is the Red Hat support tool?
The support tool allows you to interact with the Red Hat knowledge base, support tickets, analyze log files, and even set site-wide configuration options, all from the command line! At first glance, that may not seem like a big deal but consider these real-world scenarios.
Want to catch the rest of this post? Head over to the Red Hat blog!
I am sure many sysadmins can relate to this scenario:
You get into work on Monday morning, attend your staff meeting, and log into your ticketing system, expecting a quiet week. NOPE! Right there in all caps (why do people use all caps in a ticket?) and marked Urgent is a request for a new application environment. Of course, the requester needs the new server up and running by the end of the week.
You are a savvy sysadmin. No problem, right? How hard could it be to deploy a new server with a database and web server? You thought ahead. You have templates for these things!
Then that database server you spent all weekend trying to fix crashed again. That took all day. Tuesday was that company all-hands meeting. Wednesday, more meetings and fires. Now it’s nearly Friday. That urgent ticket with its all caps glares at you every time you log in to update a ticket.
Time to be a hero! You close your email, mark your calendar as busy, and put on your headphones. You deploy your production template, but uh oh, that one is three minor versions behind.
So you check the one on your laptop. That one is running the latest version, woot, but nope, that one is running the “old” security tool. In desperation, you log in to your private cloud (say OpenStack). You know that template is up to date, but something corrupted the boot image, so now you can’t get a terminal.
In frustration, you return to your production image and just run the patches. You throw your hands up and add three new tickets to your queue to fix these out-of-date images.
A new way to RHEL
If that feels familiar, you should connect with me on social media: @itguyeric. I think it’s about time we start a club, support group, or something. While that may be an amusing anecdote, it was true of my experience for a good chunk of my operations career. And not just for me, but for many of you who work in the trenches daily keeping companies, universities, and governments up and running.
Deploying an operating system is expensive. It costs resources (hardware or compute time) and something far more precious: the time and attention of a sysadmin.
Do not despair; those days of managing images across platforms, versions, and configurations are swiftly closing. The issue of template management is where image builder comes into play.
Red Hat Enterprise Linux’s (RHEL) image builder saves time and reduces complexity when deploying optimized systems across datacenters and cloud footprints.
Image builder comes in three flavors: command line, local install (on a RHEL host), or Red Hat’s hosted service. No matter which flavor you choose, you’ll be able to design optimized images for your targeted platforms: hardware, qcow2 or vmdk, or cloud image.
Image builder workflow
You can break down the image builder process into five steps:
Select your platform. Choose one of the three big cloud providers, a virtual image, or a hardware installer for servers or edge devices.
Select your image builder tool. Choose between an on-premises build or the hosted solution.
Create a blueprint. Define filesystems, select packages, and configure users.
Build the image. Pick virtual, AWS, GCP, Azure, VMware, or ISO types.
Deploy your instance. Not just one, either. Image builder helps create images to deploy anywhere, anytime.
How does it work?
I sense some disbelief, so I’ll walk through an example. And if you prefer to learn by watching, check out my video at the bottom of this article.
First, log in to the tool at console.redhat.com. Once you’ve logged in with your Red Hat Customer Portal account, navigate to Red Hat Enterprise Linux and select Red Hat Insights.
The link for image builder is toward the bottom of the Insights panel (or just navigate straight to the tool).
Now you can begin to create a new image.
From the Create image wizard, you define how your image will look. First, choose between RHEL major releases. Versions 8 and 9 are currently available on the hosted service. Next, decide what kind of image to build.
For this example, imagine you want to deploy a production instance on Google Cloud Platform (GCP) but also have a qcow2 file to do testing and development work from your local laptop.
Notice that when you select certain options, your breadcrumb trail adjusts to reflect the additional steps. For GCP, you can choose to share the template with a user account, a service account, a group account, or a domain.
For this example, I will just share it with my Red Hat account on GCP.
Now, this is one of my favorite features: You can bake your registration into the image. All you need is a valid activation key setup in your customer portal. But that’s not all; you can also preconfigure your image to register with Red Hat Insights right from the template.
One of the newest additions to the image builder tool is manually configured filesystems. You can now define sizes and locations for multiple partitions. For this example, I’ll add a home partition, and also add a webapp directory under opt. I will set both of those to 5GB but leave the root at the default 10GB.
Next stop, packages. There are literally thousands of packages available in the Red Hat repositories. You can add any combination of these packages to your image. For instance, I am a huge fan of tmux, a terminal multiplexer.
I mentioned this would be a web application, so I’ll grab Nginx, too.
What you cannot see from this menu is that image builder automatically added all the dependencies for tmux and Nginx to the image. That’s over 100 packages that it added to the list without any intervention.
All that is left is to give your image a descriptive name and review the choices. Image builder does the rest.
Building an image varies greatly between how complex the image is, how large the actual image will be, and, like all shared services, how heavy of a load there is on the platform. In this demonstration, I saw between 10 and 18 minutes.
Once the images are done building, you can start deploying them. For the qcow2 image, I received a link to download the file directly from my browser. You can then upload it to a file share or hypervisor, or import it into your laptop for local use. Your options will vary depending on your choices above.
You receive an image name for the GCP image that you can use to copy the template into your GCP account. You can use it just as you would any other cloud image.
Wrap up
This article may sound like an infomercial for image builder, but the process is that easy. I have used many different tools over the years: Documenting the process in text files, complicated Kickstart scripts, or VM templates. Image builder has been the easiest to incorporate into the workflow for my home lab and for the content I help develop for Red Hat Enterprise Linux.
With different platforms, formats, and combinations of settings, image builder quickly meets the needs of any number of operations projects.
Please don’t take my word for it, though. Try it for yourself. Either visit the hosted service or try out our two Image Builder labs. The first is web console-based and the second relies on the command line interface.
Here’s a demo video we made of the full process.
This article is based on “The new way to Install Red Hat Enterprise Linux: image builder service” from Red Hat Summit 2022 and was originally published on the EnableSysAdmin blog.
From creating technical labs, blogs, and videos to pairing customers’ problems with product features, technical marketers never see a dull moment.
Slide-deck builder, swag folks, booth dwellers, buzzword people… technical marketing gets a bad rap sometimes. Today, I want to set the record straight. Marketing can be a chaotic, challenging, yet rewarding space to work in… and there’s also some swag involved.
I’ve held several different roles before finding my home as a technical marketing manager (TMM), including support engineer, systems administrator, and solutions architect (technical sales), to name a few. None of those roles quite brought me the thrill and fulfillment that my current position does. What does a TMM do day-to-day? What skills and tools do you use? What traits do you need to succeed?
Want to catch the rest of this article? Head on over to the Enable Sysadmin blog!
These days it can be overwhelming to select the best software to use because now more than ever, choices are abundant when it comes to software. Messaging and Communications apps are a great example of that because there are so many options out there. What if you’re looking for a messaging app that is scaleable and privacy-focused? It can be even harder.
Thanks to the Element team, I’ve got a great option to show you. Element, previously known as Riot.im, is a cross-platform client that works on the Matrix protocol. What does that mean? Is Neo the One? Well, let’s talk about the protocol and why you should consider using this great messaging platform.
What Is Matrix?
The Matrix team describes it as an “open standard for secure, de-centralized, real-time communication”. First, it’s open-source, more eyes equals better code. We all know how much I love open source…but for the uninitiated, that means more people can read and study the code, security vulnerabilities can be found and fixed faster, and other projects and contributors can build effective integrations into the source project.
Second, it’s decentralized. This is a little more complicated, but think of it this way, when you stand up an instance of a decentralized application, that is your space. This could be for a family, a meetup, or a company. Everything would be self-contained until you make your instance discoverable. At that point, you@yourhomeserver.com can reach out into the world and find say friend@anotherserver.com.
Thirdly, Matrix supports real-time communications. This includes collaboration, messaging, voice, and even video! Matrix provides a series of encryption algorithms and bridges to facilitate end-user applications to communicate with one another. You may use Etherpad for real-time collaborative document editing, Jitsi for video conferencing, and in today’s blog post, Element for messaging.
Some of the most popular bridges for Matrix are IRC and Gitter. The Open Source Community jumps in with some of their own too, including Telegram and Google Hangouts.
Matrix enables the communications between these platforms within an instance or throughout the interconnected network of Matrix instances across the Internet.
What is Element?
If Matrix is the network, then the Element client is the vehicle that allows you to traverse that network; Element is the interface for text, voice, and video conversations. Just like the Matrix protocol, the Element client is completely open-source!
With the ability to bridge between different apps like Slack right into the Element interface, you no longer need to install and maintain a dozen different apps just to keep in touch with friends, family, work, your volunteer group, your work’s other chat client…you get the idea.
Create an account, activate the needed integrations, and chat with anyone, anywhere on any number of different platforms. Enjoy a 1:1 conversation or hundreds of participants in public rooms.
Bonus: One of my favorite features? Notifications management. I can have every notification from every room, set it to only being notified if I am tagged, or never get any notifications…ever. But Element didn’t stop there, nope, they have one of my favorite notification settings I have ever seen: keyword notifications.
Let’s say I want to know any time someone is talking about dogs. I can add keywords to my configuration and get notified anytime someone says dog, dogs, cats drool, you get the idea!
Element has the option to join the central server at Matrix.org, host your own instance on your own server, or pay a monthly fee for a secure, hosted option. In fact, from their website, you can get up to 5 active users a month for as little as $2/month (USD).
Creating Your Account
It’s now time for you to enter the Matrix and get into your Element. See what I did there? Alright, to get started you will need to create an account. One of the best things about Element is that you can use it on all sorts of devices like your laptop, tablet, phone, or whatever.
For this guide, I’m going to show you how to do it on the Web client in your browser. So open up your favorite browser, such as Mozilla Firefox, and navigate to https://app.element.io.
Your browser will likely ask you to allow access to persistent storage. Accept it that way Element can store your keys, messages, etc. Next, we are going to create an account.
We could create our account on Matrix.Org, but here is a little pro tip: The central server in a federation usually is over-taxed and prone to lag. So, if you know of another public-facing instance, that would be a good bet.
Lucky for us, the community has some awesome members that manage LinuxDelta.com, a community-driven hub for information on Linux distributions, tutorials, and a Matrix server! Instead of using the Matrix.Org option, we are going to go to Advanced/Other:
In the ‘Homeserver URL’ field, type in: https://matrix.linuxdelta.com and click on the green next button. Next, it’s time to create a username. The username will be your display name as well so keep this in mind as you decide. This is what people will see you responding as and how they can tag or search for you! Then create a password, make sure it’s complex. No sense in skimping on security especially if you are utilizing a password manager, like Bitwarden for instance.
Me personally, I am a content creator and a community advocate. I want to be found in the open-source community, so, I would add an email so people can look me up via email. If you do, you’ll of course be sent the customary email confirmation link. For now, though, let’s go ahead and sign in.
Once you have filled in your username, password, and email go ahead and click the green Register button!
This next step is tricky but stay with me. One of the advantages of Element we discussed was end-to-end encryption. We need to generate a Security Key (that is different from our password!). I typically recommend using a system-generated key. Then you can use a secure note somewhere to store the key.
Disclaimer – I changed the security key after writing this blog post, so, don’t think you can get into my account that easily. 😀
Once you’ve saved your key somewhere safe, go ahead and enable notifications and read through some of Element’s recent announcements.
Getting Connected
You are sitting with a brand new, secured account. Now what? Well, Element is a communication platform, let’s find some people to communicate with!
In the middle of the window, there is the option to “Explore Public Rooms”. Let’s click there. Element will default to your home instance, in this case, LinuxDelta.com.
Get connected to The Geek Lab, for instance, by clicking join. That will put you in touch with hundreds of other technology enthusiasts like yourself who hang out, chat, and help each other fix technical problems.
Want to get connected to the broader world? Go back to the Explore button, next to the search bar. In the window we saw before, we have the option to create a new room or select a different server. Let’s hop over to Matrix.org.
There are literally thousands of public rooms covering a crazy number of different topics. Many open-source projects have communities on Matrix. There are HAM radio enthusiasts, D&D (Dungeon and Dragon) hangouts, and even region-focused rooms.
The join process is exactly the same though for a different server, just find a room you want, click join, and start chatting.
There is plenty more to do and discover. From 1 on 1 conversation, adding bridges, and initiating video calls. However, for now, that is all the deeper we will go!
Closing Thoughts
You may be surprised to hear that this is not paid content. I wrote this because I believe in Element. I believe that Matrix is going to have a HUGE part to play in the years to come. There are SO many (read too many) apps to keep track of. Many of them have ads or tracking built-in, or are limited to voice or text. Element, powered by Matrix, has it all. The integrations keep getting better. More and more bridges keep getting built (no pun intended, okay, maybe a little pun).
Open Source is the key. E2E (End to End Encryption) will ensure that your private conversations stay private… You know, I haven’t even mentioned the beautiful interface or that the Element Team releases new features on a frequent basis.
So go sign up and give Element & the Matrix protocol a try! When you get your account registered, be sure to look me up: itguyeric@one.ems.host
(This article was originally posted here and is used and updated with permission.)
I was recently asked, “Why call yourself the IT Guy? Why not just use your name?” Great question! In the professional world, we are encouraged to “build a professional brand,” I just took it to an entirely different level.
There were a few minor reasons. One of which is privacy. I initially didn’t want my full name publicized all over the Internet. However, I eventually realized that anyone that wanted to figure out who I was badly enough could follow the breadcrumbs to LinkedIn.
Linux Unplugged
Another more humorous reason was that I used to hang out regularly on Linux Unplugged, a live podcast that features a Mumble room for guests to jump on and be a part of the hosts’ discussion. When I first joined, I was “erich1527”. Little did I know that there was an Erich who worked with an open-source project and frequently came to hang out on the show as well. Having two Eric’s made it confusing for the host!
When the IT Guy was born, I worked full-time as a Systems Administrator and part-time trying to start my own IT Consulting company in the Kansas City area. Granted, the consulting business withered away as life changed, kids came into the picture, and priorities shifted. However, it gave me the branding I wanted to create!
I had a client at the time who had me handling an office move. When I walked in the day of the move, the lady behind the front desk leaned into the main conference room and, to her boss, said, “Hey the IT Guy is here.” I was hooked!
I loved how simple the name was: “Eric the IT Guy”. It was generic but appropriate. The IT Guy could be any of us who deal a lot with technology and trying to get it to work. (Obviously, some of you might have to be the IT Gal…but I digress.)
I had colleagues in the technology space who helped me find a voice. I borrowed equipment from them, recorded sample episodes, started appearing on podcasts as The IT Guy. It stuck. It felt right!
When I realized that the brand was working, I was at a DevOps conference here in Kansas City. I introduced myself as Eric, sporting my GitLab work t-shirt at the time. The dude I was chatting with said, “Wait. Eric…Eric…The IT Guy?” My response was a huge smile and “The one and only!”
Previous Recording Space
Some of you may laugh at the name Eric the IT Guy, but hey, it works. As the IT Guy, I try to help educate my fellow technologists. I try to bring exciting technologies to the forefront. I try to teach methodologies and techniques that can save you time and trouble that I dealt with as a Systems Administrator.
Do you need to give yourself some cool nickname or create a personal logo? Probably not. Do you need to network, build connections, and share your knowledge? Most definitely!
If you aren’t sure how to grow your network, you can start by adding me! I am just about everywhere as @itguyeric. Find me, let’s chat; that’s all it takes to get started! One person, one conversation.
For me, it’s meetings, household chores, ongoing projects, random lists, IMs, Emails, forum posts, social media (yeah, believe it!), whew. For years, I tried different tools and methods for tracking my to-dos. I was pretty good at it… Most of the time. It seemed like now and then, though, I would hit a breaking point and all the plates I had been juggling would fall to the floor, and I’d have to start over again.
Enter Todoist, a product which boasts you can “regain clarity and calmness by getting all those tasks out of your head and onto your to-do list (no matter where you are or what device you use).” To say that Todoist is a to-do list or even a project management application would be a gross understatement. Over the past few years, I have managed to shift from an anxious task tracker to a productivity power user.
I work a demanding job in a challenging field, host a podcast, a live stream, have a wife, four wonderful kids, and a few hobbies. Add on top of that the need to sleep, work out, and get things done around our house. I don’t say that to impress you. We are all busy. It’s a challenge. What I plan to unleash into your minds is a series of tools and methods I use every day to get everything done. We’ll cover Todoist, email management, ways to focus on tasks (like me trying to write this blog post), and much, much more.
Grab your caffeine and hold on tight. Here we go!
Why use a to-do list?
“I don’t need a to-do list. I have that list in my head.”
Pleeeaaase. No you don’t! We live in a world of CRAZY connectivity! Everything is always on all the time. Tweets, news, sports, YouTube, podcasts…and that’s just a short list only from the digital world! Many of us have multiple devices within a few feet of our favorite chair that spend their time lighting up, dinging, buzzing, and ringing. Attention spans and deep work are at an all-time low.
“So what, I can multitask.”
Sorry, Charlie! That’s a common misconception. What you are really doing is context switching. The more alike tasks are, the easier it is to switch between the two in a short space of time and with little productivity penalty. However, if you go from following a lively instant messaging thread about plastic versus metal dice for tabletop games to working on a 3-year business plan, you aren’t giving either your full attention.
Not only are you not giving either task your full attention, but you are also draining your limited energies for the day. You’re shifting gears between two very different tasks. That comes with a tax and lowers the quality of the finished product. We try to compensate for this by starting several tasks at once, then getting nothing done. Then, as inevitably happens to me, your youngest daughter bursts into your room and grabs your iPad off your desk! By the time you get her setup with her afternoon activity and get back to work, those 3 or 4 or 5 tasks have all fallen and shattered all over the floor. Now, you have to spend wasted time trying to pick up where you left off with each task!
“Eric, tell me there is a better way!”
Fear not, my young apprentices. There is a better way! To-do lists. Ta-da! That’s it. You’re welcome.
Oh, wait… You want to know which one? Okay, I got you. Sorry, I dropped the mic too soon.
How I found Todoist
I used to be stuck on Microsoft Outlook 2003. It had a decent task tracker… You could schedule tasks, set reminders, and eventually could even set tasks to repeat. It was okay. Eventually, I moved to Apple Tasks. It wasn’t as feature rich as it is today, but it got the job done and as a bonus synced to my mobile device. I’d also tried out Trello, but at the time couldn’t quite get a handle on how to use a task board (stay tuned, wink wink!). I also tried organizing projects into MS Project in college (yeah, I was that nerd), eventually projects moved into Evernote, and later Joplin.
Tasks and projects though are two different beasts entirely, but they are also connected! What I found I needed was a way to do both, preferably in the same tool. I needed to be able to do scheduling, track progress, and and and… My list of needs seemed to keep getting longer, how could any tool stand up to that!?
A friend of mine told me about this tool with a weird sounding name: Todoist. To-Do List without the L, clever, huh?
I had my doubts and, if I am being honest, was just looking for excuses not to use it. Strike 1 it’s not open source, strike 2 it’s a paid, cloud service. I told my friend this wasn’t looking good.
UI Screenshot, Todoist.com
However, I begrudgingly created an account, and what I found surprised me. It had a simple-yet-beautiful user interface (UI), incredibly intuitive layout, and many of the features I felt I needed out of a task management tool. I can remember setting aside my work for the rest of the afternoon; I needed to give this tool a proper test drive. A few hours later, I was sold, literally, I signed up for the Pro subscription right then and there.
I could set reminders, recurring tasks, could set labels or organize by project. I had a Today view, that really helped, so I didn’t see EVERYTHING I needed to do, just wanted I wanted to get through that day. Not only that, but I had multiple levels of tasks (projects, sections, tasks, sub-tasks, and priorities).
It didn’t stop there, though! Since becoming a Todoist customer, they have introduced Kanban boards. Now, instead of sections just being a “subproject”, I could use Agile practices to track my work across their typical life cycle, say from idea to outline, draft, edit, and ready to publish. I could set up email aliases for each of my projects, that way, when someone emailed me a task to complete, I could hit forward, add in some metadata, and hit send. Within a couple of minutes, that task was also captured by my Todoist.
Todoist released Calendar integration. This made it much easier to judge how much work I had to get done. The average work day for me ranges from 30 minutes of meetings, up to 6 hours some days. (Yeah, tell me about it! That’s a lot of meetings.) The problem was, those meeting heavy days I may try to schedule my usual 8-10 tasks and get only a couple of them done. Well, I don’t want meetings to break my streak!! No way! So, I started creating tasks for meetings. Attend a meeting, mark off a task. It kept the streak alive, but also helped me plan better – more meetings, fewer tasks scheduled that day.
Getting Tasks Organized
Like many, many human beings, I sat there that first afternoon, staring at this blank canvas. Now what? I can create anything, schedule it any time, what do I do!?
Eric’s Project List
After a brief battle with the void, I started out by creating projects for each major area of my life and color-coding them similar to my different calendar accounts I was already using: Personal (Blue), Work (Red), and General Tech (Green). For the most part, several years later, I still use roughly that same layout, though I have added a couple more top-level projects. For instance, I eventually added my content creation efforts like the Sudo Show and this blog to their own project.
The next easiest thing to do was to go into Apple Tasks and grab all the tasks I had stashed away in there. Take out the trash, submit a time sheet, etc. Short, recurring tasks were the first to come over. Put them in the right project, give them a due date, and move on to the next task.
The harder migration (at first) was how do I break up the projects on my plate and put them into Todoist? Fortunately, Todoist had me covered. Each project has sections. So, underneath my work project, I have a section for general tasks, for each of the engineering teams I support, meetings, and one for the live stream I host every other week.
I could then add my old projects as tasks inside each of these sections. From there, I learned how to break up a large task (like a podcast episode) into sub-tasks from researching the topic, writing the outline, following up with the guest, and eventually releasing the episode. This made it easy to break off bite-sized chunks of a task and get a little progress done each day! (Incredibly beneficial when you release a new episode every two weeks!)
While I was able to migrate a LOT of my ideas, tasks, and projects in the first couple of days, my approach to project planning, task execution, and idea tracking have evolved over the years. I’ll share more on that in a later post. Nowadays, I get between 10-15 tasks done a day. I have my paper notebook open every meeting to jot down thoughts or ideas, but I also have Todoist open somewhere (phone, tablet, web, or app) to make sure I grab any action items that I need to address. I constantly filter through my emails, ensuring nothing gets asked of me there. Anytime I get an IM with a request, into Todoist it goes!
Why Choose Todoist Brake Down (Graphic provided by Crazy Egg)
Want to get started?
I would highly encourage you to get started with Todoist. It’s an amazing tool fueled by a company of folks who are passionate about helping you get more done. They have frequent releases that improve performance, squash bugs, and are still adding new features! They’re used by Apple, NASA, and folks from all different walks of life.
Disclaimer: This link is an affiliate link. If you purchase a Todoist subscription, I get a small percentage. That being said, I would be greatly appreciative of you using my link as anything I make from it is set aside to be reinvested into my content creation efforts (gear, hosting, etc.).
My Reading List
Before you go, I wanted to drop one more idea into your lap: From the screenshots, you’ll notice an orange project called Reading List. Todoist is a great place to drop books, blogs, and white papers!
I have a recurring task to check my RSS feed for any articles that have been published from my list of sources. I probably get about 40+ articles delivered to my RSS reader every day and read probably 25% of them from top to bottom. That can stack up if I don’t keep up with it.
I also do a TON of research between work, the podcast, and my own curiosity. White papers, data sheets, etc. are a hugely popular way to share content these days. Fortunately, Todoist has me covered there too. Todoist supports attachments! If I have a market research report to review, I’ll download it out of my email and drop it in a task and assign a date, that way I am certain I get to it.
Finally, there is my backlog of 60-some-odd books that has been accumulating over the years, from fiction to marketing to parenting. Todoist has even helped me knock that list down from 90 to 60 in the past year or so. When someone recommends me a book, I grab the link from the Kindle website and create a task for it. When I start a new book, I create a sub-task for every chapter. Then, I schedule one chapter a day each workday until that book is complete. The last chapter marks the book task complete, and I move on to the next book!
To keep things interesting, I usually pull a book from each category in my list, then start back at the top. I hope one day to only have a handful of books in this project, but considering my appetite for learning, I doubt it!
Wrap Up
Over the past couple of years, my productivity has skyrocketed! I feel confident I can manage a wide array of tasks on a wide range of projects and still keep my sanity.
Todoist now has a hand in: meeting tracking, household chores, my reading list, podcast and content planning, social media scheduling, and learning. I track tasks from keeping my daily food log to changing the water filter every 2 months, to reminding me to renew that one subscription each year that requires manually requesting a renewal. I haven’t even begun working with a lot of the integrations available in Todoist!
One thing I hope to implement soon is ensuring that recreation and disconnect time become scheduled, recurring tasks in my Todoist so that I can keep the momentum going. Whether that is a day to turn off all my notifications and rest or take the kids to the park. It’s easy to get caught up in all the demands of this world and forget what is truly important: love, joy, fun, family.
Take this journey with me. If you are struggling, learn from my mistakes and my victories. I highly recommend Todoist, but it’s not the only tool out there. Find one that works for you, and let it help you make a difference in your life and in the lives of those around you!
I have loved video games my entire life. I got started on a Super Nintendo playing Super Mario Brothers and Super Mario Kart. That was the start of my #nerdlife. Haha!
It was great to sit down with Matt and talk D&D and play Terminator as part of my prep for a podcast. Not very often can you say leveling up is part of your show prep.
On this episode of Game Sphere I get the chance to talk with Eric from the Sudo Show. We talk a bit of DND and then we get into talking about Terminator Salvation and our first impressions of it after playing for a few hours.
We tend to associate free with good. That’s not the case though when what is free is unauthorized root-level access to your Linux systems! On January 26, 2021, a vulnerability, CVE-2021-3156, was disclosed that affects just about every Linux or Unix distribution that utilizes the sudo functionality.
TLDR: You need to update your operating system as soon as possible to ensure you have the patch.
Now that you have scheduled emergency patching windows for all your impacted systems . . . you did right? Let’s get into how this vulnerability works and what the potential impact is.
On a healthy system, you have to run a su command and provide the root password or have your account authorized in the /etc/sudoers file to gain administrative level access to a Linux system. The Baron Samedit bug, however, utilizes a buffer overflow in the Sudo logic to allow a non-privileged account to bypass this security mechanism and run commands with root-level privileges.
While running a sudo command in shell mode (either with the -s or -i argument), special characters must be escaped with a backslash / character. With this vulnerability, however, you can add an extra backslash to any command. This will cause sudo to skip the policy review step where it reads /etc/sudoers to ensure the executing account has sudo privileges. Now with ill-gotten access to root-level privileges, a bad actor could do anything to a compromised system.
You can test this for yourself by logging into a Linux system with a non-privileged account and running:
$ sudoedit -s /
If the prompt returns sudoedit: your system is vulnerable and needs to be patched. However, if your system returns a usage description, your system has been patched and is no longer susceptible to this attack.
sudoedit returns useage on patched system
This vulnerability was discovered by independent testing by Qualys Inc. an information security and compliance company. Their research found that Baron Samedit was actually introduced in version 1.8.2 released, get this, 10 years ago! This bug has been in the wild for almost a decade! It impacts legacy versions 1.8
Rarely do we see a bug with such a wide pool of targets. Sudo is utilized in Unix and Linux systems everywhere. This impacts popular distributions like Red Hat Enterprise Linux, Ubuntu, Debian, SUSE, Fedora, and so on. Even BSD and other Unix derivatives are not immune to CVE-2021-3145. The risk of any bad actor gaining root-level rights to your systems cannot be overstated. Once running as root, your system can become a slave to botnets, used for crypto-mining, or exploited to retrieve sensitive data.
the above table lists the packages containing the patch in the most popular distributions
If you would like to read more about Baron Samedit and the deeper, technical explanation of how this vulnerability was found and how it works, Qualys published an in-depth blog on their findings: CVE-2021-3156: Heap-Based Buffer Overflow in Sudo
You maybe wondering the same thing I was . . . Where in the world did Qualys get the name Baron Samedit? Turns out, it’s a play on sudoedit and Baron Samedi. According to Voodoo mythology, Baron Samedi is the Loa (god) of the Dead. He is a chaotic spirit who spends his time smoking, drinking, and well possessing others. This ‘spirit’ even attempts to ensnare everyone’s favorite secret agent, James Bond.
Baron Samedi from Live and Let Die
Just like 007, we need to overcome this new foe, Baron Samedit. Patch your systems…
Rocco was one of the people I instantly connected with in the open source community. His values and his love of the people in open source really resonated with me. Rocco really helped encourage me while finding my own voice.
We talked a LOT on this episode! We covered things from gaming to conferences to announcing the launch of the Sudo Show podcast!
In today’s episode of Linux Spotlight, I get to sit down with my friend Eric The IT Guy. Eric has been in the IT field for awhile and currently works for RedHat. We talk about his history in Linux, his job, Linux conferences and his new podcast called the “Sudo Show”.
I have some very exciting news to share with you all!
My name is Eric The IT Guy and I am a recovering Systems Administrator! I have over 11 years of IT experience ranging from Systems Administration and Engineering to technical sales and community advocacy, most recently, as a Sales Solutions Architect at Red Hat.
My mission as the IT Guy is to fight against burnout and poor work life balance. My goal is to promote methodologies and communities around DevOps and Open Source as well asn an endless supply of fun gibberish along the way. I have worked under all the cliche’d IT cultures – from nightmare on-calls to constant firefighting to teams that are as closed minded as the software they use. I’ve learned a lot from my more-than-a-decade of experience. I hope to share those stories and the lessons I learned with all of you to help make your lives and your organizations better.
Now with that said, here’s the news:
I am very excited to announce that I have joined the Destination Linux Network! If you’ve not heard of DLN . . . where have you been? It’s okay, I’ll just tell you. The Destination Linux Network is a media network powered by Linux and Open Source with a focus on bringing quality content to our audience to help you learn and enjoy the awesome technologies that we all have available.
On DLN, I’ll be one of the hosts of the Sudo Show podcast which will be your place for all things enterprise open source. As I said, I’ll be ONE of the hosts and joining me is Brandon Johnson, a fellow Red Hatter . . . oh did I mention I work at Red Hat? The Sudo Show is going to be an awesome podcast covering careers in IT, productivity, and enterprise technology. If you are just getting started or a seasoned veteran looking to “keep up” then you will certainly want to subscribe to the show! You can get our content on the DLN YouTube Channel or subscribe to the audio version wherever you get your podcasts.
In addition to the Sudo Show, I’m joining the team at Front Page Linux. I will be writing articles at Front Page Linux Dot Com; these will cover topics like avoiding burnout, ways to boost productivity, and how to impact your companies’ culture for the better.
Last but not least, we get to my Youtube Channel. I will be releasing periodic Vlogs there for more random content like an inside look at my experiences as a Solutions Architect.
I am excited to be joining such an awesome community. If you’d like to get in touch, just shoot an email over to Contact@Sudo.Show. You can follow me @ITGuyEric on Facebook, Twitter, LinkedIn, and Mastodon…just to name a few.
I can’t wait to get started, our first release is June 25th. I look forward to sharing my experiences with you and especially getting your feedback!
I spent over seven years in IT before I really started to understand the breadth of the industry. Technology gets a bad rap for being such a deep field but not necessarily a broad one. In fact, when I was attending college in 2009… Hold the phone… I graduated from DeVry University A DECADE ago! When did that happen!? Ugh, nothing like a personal revelation in the middle of a blog post. Any-who…the career advice I was given was there were two paths in front of me, eventually they would lead to: 1) becoming an architect, the system-designing ninja guru of a major enterprise or 2) becoming CIO of a major enterprise. Said another way, either you go the technical track or the manager track. It wasn’t ever really explained to me there were forks in those roads. Quite a few of them really! (In fact, a funny aside was that my the advisor for the first college I attended told me I wouldn’t ever be successful in IT because my higher math grades like Calculus, Trigonometry, etc. weren’t good enough. Jokes on them!)
While I am making light of a couple situations, these illustrate some very big issues in our culture, the corporate world, and our education system. (Disclaimer, I am not calling out DeVry in any sense. I loved my education and it set me up for great success. In fact, I was even crazy enough to go back and get a Masters from their graduate program.) In fact, any one person should only be limited by their own imagination or to quote the great philosopher, (Captain) Jack Sparrow: “The only rules that matter are these: what a man can do and what he can’t do.” Our rum-loving friend had a great insight. The more I learn about my career the more I realize I didn’t have a clue when I started out.
So, here’s the deal, I have been around the industry long enough to watch the shift from hardware to virtual machines to now cloud hosted workloads. I have worked within IT operations long enough to go from carrying a pager to two phones to an app-based on call rotation. I have seen the Internet go from a dial-up access to email and AIM to an essential element for virtually every industry. I have learned a thing or two along that journey and I really feel like I would be doing the industry a disservice to keep those lessons to myself. Heck, even writing that out made me think, “Hhmm, maybe I do know a couple of things!”
So, here is what I plan to bring your way. I want to address some issues that weigh on my mind: work/life balance, operational priorities, marketing buzzwords, career pathing, just to name a few. I want to share my experiences, make a few jokes, and deliver relevant news, content, and maybe a few tutorials along the way. I want to make my content available via blogs, vlogs, podcasts, conferences, whatever medium I need to use to help my fellow technologists find out where their passion and skills could best take them.
I had the pleasure of speaking at the Kansas City DevOps Meetup in downtown Kansas City! It was kind of like a coming home party. KC DevOps Days is where I got my start at GitLab and set me on a path towards a career I never imagined possible. This event, in the vault of the downtown library was my chance to share GitLab’s story to my local meetup. It was well received and even led to an impromptu demo of the GitLab product!
In the IT Industry, many incidents have been misunderstood or blown out of proportion due to poor handling of communications during and right after a crisis arises. The how, when, and how much communication can be the difference between a media frenzy and an outage that people work through and forget about. Ever since a database outage in January of 2017, companies and contributors have received timely and effective communication from Gitlab.
I gave my Busting Open Source Security Myths talk at DevSecOps Days Denver to a packed out auditorium. If was so well received, I decided to bring it back for Day 2 of SELF 2019!
Developers are constantly being asked to make more and more powerful applications. The more feature-rich the application, though, the more prone to risk it becomes. Many have thought the solution is to keep the code base locked up tight, that open source is undesirable. The truth, however, is quite the opposite! More eyes on code has proven to increase the quality and security of the modern application.