Build a golden image for your RHEL homelab with Image Builder

In How I built a homelab with Red Hat Enterprise Linux (RHEL), I laid out my plans for revamping my home lab using as many Red Hat Enterprise Linux (RHEL) and Red Hat-adjacent tools as I could get my hands on.

My goals are:

  • Learn the processes.
  • Teach others some systems administration good practices.
  • Automate my homelab as much as possible.

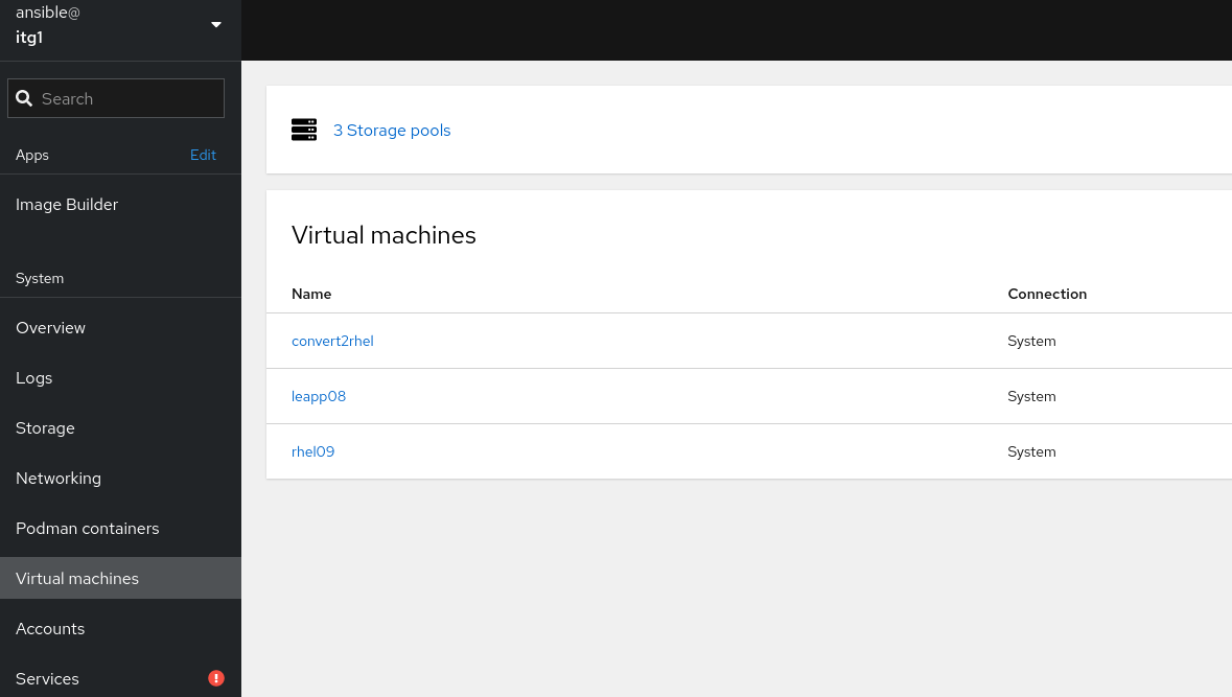
The first article covered my goals and the process for building a new “non-production” RHEL 9 virtual machine to act as a jump server and collection point for different configuration files, scripts, and the like.

I built a basic server and added only a few tools, such as the web console and Image Builder. In this article, I will focus on building a customized template that:

  1. I can deploy repeatedly.
  2. I can automate its upkeep.

What is Image Builder?

The short version is that Image Builder is the intended future installation experience for RHEL. Image Builder is not a product but a feature within the distribution.

With Image Builder, administrators can deploy different RHEL versions on different platforms (hardware, virtual, cloud) with different configurations. There are three ways to interact with Image Builder:

  • A web service through the Red Hat Console
  • A web-UI-based tool
  • A command line-based tool

Build the first image

A vanilla image should be enough to get started. This image undoubtedly will be one of many I create throughout this project. I’m starting with the web console (Cockpit) Image Builder application to get the ball rolling. The URL to connect to it is: https://{hostname}:9090/composer.

If you don’t have Image Builder installed yet, you can install it with DNF:

# dnf install -y cockpit-composer.noarch

Then enable the socket to start automatically:

# systemctl enable --now osbuild-composer.socket

Now you can access Image Builder using the web console:

Image Builder web console

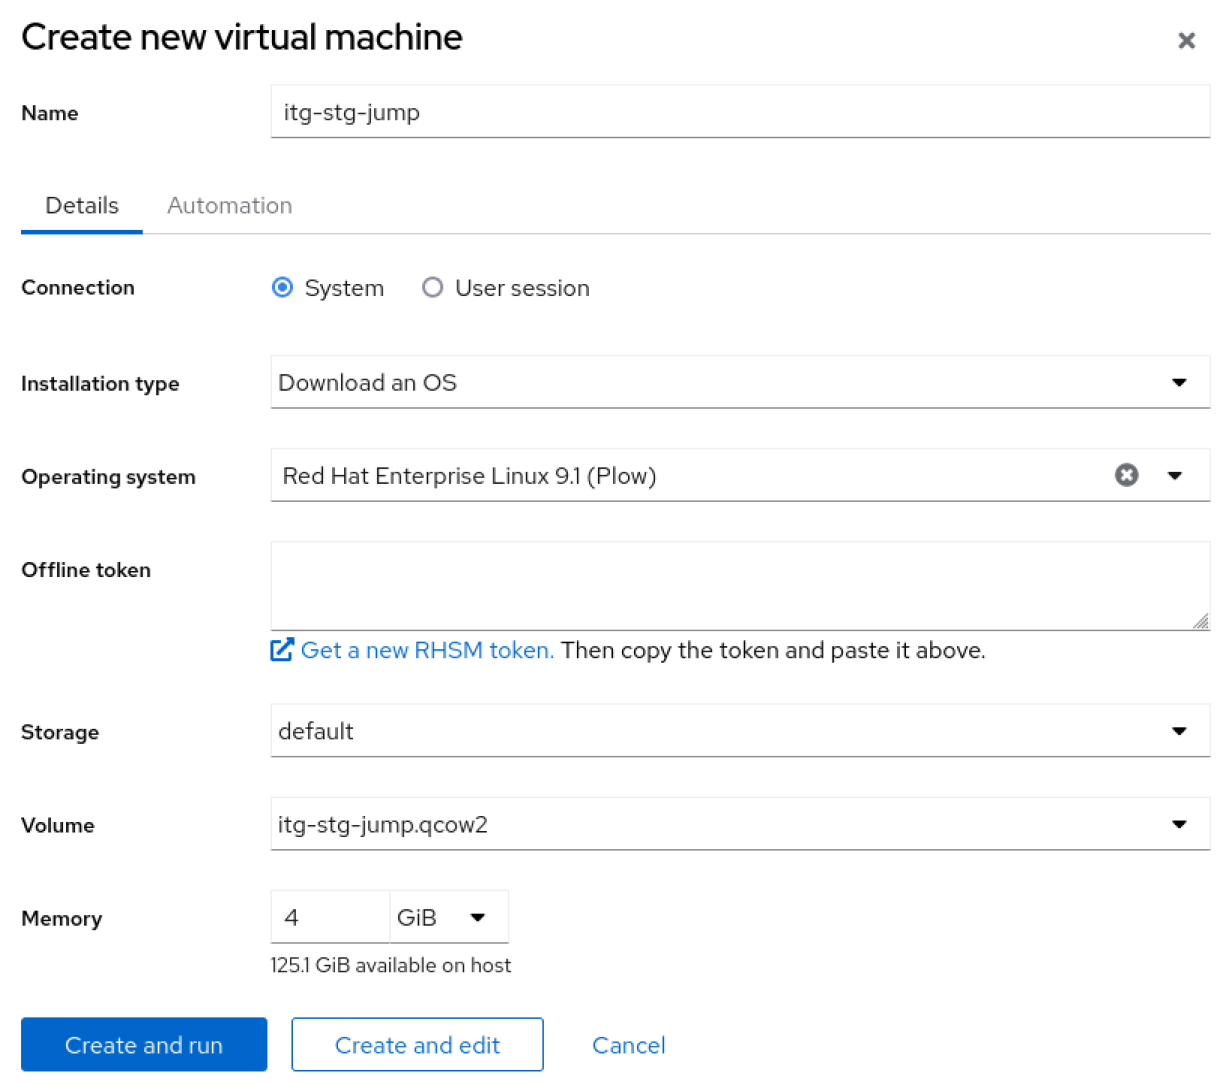
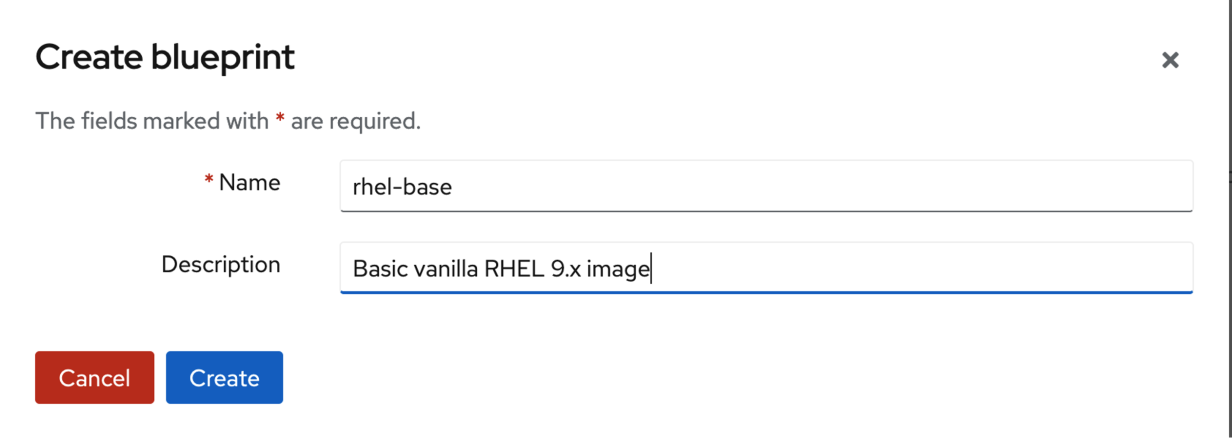
Use the Create blueprint wizard to define what the initial image should look like. Start by giving the image a helpful name and description:

Create blueprint with descriptive name

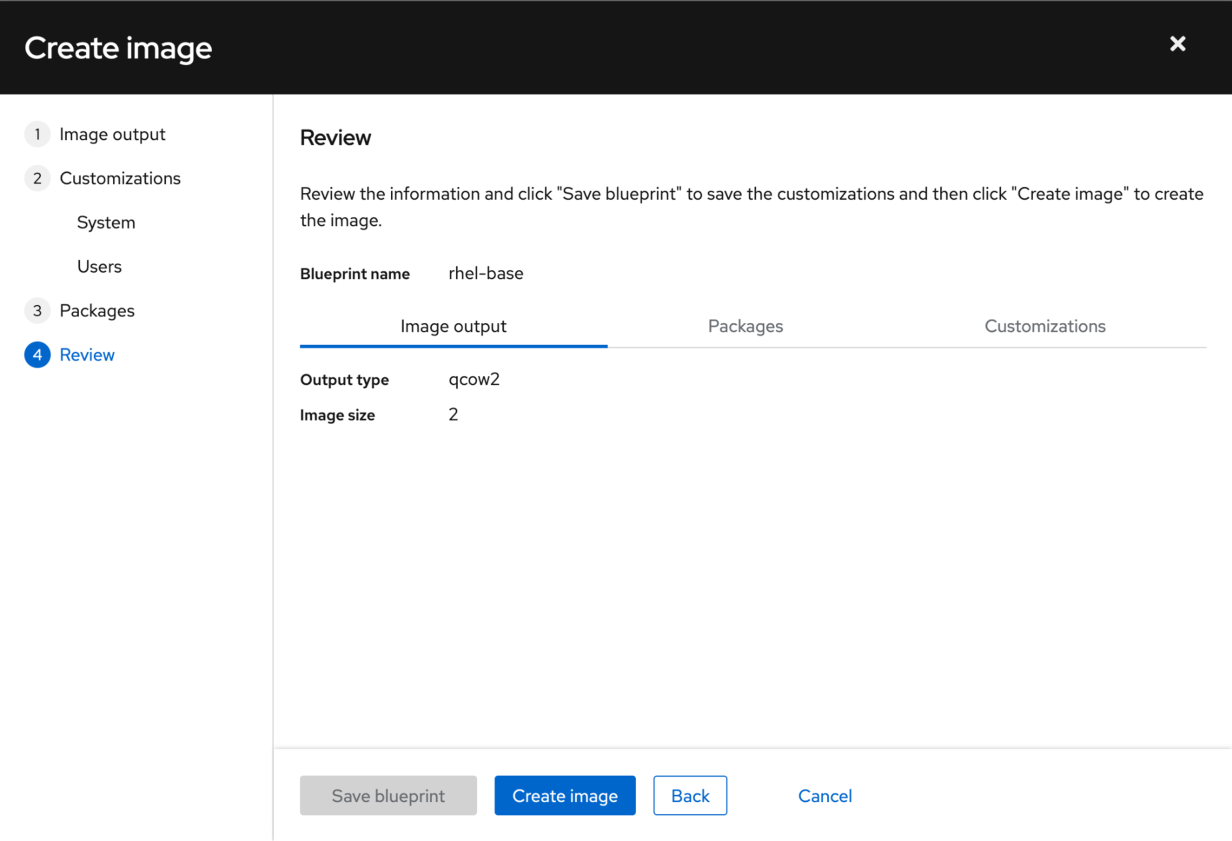
The next step is to decide what output format the image should be. Since my bare-metal server will be a hypervisor for my rebuilt lab, a QEMU-based qcow2 image makes the most sense; your environment may dictate differently.

Choose an image output type

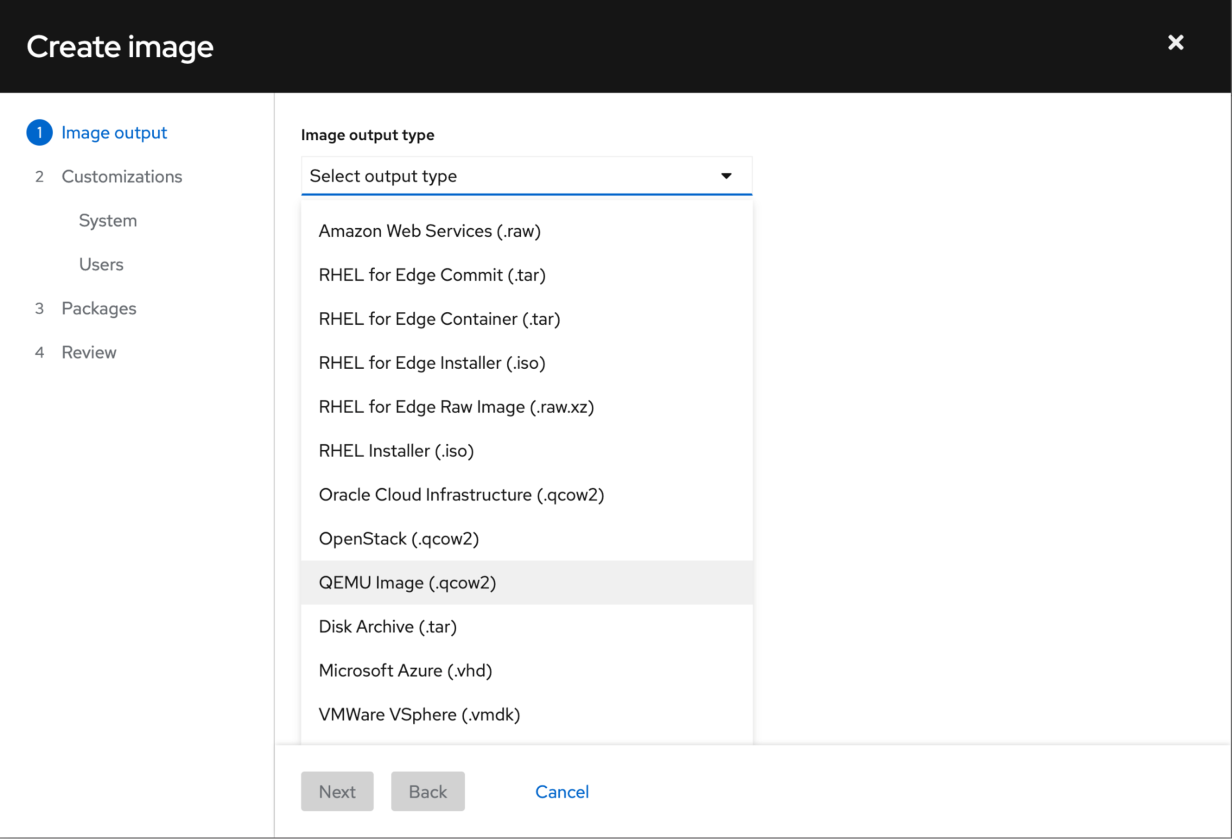
The first step in the wizard also asks what the Image Size should be. The default and minimum are 2GB. For now, this should be fine.

I’ll move on to customizations. The next screen shows the option to pick a hostname. I will leave this blank and assign a hostname later when I deploy these images.

Create image - set hostname

Next, define a user. I will create a service account named ansible so that I can easily deploy system roles across a small test environment (as I’ll do in the next article in this series).

Create image - set username and password

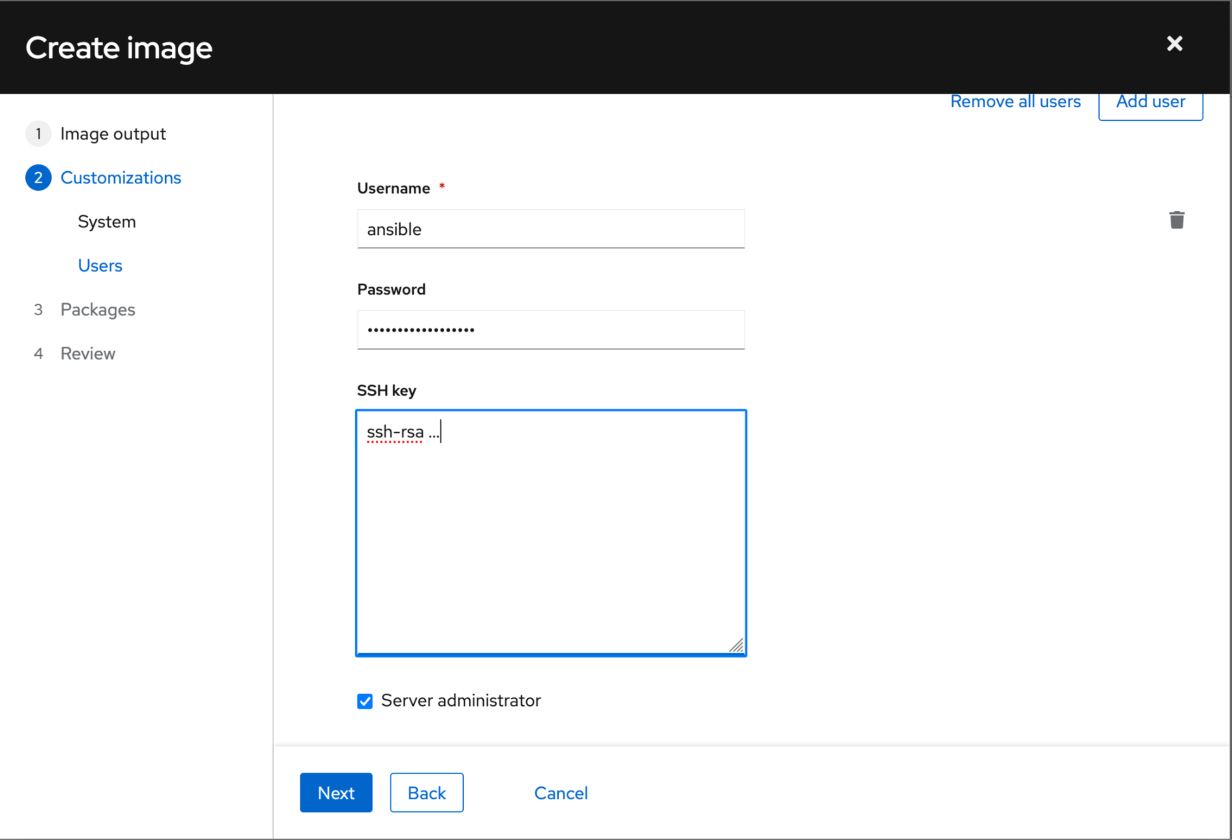
Don’t forget to assign a password and create an SSH key. Adding a key here provides everything needed to use the ansible account across the fleet. Also, check the Server administrator box to add the ansible account to the wheel group.

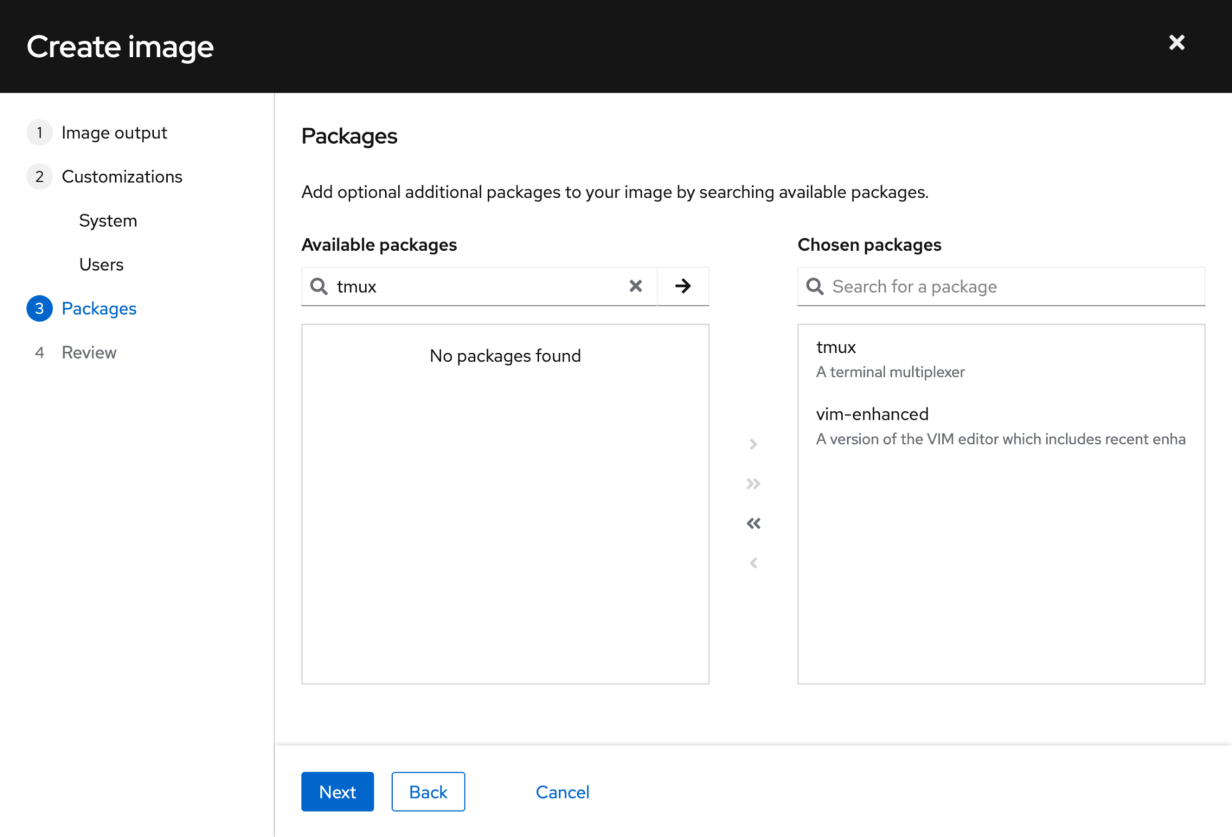
Next, I’ll add a few packages I want across my fleet. Again, your choices here may vary. I’ve only added a couple for now, such as tmux and vim-enhanced.

Create image - install packages

Finally, review the configuration and save the blueprint.

Create image - review settings

Create an image

You just created a blueprint for a RHEL 9 virtual machine (VM). Think of this as a recipe for a meal you will prepare. It’s time to try it.

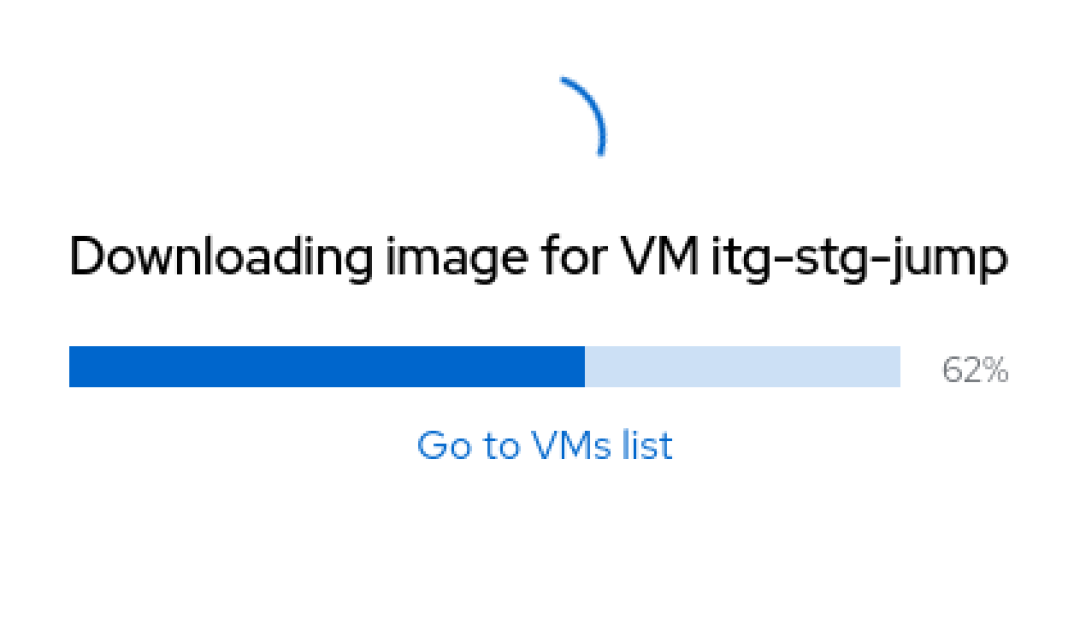
Either from the wizard you just walked through or from the main page of the Image Builder app, select Create image to begin the build process.

The image is added to the build queue
Image build progress

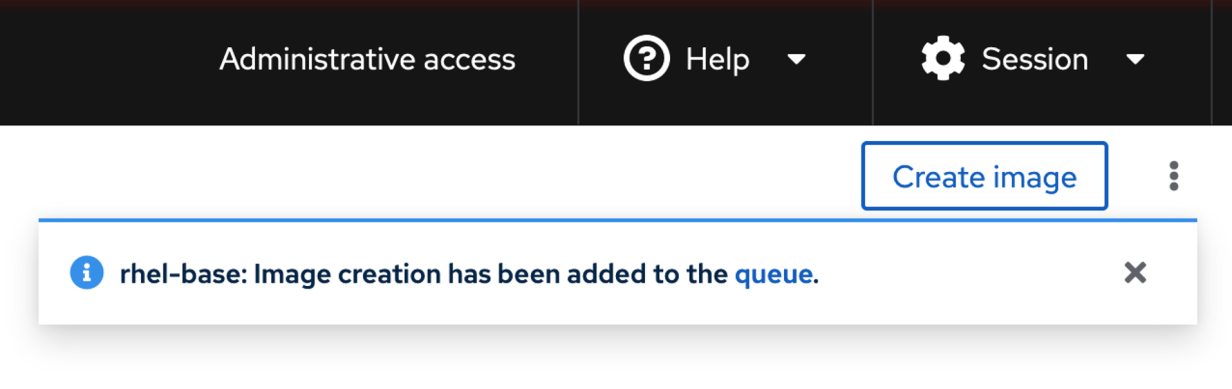
In the background, Image Builder pulls all the relevant packages from the Red Hat Content Delivery Network (CDN), defines the filesystem layout, and builds the boot image.

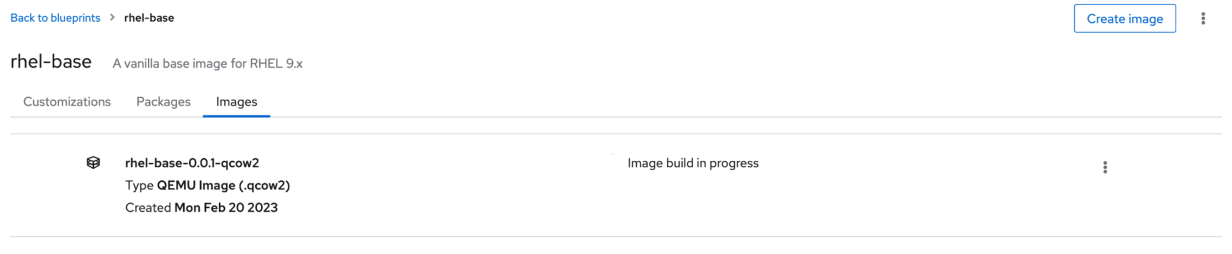
Depending on your hardware and internet connection, this process takes a few minutes. But when the image is complete, you won’t immediately have to go in and update all your packages.

Image build complete

Once the image finishes, you can use the qcow2 artifact to build the first test client machine. The easiest way is to use your browser’s Download functionality to grab the qcow2 file and upload it to your test environment.

Image build complete

However, I want to make additional changes to my image before deploying it.

Add features to the vanilla image

I want to ensure I have a well-defined image before deploying it repeatedly. To do this, I will switch tools.

The local, web-based Image Builder tends to be the slowest to get new features due to its ties to the RHEL release development process. It currently lacks a built-in mechanism for updating templates regularly. Remember, the goal for this lab is to operate as hands-off as possible.

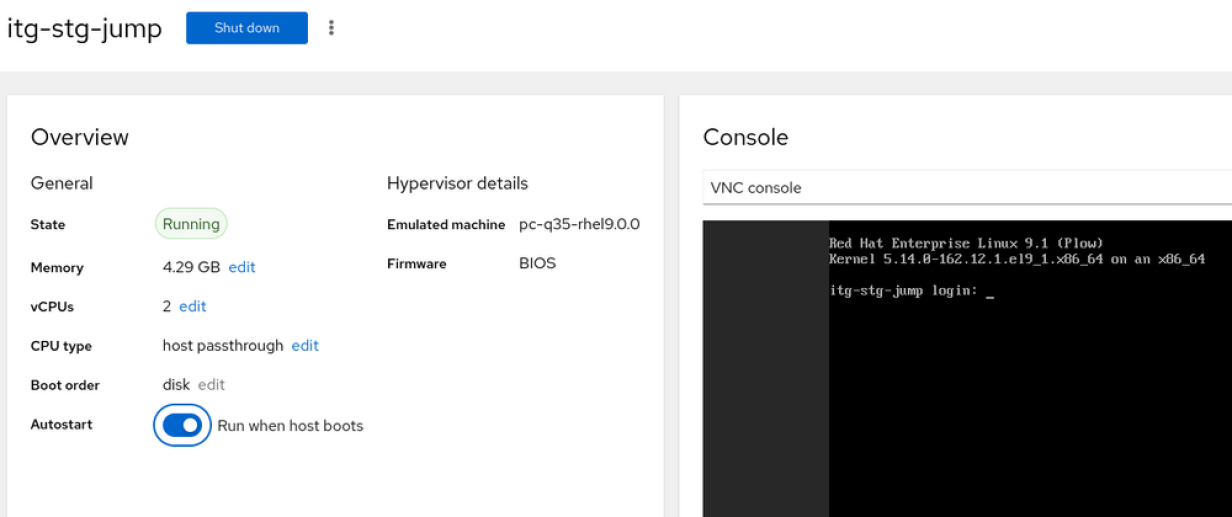
I’ll use SSH to connect to the jump server for this step. I don’t plan on this jump server living a long life, so I don’t have to worry about creating a user account or importing any of the preferences. This approach is not advisable for production or long-lived servers, but I’ll fix this later with the golden image.

I pulled some knowledge from a couple of different tools for this next part:

(In this industry, it is often not what you know, but whether you know how and where to find the knowledge you need.)

Next, install the tools:

# composer-cli blueprints list
rhel-base

# composer-cli blueprints save rhel-base

# vim rhel-base.toml

name = "rhel-base"
description = "Vanilla RHEL 9.x"
version = "0.0.2"
modules = []
groups = []
distro = ""

[[packages]]
name = "tmux"
version = "*"

[[packages]]
name = "vim-enhanced"
version = "*"

[customizations]

[[customizations.user]]
name = "ansible"
description = "Ansible Service Account"
password = " <redacted> "
key = " <redacted> "
groups = ["wheel"]

Make a few additions:

name = "rhel-base"
description = "Vanilla RHEL 9.x"
version = "0.0.2"
modules = []
groups = []
distro = ""

[[packages]]
name = "tmux"
version = "*"

[[packages]]
name = "vim-enhanced"
version = "*"

[[packages]]
name = "cockpit"
version = "*"

[customizations]

[[customizations.filesystem]]
mountpoint = "/var/log"
size = "4 GiB"

[customizations.services]
enabled = ["cockpit"]

[[customizations.user]]
name = "ansible"
description = "Ansible Service Account"
password =  <redacted> "
key = " <redacted> "
groups = ["wheel"]

I added stanzas for Cockpit (the web console) and an enabled services section to ensure the web console starts on boot.

You can add a 4GB filesystem for /var/log. (You can always add more later.)

Finally, add a user description for the Ansible service account. You can also check the documentation for additional customization ideas.

For now, though, import the modified blueprint and execute a build:

# composer-cli blueprints push rhel-base.toml

# composer-cli compose start rhel-base qcow2
Compose bb259a2e-cbd6-4fe9-99bf-3a9b28e2cbcf added to the queue

You can keep an eye on the build by running the status command:

# composer-cli compose status
bb259a2e-cbd6-4fe9-99bf-3a9b28e2cbcf RUNNING  Mon Feb 20 15:50:14 2023 rhel-base   	0.0.3 qcow2       	
209cfd00-a57b-4458-8de0-df0942e2cc65 FINISHED Mon Feb 20 15:05:26 2023 rhel-base   	0.0.1 qcow2        	2147483648

Once done, the build will show a FINISHED status like when the job kicked off from the web console earlier. I’ll hold onto the finished qcow2 image for the next article.

Automate future builds

Now I have a good image I can duplicate to build and test what will eventually become my golden image. This planned image will have as many of the latest updates as possible, the preferred packages, user data, and filesystems.

From there, I’ll be able to add more layers of packages and configurations to the base image to build out the different services I’ll be hosting in the lab.

However, I don’t want to worry about creating a new image manually. As the tool evolves, there will be better options for this, but for today, I plan on using systemd timer to build an updated image on a scheduled basis.

I’m adding a systemd timer to trigger a rebuild every Sunday night. (Did you know about creating your own systemd timers? I didn’t! I found the article Use systemd timers instead of cronjobs during my research!)

First, you need to create a systemd service to call the composer command:

# vim /etc/systemd/system/composerBuild.service

	[Unit]
	Description=Rebuilds a vanilla RHEL template through image builder
	Wants=composerBuild.timer

	[Service]
	Type=oneshot
	ExecStart=/bin/composer-cli compose start rhel-base qcow2

	[Install]
	WantedBy=multi-user.target

Second, create a systemd timer to call the service:

# vim /etc/systemd/system/composerBuild.timer

	[Unit]
	Description=Timer to rebuild vanilla RHEL template using image builder
	Requires=composerBuild.service

	[Timer]
	Unit=composerBuild.service
	OnCalendar=Sun

	[Install]
	WantedBy=timers.target

# systemctl enable composerBuild.timer

As a paranoid sysadmin, I want to verify that the timer is working:

# systemctl status *timer

… output truncated …

● composerBuild.timer - Timer to rebuild vanilla RHEL template using image builder
 	Loaded: loaded (/etc/systemd/system/composerBuild.timer; enabled; vendor preset: disabled)
 	Active: active (waiting) since Thu 2023-02-23 12:04:13 CST; 2min 14s ago
  	Until: Thu 2023-02-23 12:04:13 CST; 2min 14s ago
	Trigger: Sun 2023-02-26 00:00:00 CST; 2 days left
   Triggers: ● composerBuild.service

Keep in mind this is a “quick-and-dirty” approach. As I add tools like Ansible Automation Platform and Red Hat Satellite, I’ll have better options for automating the process of providing up-to-date templates to deploy.

Wrap up

I covered a lot of ground in this article. I am enjoying the process and looking forward to seeing what the lab looks like on the other side of this series!

Here, I talked about the ideas of a golden image and took steps toward building the first couple of client systems that I’ll use in the next article.

Next time, I will take the test systems and add RHEL system roles to the golden image. System roles are a codified method of configuring Linux subsystems such as firewalls and SSH using ansible-core and deploying these configurations at scale.

If you follow this series, I would love to connect with you. You can easily find me online.

This article originally appeared on the Enable SysAdmin blog.

5 ways to make an impact on your IT community

In 5 changes to help grow your IT career, I discussed establishing a learning mindset and forming daily habits to build your mental muscles. Learning will help you grow as a person (and hopefully as an employee), but work is not the extent of our existence.

People need people—in technology as much as anywhere else. So, how do you take your daily learning habits and use them to help others? I have a few thoughts on the topic. (I know. That likely won’t surprise anyone who knows me.)

1. Share your knowledge in the workplace

You can probably relate to this: When I was only a few years into my Linux career, I took a contract working for a company that had seen many turnovers in the preceding years.

The infrastructure was understandably behind in terms of refreshes and security patches. In and of itself, that would be a difficult task to overcome. However, that wasn’t the worst of it.

Several generations of systems administrators came and went after the original architecture was developed and implemented. I’m sure you can guess what comes next: Their documentation was… lacking. The original sysadmin was also a huge fan of scripting, custom compiling applications, and finding ways to over-engineer solutions.

Hoarding knowledge doesn’t make you a better operations person, nor does it keep your job more secure. Sharing information and ideas is essential to a healthy organization.

Even if you are a one-person IT shop, do you think you can remember every facet of every decision you make? For that matter, do you remember what you ate for breakfast yesterday?

How do you overcome this problem? Start an internal wiki, a Git repo, or at the very least, a text document on a shared drive.

Yes, that’s a lot of work, but take it from a recovering sysadmin; it’s worth it. Start with one process or one application at a time. Set a goal each week to add a little more. You’ll be amazed at how much knowledge you accumulate over a month.

2. Contribute to a publication

Guess what? Enable Sysadmin articles aren’t written by a highly trained team of bloggers who sit around a table at an undisclosed location and make this fantastic content. A small core team manages the site, reviews the content, and makes suggestions. The real heart of Enable Sysadmin is the community of dozens of volunteers who have a passion for a topic and write about it. (Yeah, I am not getting paid to write this blog. I am just passionate about growing and seeing others grow as well.)

3. Join a community

Some of my best ideas come in the wake of a conference or a meetup where I sit around a dinner table for hours chatting with fellow nerds and techies.

Inevitably, we talk about a problem one of us is facing, and someone else has a solution. I am just a person who loves writing and telling stories. However, I couldn’t grow without the help of those more competent individuals around me. (Yes, it’s usually me trying to do something dumb in my home lab and someone else bailing me out.)

Look online. Look in your city. There are meetups and communities for just about every conceivable interest. Some of my favorites are DevOps Days or Linux user groups (LUGs).

Can’t find one? Start a community! It’s not as complicated as it seems. Find a place to meet, pick a time, find something to talk about for 15 minutes, and invite your friends and or coworkers.

4. Volunteer

Many charitable organizations need help. Find an organization that focuses on an issue you care about and email them or call their office. Tell them what you have to offer and see what happens.

Not only can you make a real difference in your community, but you can also sharpen your skills in the process. (Yeah, that also looks good on a resume.)

5. Be a mentor

If you’ve been in IT for a few years, find someone new to the field and take them under your wing. If you are new to IT, find someone doing something you find interesting and introduce yourself.

Talk to your mentee. Form a relationship. Get to know their interests and their drives. You have more to say than you think you do. I owe much of my career to having trusted relationships around me, guiding me.

Many companies (Red Hat is one of them) have mentorship programs where you are matched with someone you can lead—or who can lead you—in a particular career path or technology.

Wrapping up

I am writing this on an international flight home from Tech Exchange, an internal Red Hat conference where technologists meet to learn about our product portfolio, grow their skills, and get to know one another. I got the chance to speak about many of the resources that the Red Hat Enterprise Linux (RHEL) technical team produces.

During one of the team dinners, a solutions architect came up to thank me for the work I was doing. Content I produced made an impact on his career. He felt more confident as a technologist and as a Red Hatter.

That moment was humbling to me. It wasn’t but a few years ago that I was on the other end of that conversation, where I was guided into my current career path by friends and co-workers. Busy and intelligent people saw more for me than I saw for myself.

Step out of your comfort zone. Make some human connections with people. The impact you have on them will also impact you.

This article was originally published on the Enable SysAdmin blog.

5 changes to help grow your IT career

Change is an intentional, methodical process. You don’t need to wait for a specific date, like New Year’s Day, to resolve to change something—you just need to make a list, and start making small changes today.

To do so, make a minor change, stick to it, then make another change. This builds momentum, and you can make even more changes. If you start making slow, intentional changes to your career now, when you look at 2023 in the rear view mirror, you’ll be amazed at how far you’ve come.

Disclaimer: I have been a Red Hat Enterprise Linux (RHEL)-focused sysadmin for most of my career, and I currently work for Red Hat. So there will undoubtedly be some bias on my list; even so, I am confident that the information below will be applicable no matter where you find yourself.

1. Broaden your horizons

As I mentioned above, start small. Make a simple change and stick with it.

  • Download an RSS reader (something like Inoreader or Newsify)
  • Find some blogs that cover topics you find interesting

One part of my daily routine is skimming the headlines of several news sites. This keeps me in the loop of what is happening in the technology industry. A few examples are Ars Technica, Opensource.com, and the New Stack.

I also review product and technical blogs. As a Red Hat-focused Linux sysadmin, I follow the Red Hat blog, especially the RHEL channel, and Enable Sysadmin.

While news sites help me keep up with the tech industry, these more technical sources help me learn about new releases or new skills.

Try to read a little bit each day. Do that for a week or so and try not to miss a day. This will help you build up your learning muscles and form a daily learning habit.

2. Learn a new task or feature

You are learning a little bit each day. Bite off a little more! Tech folks usually learn by doing, and luckily, there are tons of tools to help you learn how to do new things. The better news is a lot of them don’t cost a thing!

One of the best examples is the new Red Hat self-paced lab experience. This site provides dozens of labs you can spin up on demand for RHEL, Red Hat OpenShift, and Ansible.

For each technology, you’ll find everything from beginner labs to more complex labs. New to Linux? Learn how to create a new user. Want to install Red Hat Ansible Automation Platform? There’s a lab for that too.

These labs include instructions, links to additional resources, and a live terminal to try tasks out without needing a cloud subscription or homelab. They typically are self-contained and last 10 to 15 minutes. If you have a 60- or even a 30-minute lunch break, take 15 minutes and learn something new while you eat!

3. Take a class

Once you’ve made the first two skills part of your regular routine, I suggest it’s time to try something even crazier: Take a class.

It doesn’t have to be at a college or technical school. Plenty of online academies provide courses in topics across all platforms and disciplines.

Not sure where to start? Red Hat provides its Red Hat Enterprise Linux Technical Overview class at no charge. (See the disclaimer above regarding my admitted bias towards Red Hat.) Learn the basics of Linux and find out what learning is like within the Red Hat ecosystem.

4. Teach others

One of the best ways to really learn a concept is to teach it to someone else.

Take it from my experience; I didn’t realize how limited my knowledge and expertise were until I started podcasting about technology. Even now, years into my life as “The IT Guy,” I still learn something new almost every episode.

This is one of the more complex methods to implement. You could teach your kids about Linux and open source. Minecraft has a fantastic community around it to introduce coding concepts.

Join a Linux user group (LUG) or meetup; they often take turns sharing different topics and concepts with the group. (In fact, LUGs should probably be a point of their own.) Today, user groups exist in both physical and virtual formats.

5. Get certified

Many people find careers in technology because it keeps them close to the interests and hobbies we formed earlier in life. Others come to IT as a means of earning an income. Regardless of what brought you to technology, it helps to have a way to show others how much you’ve learned.

That is where certification comes into play. Now, I have to admit another bias here (although this one predates my time at Red Hat by at least a decade). Many certifications are multiple choice exams. When it comes to practical knowledge, they aren’t always a fair assessment of your skills. For hands-on tasks, a hands-on exam is the best way to go.

The Red Hat exams provide a lab system, a set of instructions, and a timer. You get so many hours to complete a series of tasks. They come in various difficulties and disciplines, such as Red Hat Certified Systems Administrator (RHCSA), Red Hat Certified Engineer (RHCE), and Red Hat Certified Architect (RHCA).

Wrapping up

You’re probably thinking, “Eric, what about?” or “Did you forget?” These are just a few ideas to get you started. I also wanted to focus on an aspect of these steps without overloading you with ideas while trying to establish a habit of learning.

Focus on one of these items at a time. Make them a habit. Add the next item to the list. See how that goes. When you look back on this process a year from now, I am confident you will be shocked at how far you’ve come.

I believe in you. If you are reading this article, you’ve already taken the most challenging step: You’ve admitted something needs to change. Keep at it; if you ever need any encouragement, my virtual door is always open.

In my next article, I’ll cover a related subject: making an impact. One of the most significant ways we learn is by teaching others, but we grow as human beings in community. This article focused inward, my next will focus outward and discuss how to impact, connect, and help others in their journey.

This article was orginally published on the Enable SysAdmin blog.

How I built a homelab with Red Hat Enterprise Linux (RHEL)

As a recovering sysadmin, the last thing I want is to end up being technical support at home. I often tell people that I wish I had the tools available in Red Hat Enterprise Linux (RHEL) now when I was a fresh Linux sysadmin.

So I’ve set a challenge for myself: to implement some of the best practices in our industry using only Red Hat or Red Hat “adjacent” tools, whether upstream or partner software.

My goals here are simple: I want to build out a homelab that:

  • Allows me to spin up virtual machines (VMs) in an unattended fashion
  • Provides demo-ready RHEL systems for topics I cover regularly (for example, in-place upgrades, Image Builder, and more)
  • Is capable of self-healing my home “production” services (including Plex, Valheim, and Home Assistant)

I hope this series will help you either with your homelabs or think differently about how you administer your employer’s infrastructure.

My old homelab setup

Currently, I have a single-node server running RHEL 9.1. Eventually, I need to rebuild this server from scratch. It’s packed with several TB of storage, 24 cores, and 128GB of RAM.

I have several RHEL virtual machines that I set up for demos I do at conferences, webinars, and live streams. These include a Convert2RHEL demo, in-place upgrades, and a sandbox system. I also have several Podman pods running that constitute my “production” services: Home Assistant, WordPress, Minecraft, and others.

I make copies of the qcow2 files for my VMs. My container pods are running as root. I have no offsite backups. The ol’ sysadmin inside me screams when I think about how inefficient this is.

Building my new homelab

Now, I’ve got some objectives; I have a plan (sort of). It is time to get started.

My existing server host needs to remain in place until I’m confident I can rebuild the services (and their applicable data) in an automated fashion. This bodes well for the project because I can build out the “next generation” of servers in isolation before introducing it into production.

In all the environments I worked in, I tended to build a jump or utility server to store all my tools and act as a single point to administer the rest of my environment. That is where I am going to start.

Since this utility server will be temporary, I want the quickest route to the live system. For me, that’s using the web console (the downstream of Cockpit) with the VM tool and a RHEL 9.1 ISO.

Screenshot of RHEL web console showing three VMs

I’ll select Create VM. Luckily, the web console makes it incredibly easy to spin up a new VM: Fill out a few fields and wait.

Screenshot of fields in the "Create a new VM" menu

What’s with the hostname, itg-stg-jump? Well, old habits die hard. Back in the day, I worked for a company that had servers in multiple datacenters. So the first stanza (itg) is the location. In this case, my homelab: the IT Guy. The second stanza (stg) is the environment, in this case Stage. Finally, the last stanza (jump) is the application it is running.

Screenshot of VM image downloading
(Eric “IT Guy” Hendricks, CC BY-SA 4.0)

If you are wondering, yes, I took all the defaults and the simplest configuration possible. There is no fancy filesystem layout or security profile. I will add all that to later iterations of my golden image.

Screenshot of web console showing running VM

While the system is booting up, I am going to go ahead and mark this VM to start on boot.

Bingo, I have a jump server ready for use. I am going to go ahead and install any available updates, install Git and Vim, and enable the web console.

# sudo dnf clean all && sudo dnf update -y
# sudo dnf autoremove -y
# sudo dnf install -y cockpit cockpit-composer

Then enable the web console and reboot.

# sudo systemctl enable --now cockpit.socket
# sudo reboot

Wrap up

I hope this article becomes a series of posts (and maybe some live coding events). In the next edition, I will revisit our utility server and build the first Image Builder blueprint. That will be the basis of all the other images and servers I will use in future posts.

This article was originally published on the Enable SysAdmin blog.

Containers: One Size Does Not Fit All

There, I said it! Containers won’t fix every application, they won’t replace your server farm, and sadly they won’t do your laundry.

Someone needed to say something in this world of marketing buzzwords and hype machines. “I volunteer as tribute.”

I work with a lot of container tools and platforms, and I have to say the technologies are fantastic! However, I was a SysAdmin for about a decade and worked in the MidWest to boot. (I say that because technology in the United States seems to start on the coasts and works its way to the middle of the country.)

Containers DO serve a great purpose: they isolate a running application into isolation and only give access to host resources that are absolutely necessary.

Containers DO make it easy to try out new technologies and applications. My home lab runs several web hosting tools (like WordPress and Hugo), gaming platforms, and home automation tools. To figure out which ones I liked best, I could spin up a basic image with a couple of commands.

Containers DO allow you to create applications that are self-healing, that can be deployed through automated pipelines, and provide for a dense application population.

However…

Containers DON’T replace the operating system. Guess what? The code running in containers is still Linux (and some are a few Windows images too). The orchestrator or operating system running underneath your container… an OS! The only question is how deeply that OS is obfuscated away.

Containers DON’T have a migration path like P2V (physical-to-virtual) did in the dawn of virtualization.

Containers AREN’T designed to absorb your 100GB legacy application that runs on an antiquated code base.

However…again…

I will say container technologies have come a long way in the last few years. The routes to production have become much more straightforward and more opinionated.

Container technologies are no longer the Wild West. So, while containers may not be a one-size-fits-all solution like the hype machine would have you believe, I do think there are a growing number of use cases.

I picture a long highway that stretches past the horizon. Each exit is a different stopping-off point for an individual workload. For instance:

Exit 1) Maybe you are a small business with a web server, a sales portal, and a backend database. Do you really need a 6-node Kubernetes cluster hosted on a cloud provider? I’d say not.

In this scenario, running a single server (with automated backups, of course) and running your workloads in a series of Podman pods would make sense.

Exit 2) At some point, you decide you want to start adding features to your sales application. Now, you may add 2 or 3 more servers to serve as Dev and QA environments. 

This exit is a little more crowded, but you can still get by with managing your container infrastructure by hand. 

Exit 8A) Let’s say your small sales company expands at a rapid and unanticipated rate. Your 3-4 pods with a couple of containers each are now at over a hundred pods with multiple containers each. You have measurable ebbs and flows of traffic throughout the day.

Do you really want to run each pod by hand? Do you really want your applications to run at peak capacity at 3 AM when you get no traffic to your web properties?

Now we start talking about container orchestration. Now we start discussing bringing in Kubernetes. Now you can build each of dozens of components by yourself, or you can look at the next exit:

Exit 8B) Each cloud provider has their own managed (read opinionated) implementation of Kubernetes, where all the hard decisions are made for you. 

All your operations teams have to do is spin them up, instantiate some users, and start deploying (grossly over-simplified, but you get the idea).

In fact, my company, Red Hat, has one of the coolest (in this dude’s opinion) container platforms out there: OpenShift! 

While I am just a Linux SysAdmin at heart, I can genuinely appreciate what containers and platforms like Kubernetes and OpenShift are trying to accomplish.

I host a live stream on Twitch and YouTube to talk about Red Hat Enterprise Linux. This next week, January 11th, we’re having some of the OpenShift team on to talk about running virtual machines on their platform! (See the comments for the link.)

I am in love with containers; my home lab lives by them. I believe it is necessary to take a realistic approach to move into the container space. One size does not fit all.

——

Disclaimer: This is an opinion piece of my own making. It is neither sponsored nor commissioned by Red Hat.

x  Powerful Protection for WordPress, from Shield Security
This Site Is Protected By
Shield Security