2 tools to manage infrastructure sprawl with Red Hat Enterprise Linux (RHEL)

For a systems administrator, it seems like every project brings new complexity, more servers, and more sprawl to manage. I will assume that your messes are a lot like mine: On one server, you’re running CentOS Linux 7 from a project several years ago. Over here, you have a handful of Red Hat Enterprise Linux (RHEL) 9 servers from a recent project. Over there, you have an Oracle RAC database running on Oracle Linux 8.

No matter where you look, you have a mix of different distributions on different major and minor versions. What is a hard-working sysadmin to do? Never fear; the IT Guy is here, and as Terry Bowling and I did in our 2022 Red Hat Summit talk, I will walk you through a couple of tools to help you bring some order to the chaos in your infrastructure.

Why I standardized on Red Hat Enterprise Linux

In all my years as a sysadmin, I’ve never had a better experience managing a Linux operating system than with RHEL. I know what you are thinking: “This guy works for Red Hat; of course, he would say that operating system is the best.” Rest assured, my love for RHEL long predates ever receiving a paycheck with a red fedora.

One reason is that RHEL is open source, which is critical to the development and sustainability of the entire Linux ecosystem and, to a real extent, the world of technology we enjoy. For another reason, Red Hat has always been a vendor I love talking to, in contrast to the ones I wanted to get out of the door as quickly as possible because all they cared about was the upsell.

If I were to start a business, manage a large bank, or control a space station, I would put RHEL at the heart of it. The main reasons are security certifications, an unmatched partner ecosystem, and a suite of management tools built right into the subscription in the form of Red Hat Insights.

I could talk about how much I love RHEL all day, but I’ll move along. Assume I have convinced you that RHEL is the way to go, so how do you standardize on it without rebuilding hundreds or even thousands of servers?

That is where the Convert2RHEL tool comes into play. Convert2RHEL is a supported utility that replaces existing packages with Red Hat-signed versions. So you can replace your CentOS Linux kernel with the RHEL kernel and a third-party MariaDB version with the Red Hat version. You get the idea. Modern systems can have anywhere from 500 to 1,000 or more packages, and the Convert2RHEL tool handles the conversion process. It also ties the converted system into your Red Hat Access account, allowing you to install packages, get support, and connect to tools like Insights and Red Hat Satellite.

I mentioned a crucial term in the paragraph above: supported. Convert2RHEL is a supported operation. If you run into issues, you can open a support ticket or even talk to Red Hat Consulting to get advice and build a plan for a standardized platform. Need to carry out a bulk conversion? You can automate the process with Satellite.

Get started with Convert2RHEL

To get started with Convert2RHEL, you can follow the commands and screenshots in this article or watch the complete process in this video:

I will walk through this process with a vanilla CentOS Linux 7 virtual machine (VM). To make life easier, before you do anything, ensure all your packages are up to date:

$ sudo dnf update -y

With that done, run three curl commands to pull down the GNU Privacy Guard (GPG) key, SSL certificate, and repository confirmation necessary to pull the convert2rhel packages from the Red Hat content delivery network (CDN):

$ curl -o /etc/pki/rpm-gpg/RPM-GPG-KEY-redhat-release https://www.redhat.com/security/data/fd431d51.txt
  % Total	% Received % Xferd  Average Speed   Time	Time 	Time  Current
                             	Dload  Upload   Total   Spent	Left  Speed
100  1855  100  1855	0 	0  11393  	0 --:--:-- --:--:-- --:--:-- 11380

$ curl --create-dirs -o /etc/rhsm/ca/redhat-uep.pem https://ftp.redhat.com/redhat/convert2rhel/redhat-uep.pem
  % Total	% Received % Xferd  Average Speed   Time	Time 	Time  Current
                             	Dload  Upload   Total   Spent	Left  Speed
100  7411  100  7411	0 	0  28684  	0 --:--:-- --:--:-- --:--:-- 28724

$ curl -o /etc/yum.repos.d/convert2rhel.repo https://ftp.redhat.com/redhat/convert2rhel/7/convert2rhel.repo
  % Total	% Received % Xferd  Average Speed   Time	Time 	Time  Current
                             	Dload  Upload   Total   Spent	Left  Speed
100   247  100   247	0 	0   1080  	0 --:--:-- --:--:-- --:--:--  1083

Now it’s time for the main event: The conversion. Be forewarned; depending on your underlying hardware and the complexity of your client install, this process could take some time.

$ sudo convert2rhel --org 12345678 --activationkey SuperSecret

I’ll break this command down. First, convert2rhel calls your newly installed tool. The --org flag allows you to specify your Red Hat Access organization ID, and --activationkey allows you to select a key. These two arguments let you register your converted RHEL server to your active Red Hat subscription.

For more information on using org ID and activation keys, check out the documentation.

Package conversions

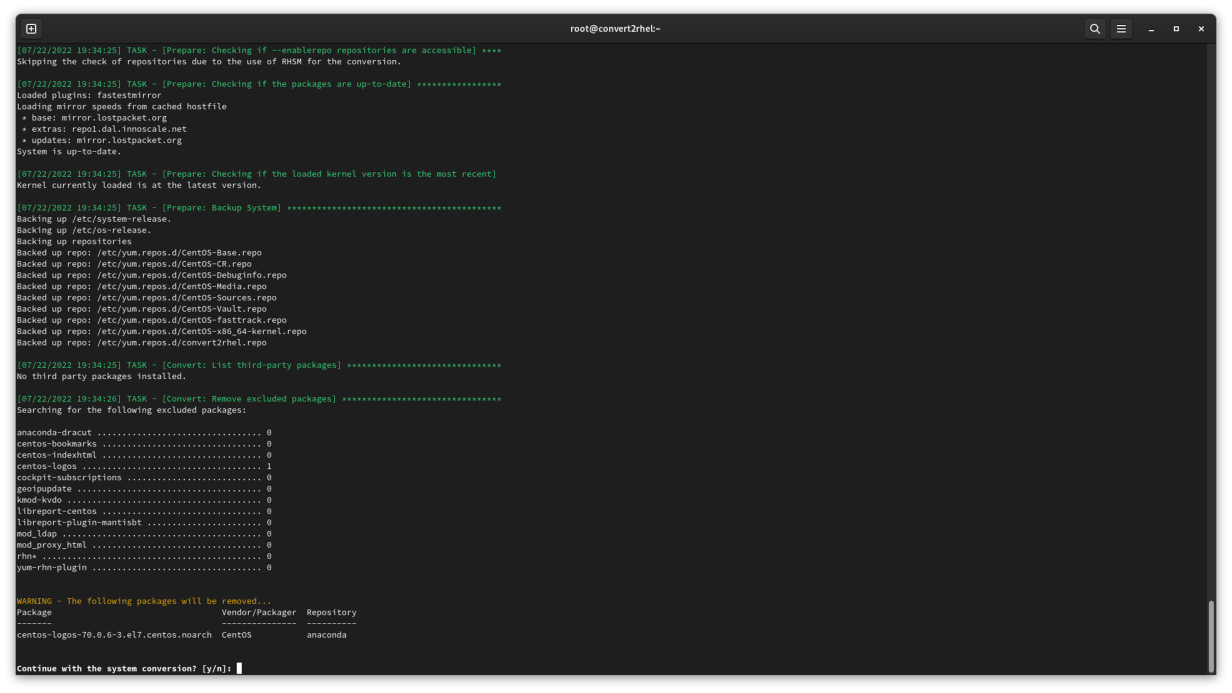
Once you start the conversion process, you are presented with the RHEL end-user license agreement (EULA) and asked if you are sure you are ready to proceed. Once all the preconversion checks are complete and the Red Hat packages staged, you can reboot the system.

Backing up packages

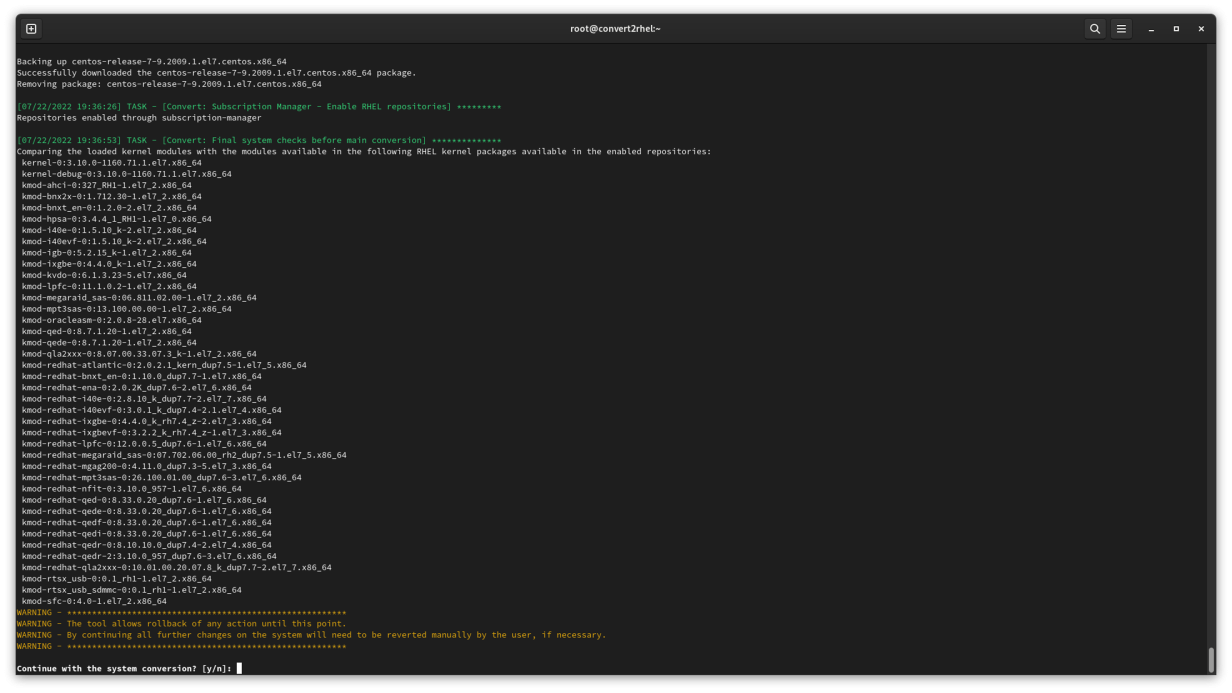
Up to this point, no changes have been made to the system. However, once you tell the instance to reboot, everything starts happening.

After you hit Enter, your system boots into a temporary environment. Convert2RHEL will replace all the CentOS-signed packages with their Red Hat-signed equivalents.

convert2rhel login

Standardize on major versions

That wasn’t so hard, right? Now that you’ve trimmed the number of distributions you have to manage to one, you need to do something about the environment’s version sprawl. You may have 7.9, 8.4, 8.5, 8.6… you get the idea. To give the newly standardized environment the most runway, consider upgrading all of your servers to the latest major version.

For one thing, RHEL 8 and 9 have a predictable lifecycle: five years of full support (such as new features and hardware enablement) followed by five years of maintenance support (for example, bug fixes and security patches). That gives you 10 years total. You can also expect a new minor version every six months and a new major version every three years. Since RHEL 9 was released in May 2022, you can expect RHEL 10 in summer 2025.

However, if the “latest and greatest” gives you pause, Red Hat has an Extended Update Support (EUS) release. This allows you to upgrade to a minor version with two years of support.

A predictable release cadence makes life easier for operations teams. Remember having to make the switch from init to systemd? Yeah, frustrating. What was that command again? Oh, wait, no, that was that other server. Is this server running Podman? Nope, no containers. I feel your pain.

How can you relieve those annoying issues and provide your infrastructure with a steady state of major release cycles?

Do in-place upgrades with Leapp

There is also a supported utility to help sysadmins navigate from one major version to the next. That tool is Leapp, a solution for in-place upgrades.

Why do an in-place upgrade versus a clean install? It’s cheaper, and I don’t mean dollars. I mean your time. Your time and energy have great value. With a new build, you must install all your packages from scratch, create all your users (with passwords), and reapply all the little tweaks and configuration changes. It takes time and effort that you could spend doing so many other things.

The Leapp utility is available from the Base OS repository on RHEL 8 systems and in an add-on repository for RHEL 7 systems with a dnf install command. Leapp is also a supported operation, so if you run into trouble, you can always reach out to Red Hat’s support teams to get a fresh set of eyes.

One other aside: Leapp for RHEL 7 and 8 means you can take a RHEL 7 box, upgrade it to a RHEL 8 box, and then rerun Leapp to get to a RHEL 9 server. Granted, that depends on the workloads, library versions, and other factors you may be running.

Note: If you want to see the upgrade process for RHEL 7 servers, check out this video:

If you already have a RHEL system registered and up to date, it is an easy process to install the Leapp utility:

$ sudo dnf install -y leapp-upgrade

To evaluate that an in-place upgrade will be successful, the tool’s preupgrade assistant audits all your packages, repositories, and configurations to identify potential pitfalls or blockers that may interfere with a successful upgrade. The tool helps you identify issues that could cause failures.

package check

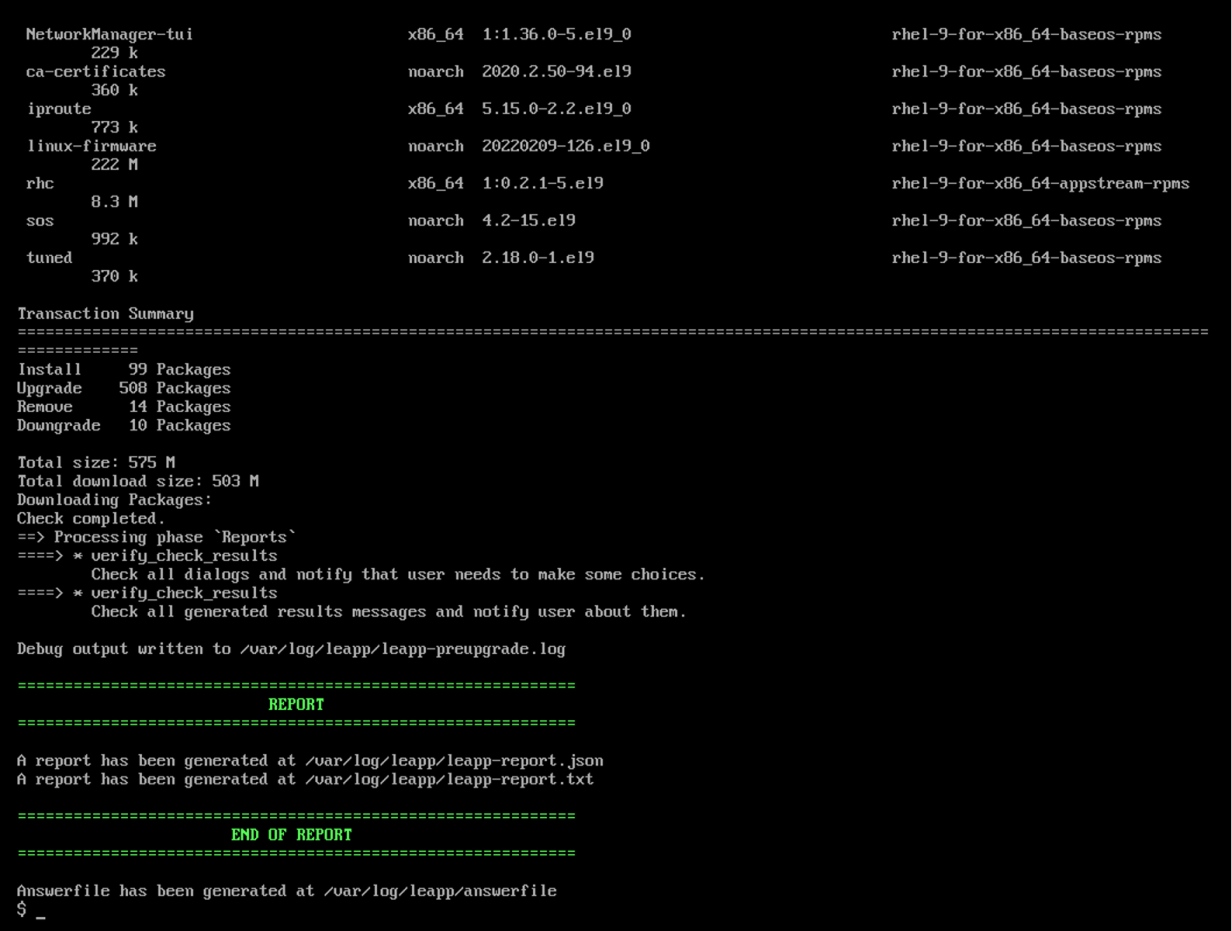
When the preupgrade assistant shows no inhibitors, you can proceed with the upgrade. If it identifies an inhibitor, you can get the details in the /var/log/leapp/leapp-preupgrade.log file. You can also add workarounds or skip certain operations by adding those options to the /var/log/leapp/answerfile. This option makes the upgrade process less manually intensive. Not only will this tool help you identify potential issues, but you can also take those notes and feed them into an answer file to further automate this process.

With the upgrade assessment in the green, start the upgrade. I like to add the --reboot option so that I don’t have to manually reboot the system after the upgrade process begins:

$ sudo leapp upgrade –-reboot

At this point, Leapp gets to work. This process may take some time, depending on the size and complexity of your installation. It downloads all new packages, from the kernel to OpenSSL to Vim and more. It also builds a new boot image to support the new environment.

upgrade process

Once the packages are all in place and the new boot image created, all that’s left is for the system to reboot itself. When you return to a login prompt, you are ready to go!

RHEL 9 login

Wrap up

Sitting on the floor next to my desk is a workstation that has been running since Fedora 29. I’ve done in-place upgrades up to Fedora 36, and the process has gotten better, faster, and more accessible. This is the foundation of the Leapp tool for RHEL. Red Hat depends heavily on upstream communities to help shape the future of RHEL.

Convert2RHEL and Leapp have seen a lot of adoption in the community and received a steady amount of engineering attention, making the process faster and easier. These two tools aim to help make your job easier by managing that infrastructure sprawl, cutting down technical debt, and providing a firmer foundation for any workloads thrown your way.

What will you do with all that newfound free time? Will you take that vacation? Learn a new technology? Knock out other projects? Or just take a nap? There is no wrong answer. As sysadmins, it is our job to enable our businesses to be successful, but that doesn’t mean we should have to toil!

Head to the migrations page and start planning your standardization project today!

This article is based on What’s new with Red Hat Enterprise Linux migrations: Convert2RHEL and Leapp upgrades, presented at Red Hat Summit in May 2022 and was originally published on the Enable SysAdmin blog.

Overcoming vulnerabilities with live kernel patching in Red Hat Enterprise Linux 8.5

IT operations folks strive to not only maximize uptime but also keep systems patched. These might seem like competing goals, but we’re here to help with Live kernel patching in Red Hat Enterprise Linux (RHEL) and enjoy some improvements with live kernel patching in RHEL 8.5.

You can use a built-in tool to get update the kernel on RHEL systems with no downtime. That tool is live kernel patching (kpatch). Kpatch has been a part of our operating system for some time now (since RHEL 8.1, 7.7). However, with RHEL 8.5 (and the 9.0 Beta), there are some significant enhancements.

To catch the rest of my article, head over to the Red Hat blog here!

Ansible Beginner’s Guide: Automate the Pain Away

Way back in the day, humanity created computers to help make our lives easier. In a lot of ways, they have; in others, it’s made life much more tedious, especially for the SysAdmin. What used to be a mainframe has turned into hundreds of servers, containers, and virtual machines spread across data centers, clouds, and even laptops!

Never fear, Infrastructure as Code (IaC) is here. Tools like Ansible have been around for over a decade or more but in the past few years they have really picked up speed. Ansible is a simple, efficient approach to automating and standardizing our environments while cutting down on the time, increasing reliability, and removing the human error factor from operations and deployments!

My Story

Probably around 2012 or so, I was a rookie Linux Systems Administrator just making the move away from managing Windows servers and desktops. I remember how much fun patch days were…at first. We got to take the morning off, spend an evening at our off-site data center, order in some Jimmy John’s, and once the corporate office closed, start patching systems. We ran CentOS, RHEL, Oracle Enterprise, and maybe even an Ubuntu system or two.

Looking back, it was actually an unnecessary time suck! Why!? Patch a couple of hundred servers, by hand, rebooting systems manually, and hoping that nothing broke because the application and database administrators were already at home enjoying the end of their workday. The one saving grace at that point was Tmux (an amazing tool to manage multiple terminal sessions at once). At least then I didn’t have to type yum update 200 times!

I guess Charles Dickens might have said of my career: “It was the best of times, it was the worst of times…” I finally got to focus on Linux Servers, bye-bye Windows, but who wants to spend their Thursday nights patching a couple of hundred servers by hand?

That’s not why you’re here, though. You all know I have my SysAdmin scars and I wear them with pride because now, I get to share amazing lessons I learned (or in today’s case should have learned back then). Today, I want to introduce a tool that could have taken our patching times from 6-7 hours down to what could have been less than an hour. Even more, that process could have been completely automated!

What is Ansible?

Ansible is a project bred from the idea that all infrastructure (even security, networking, and cloud) should be code. In other words, if you think of your lab, network, enterprise, whatever as a restaurant, Ansible would be the recipes the cooks used to make every dish. Ansible is written predominantly in Python and utilizes YAML or “YAML Ain’t Markup Language” (who doesn’t love a good recursive acronym?) for its playbooks.

Ansible, not to be confused with the Red Hat product Ansible Automation Platform, is an open-source project that runs across most Linux and Unix systems as well as Mac and Windows and even networking gear, clouds, and security appliances! The list of modules and supported platforms grows with every release.

[ansible@fedora-server-34 ~]$ ansible --version
ansible 2.9.21
  config file = /etc/ansible/ansible.cfg
  configured module search path = ['/home/ansible/.ansible/plugins/modules', '/usr/share/ansible/plugins/modules']
  ansible python module location = /usr/lib/python3.9/site-packages/ansible
  executable location = /usr/bin/ansible
  python version = 3.9.5 (default, May 14 2021, 00:00:00) [GCC 11.1.1 20210428 (Red Hat 11.1.1-1)]
[ansible@fedora-server-34 ~]$ 

The name was inspired by Rocannon’s World, a novel by Ursula K. Le Guin. In the 1966 novel, ansible was a fictional, instantaneous communication system. Ansible would later become the name of the open-source tool. Michael DeHann, the original developer decided to build a company around his new tool and with the help of Said Ziouani and Timothy Gerald founded AnsibleWorks Inc. Later, the company was renamed Ansible Inc and eventually was acquired by Red Hat in 2015.

Why Ansible?

Ansible burst onto the field in an age where Infrastructure As Code (IaC) tools seemed to be everywhere. However, Ansible had a few attributes that set it apart from its competition.

For one, Ansible is agent-less. In other words, there is no software to deploy across your enterprise. You could install the Ansible package on your laptop and manage thousands of servers across bare metal, virtual machines, and even the cloud!

Being agentless also opened the door for another advantage: Ansible utilizes OpenSSH to execute remote commands instead of proprietary or platform-specific tools.

Thirdly, Ansible set itself apart by choosing simple, YAML-based text files to define its environments and code. Want to have a pre-defined list of servers to manage? Add it to an inventory file! Want to use Ansible to create a user, set its password, and add an SSH key? Write a playbook. Want to have support for different environments (dev, prod, etc.)? Easy, just create a variable file!

Getting Started

Did I sell you on how easy and awesome Ansible is? Good, because here is the entrée for today’s meal: Let’s install Ansible and use Ansible to add a package on our local system. For the sake of this demonstration, I’ll be using one of my favorite server distros, Fedora Server, specifically Fedora 34. Ansible is available for most major distros, so, consult your package manager to find the correct package.

The first step is to install the required Ansible package and its dependencies:

[ansible@fedora-server-34 ~]$ sudo dnf install -y ansible
Last metadata expiration check: 0:05:30 ago on Tue 22 Jun 2021 04:13:57 PM CDT.
Dependencies resolved.
===============================================================================================================================================================================================================
 Package                                                    Architecture                                Version                                             Repository                                    Size
===============================================================================================================================================================================================================
Installing:
 ansible                                                    noarch                                      2.9.21-1.fc34                                       updates                                       15 M
Installing dependencies:
 libsodium                                                  x86_64                                      1.0.18-7.fc34                                       fedora                                       165 k
 python3-babel                                              noarch                                      2.9.1-1.fc34                                        updates                                      5.8 M
 python3-bcrypt                                             x86_64                                      3.1.7-7.fc34                                        fedora                                        44 k
 python3-cffi                                               x86_64                                      1.14.5-1.fc34                                       fedora                                       244 k
 python3-chardet                                            noarch                                      4.0.0-1.fc34                                        fedora                                       214 k
 python3-cryptography                                       x86_64                                      3.4.6-1.fc34                                        fedora                                       1.4 M
 python3-idna                                               noarch                                      2.10-3.fc34                                         fedora                                        99 k
 python3-jinja2                                             noarch                                      2.11.3-1.fc34                                       fedora                                       493 k
 python3-jmespath                                           noarch                                      0.10.0-1.fc34                                       updates                                       46 k
 python3-markupsafe                                         x86_64                                      1.1.1-10.fc34                                       fedora                                        32 k
 python3-ntlm-auth                                          noarch                                      1.5.0-2.fc34                                        fedora                                        53 k
 python3-ply                                                noarch                                      3.11-11.fc34                                        fedora                                       103 k
 python3-pycparser                                          noarch                                      2.20-3.fc34                                         fedora                                       126 k
 python3-pynacl                                             x86_64                                      1.4.0-2.fc34                                        fedora                                       110 k
 python3-pysocks                                            noarch                                      1.7.1-8.fc34                                        fedora                                        35 k
 python3-pytz                                               noarch                                      2021.1-2.fc34                                       fedora                                        49 k
 python3-pyyaml                                             x86_64                                      5.4.1-2.fc34                                        fedora                                       194 k
 python3-requests                                           noarch                                      2.25.1-1.fc34                                       fedora                                       114 k
 python3-requests_ntlm                                      noarch                                      1.1.0-14.fc34                                       fedora                                        18 k
 python3-urllib3                                            noarch                                      1.25.10-4.fc34                                      fedora                                       175 k
 python3-xmltodict                                          noarch                                      0.12.0-11.fc34                                      fedora                                        23 k
 sshpass                                                    x86_64                                      1.09-1.fc34                                         fedora                                        27 k
Installing weak dependencies:
 python3-paramiko                                           noarch                                      2.7.2-4.fc34                                        fedora                                       287 k
 python3-pyasn1                                             noarch                                      0.4.8-4.fc34                                        fedora                                       133 k
 python3-winrm                                              noarch                                      0.4.1-2.fc34                                        fedora                                        79 k

Transaction Summary
===============================================================================================================================================================================================================
Install  26 Packages

Total download size: 25 M
Installed size: 143 M
Downloading Packages:

<<< Output Truncated >>>            

Complete!
[ansible@fedora-server-34 ~]$

Excellent, feel the power yet? Let’s get a little crazy. Let’s write a playbook. Let’s install a package!

I really like htop. It is a “graphical” tool that, in this author’s opinion, makes it much easier to read and understand the output of the top command.

Luckily, it’s available from the default Fedora repos. So, using your favorite text editor, create htop.yml:

---
- name: installing packages
  hosts: localhost
  become: yes
  tasks:
    - name: install htop
      package:
        name: htop
        state: latest

What’s all this mean? Let’s break it down line by line. Make sure to start your playbook with three hyphens (-), then name tags are just that, it lets you know what task is being run to make it easier to understand the output (and especially troubleshoot any problems). Next, we have the hosts. For this super-simple example, we are only calling localhost. This could also call any number of hostnames or groups listed in an inventory file. Become is basically your sudo command. If you set Become to yes, Ansible will run with administrative privileges. Otherwise, the playbook will run as whatever user calls the playbook.

Under tasks, we have another name tag. We are calling the package module. This is what is so cool about Ansible; you can actually build playbooks that will run over differing distributions! The package module is intuitive enough to know what your system’s package manager is: apt for Ubuntu, yum for CentOS, dnf for Fedora, and so on. Next, we call the package, in our case, htop. The final line is the state of the package. We can set this to a specific version, to absent (if we don’t want the called package installed), or latest, which (you guessed it!) means the package will be on the latest version.

Now, save your config file, and let’s run our playbook:

[ansible@fedora-server-34 ~]$ rpm -qa|grep htop
[ansible@fedora-server-34 ~]$ ansible-playbook htop.yml 
[WARNING]: provided hosts list is empty, only localhost is available. Note that the implicit localhost does not match 'all'

PLAY [installing packages] ************************************************************************************************************************************************************************************

TASK [Gathering Facts] ****************************************************************************************************************************************************************************************
ok: [localhost]

TASK [install htop] *******************************************************************************************************************************************************************************************
changed: [localhost]

PLAY RECAP ****************************************************************************************************************************************************************************************************
localhost                  : ok=2    changed=1    unreachable=0    failed=0    skipped=0    rescued=0    ignored=0   

[ansible@fedora-server-34 ~]$ rpm -qa|grep htop
htop-3.0.5-4.fc34.x86_64
[ansible@fedora-server-34 ~]$

You can see htop is not installed before we run our playbook, then after we run it, htop is indeed present!

Wrap Up

So, there you have it. You now have the power to go out and install a package on any SSH-enabled host system. Go forth and blow people’s minds! When you take this simple example and zoom out, you start to see the sheer power that Ansible can bring to a Systems Administrator. Step aside, Luke Skywalker, we don’t need the Force anymore to move your X-Wing. We’ll do it with Ansible!

Okay…That may be over the top. However, I can’t overstate the truth: Build out your playbooks. Grow your Ansible skills. The rule is, if you have to do a task more than once: AUTOMATE IT! Stop installing packages by hand. Quit wasting your time bootstrapping servers by copy-pasting commands out of a shared document. Take those commands, add in some Jinja-variable goodness, and let computers do what they were meant to do: make the lives of humans easier.

Need some more ideas to get you going? No problem! Ansible has AH-MAZE-ZING documentation and an awesome Getting Started landing page.

Like a terrible TV infomercial, just wait, there’s more! Have a favorite open source project you like or a system service that you tend to modify? You may not even have to start from scratch! Ansible has galaxies (pun intended) of pre-built roles and playbooks available. Ansible Galaxy is a community-driven effort to provide pre-built code to get your systems up and running fast. They have playbooks for Nextcloud Server, LAMP, and even desktop applications!

I use Ansible every time I build out a new VM. I use Ansible to ensure my user account is configured exactly the same way across all my systems: laptop, desktop, server, VMs, and cloud! Admittedly, my list of Ansible To-Dos is still fairly large, however, I try to spend a little time each month adding to it. Slowly but surely, I am automating and standardizing my home lab and home production systems. You can too!

Let me know below how you are or are planning to use Ansible.

Did you like this post? Let me know in the comments if there is more you’d like to read on this topic. There is SO much more we could talk about from products like Red Hat’s Ansible Tower (or the upstream AWX project) to large-scale use cases, bootstrapping, and more. So, by all means, let me know what you are interested in.

Thank you so much for spending your valuable time to hear my “war stories” and letting me share a tool with you I am quite passionate about.

(This post originally appeared here and is used with permission.)

Lessons Learned from Hybrid Meetings

Lessons I Learned While Attending a Hybrid Meeting

The approach to work has changed several times over the past three or so years. We all keep hoping to find that “new normal,” and I think we are in it already. At least for now, our new normal will be abnormal.

It’s funny now; it wasn’t then: In early March 2020, I had just gotten back from a team meeting in New York. I was going to be home for a week before embarking on some amazing trips: I was going to finish my sales training in Raleigh; I was going to a telecommunications conference in Chicago; I was going to attend a sales meeting in Texas. Three weeks, three trips…except I didn’t go anywhere!

During that week between trips, the organizers canceled all three. In a matter of four hours or so, The world shut down. I didn’t even leave my state until Summit 2022 in Boston! That was an experience to share in a different blog post. The trip that struck me was a couple of weeks after Summit when the Red Hat Enterprise Linux team met at one of our offices for a week-long strategy session.

At that time, I had been at Red Hat for 2 1/2 years and was a marketing team member for a week shy of a year. I hadn’t met any of my coworkers in person during that time! Let’s be honest, we were there for the strategy sessions, but most of us made the trip for the human connection!

Importance of In-Person

Before the pandemic, I’d had work-from-home days and had been part of remote workforces before I came to Red Hat. I was an all-remote employee before the pandemic. It’s one thing if everyone is remote; it is a mess if you have a hybrid audience. 

Before Red Hat, I worked for GitLab, a company that prides itself on being globally distributed. I felt my team of Solutions Architects had a winning pattern: asynchronous communication, regular 1-on-1s, and weekly team meetings. My favorite part then was that we met in person once a quarter. This balance allowed us to maximize working from home while maintaining regular communication with our team. The in-person meetings allowed us to strategize, whiteboard, or grab a drink with the coworkers we spend hours with weekly.

I missed that balance during the pandemic. I think, though, we are moving back in that direction. 

Hybrid Meetings

Anyway, back to Boston and the in-person strategy session. We spent the first morning meeting everyone and discussing our plans for the future of RHEL. The difficulty was we had well over 25 people in the room and almost as many on a Google Meet!

Here’s where this blog gets informative: It took us the better part of a day to get most of the bugs worked out. We realized that there were some crucial factors to take into consideration:

1) Keep the room quiet. Anytime a bag would open or someone would fidget through their notebook, it would be annoying to those in the room. But to those hearing everything through earbuds, it was downright awful! 

2) Ensure remote attendees can participate. It is effortless to be ignored or for your attention to drift when you are one of the few not on site. We were using Meet for our meeting. It had some beneficial features:

The “raise hand” function allowed people to signal their interest in contributing to the discussion. The raise hand tool even included a queue so people could address their comments in the order they were received. 

We found something new: Google Meet had a “companion mode”. For people in the room, we could join the meeting, use the raise hand tool, and be put into a chat room. Side conversations (or, in our case, humorous tangents) are an unavoidable part of meetings, so, at least in the chat room, these conversations were quiet (see point 1 above) and recorded right along with the meeting video!

Something else we ended up doing was ensuring that someone on the remote call got to present or lead group discussions. The giant floating head effect was a little much, but hey, what can you do. 

Though, we also realized that it’s still easy to do group breakouts with hybrid meetings. When we would assign people to functional breakouts or ice breakers, the virtual room became one of the groups. 

3) Utilize virtual whiteboards or flow charts! Yeah, I know, it’s not as good as everyone circled a physical whiteboard. Still, I was pleasantly surprised by several of the tools we used! There was Miro for virtual whiteboarding and collaboration. We also used Jamboard to do more free-form thinking and capture ideas.  

Wrap up

Hybrid isn’t ideal. Nothing beats being in person for strategy sessions, whiteboarding, and building team spirit! Giving a hug (I’m a huge hugger) or a handshake is the best. However, it’s not always possible with family, health concerns, and logistics.

I am very thankful that we live in a society that accepts and acknowledges that fact. We have the right and the support of others to exercise our decisions. While I still have some anxiety around travel, I enjoy it more, knowing it is my choice.

Nowadays, I’m even safer traveling than I was before. I got bronchitis and a sinus infection on a flight right before a cruise! Now, I have a mask with me at all times. If I feel like some folks around me are less than healthy, I can put it on and rest easier.

These are just some thoughts I had after traveling for the first time in several years. These are just a few lessons our team picked up from our first hybrid meeting. I’d love to hear what has worked for you!

Using Red Hat’s support tool at the command line to solve real-world problems

Before coming to Red Hat, I spent nearly a decade as a Systems Administrator. After all that time, I’m still continually discovering tools that would make life as a SysAdmin much easier. One of these utilities is the redhat-support-tool. In this post, we’ll walk you through using the tool in some real-world scenarios.

What is the Red Hat support tool?

The support tool allows you to interact with the Red Hat knowledge base, support tickets, analyze log files, and even set site-wide configuration options, all from the command line! At first glance, that may not seem like a big deal but consider these real-world scenarios.

Want to catch the rest of this post? Head over to the Red Hat blog!

How to install RHEL a new way with image builder

I am sure many sysadmins can relate to this scenario:

You get into work on Monday morning, attend your staff meeting, and log into your ticketing system, expecting a quiet week. NOPE! Right there in all caps (why do people use all caps in a ticket?) and marked Urgent is a request for a new application environment. Of course, the requester needs the new server up and running by the end of the week.

You are a savvy sysadmin. No problem, right? How hard could it be to deploy a new server with a database and web server? You thought ahead. You have templates for these things!

Then that database server you spent all weekend trying to fix crashed again. That took all day. Tuesday was that company all-hands meeting. Wednesday, more meetings and fires. Now it’s nearly Friday. That urgent ticket with its all caps glares at you every time you log in to update a ticket.

Time to be a hero! You close your email, mark your calendar as busy, and put on your headphones. You deploy your production template, but uh oh, that one is three minor versions behind.

So you check the one on your laptop. That one is running the latest version, woot, but nope, that one is running the “old” security tool. In desperation, you log in to your private cloud (say OpenStack). You know that template is up to date, but something corrupted the boot image, so now you can’t get a terminal.

In frustration, you return to your production image and just run the patches. You throw your hands up and add three new tickets to your queue to fix these out-of-date images.

A new way to RHEL

If that feels familiar, you should connect with me on social media: @itguyeric. I think it’s about time we start a club, support group, or something. While that may be an amusing anecdote, it was true of my experience for a good chunk of my operations career. And not just for me, but for many of you who work in the trenches daily keeping companies, universities, and governments up and running.

Deploying an operating system is expensive. It costs resources (hardware or compute time) and something far more precious: the time and attention of a sysadmin.

Do not despair; those days of managing images across platforms, versions, and configurations are swiftly closing. The issue of template management is where image builder comes into play.

Red Hat Enterprise Linux’s (RHEL) image builder saves time and reduces complexity when deploying optimized systems across datacenters and cloud footprints.

Image builder comes in three flavors: command line, local install (on a RHEL host), or Red Hat’s hosted service. No matter which flavor you choose, you’ll be able to design optimized images for your targeted platforms: hardware, qcow2 or vmdk, or cloud image.

Image builder workflow

You can break down the image builder process into five steps:

  1. Select your platform. Choose one of the three big cloud providers, a virtual image, or a hardware installer for servers or edge devices.
  2. Select your image builder tool. Choose between an on-premises build or the hosted solution.
  3. Create a blueprint. Define filesystems, select packages, and configure users.
  4. Build the image. Pick virtual, AWS, GCP, Azure, VMware, or ISO types.
  5. Deploy your instance. Not just one, either. Image builder helps create images to deploy anywhere, anytime.

How does it work?

I sense some disbelief, so I’ll walk through an example. And if you prefer to learn by watching, check out my video at the bottom of this article.

First, log in to the tool at console.redhat.com. Once you’ve logged in with your Red Hat Customer Portal account, navigate to Red Hat Enterprise Linux and select Red Hat Insights.

Red Hat Cloud Console

The link for image builder is toward the bottom of the Insights panel (or just navigate straight to the tool).

Insights menu, select Image Builder

Now you can begin to create a new image.

Image Builder Create Image page
Create Image initial landing page

From the Create image wizard, you define how your image will look. First, choose between RHEL major releases. Versions 8 and 9 are currently available on the hosted service. Next, decide what kind of image to build.

For this example, imagine you want to deploy a production instance on Google Cloud Platform (GCP) but also have a qcow2 file to do testing and development work from your local laptop.

Image output page

Notice that when you select certain options, your breadcrumb trail adjusts to reflect the additional steps. For GCP, you can choose to share the template with a user account, a service account, a group account, or a domain.

For this example, I will just share it with my Red Hat account on GCP.

Target Environment

Now, this is one of my favorite features: You can bake your registration into the image. All you need is a valid activation key setup in your customer portal. But that’s not all; you can also preconfigure your image to register with Red Hat Insights right from the template.

Registration

One of the newest additions to the image builder tool is manually configured filesystems. You can now define sizes and locations for multiple partitions. For this example, I’ll add a home partition, and also add a webapp directory under opt. I will set both of those to 5GB but leave the root at the default 10GB.

File system configuration

Next stop, packages. There are literally thousands of packages available in the Red Hat repositories. You can add any combination of these packages to your image. For instance, I am a huge fan of tmux, a terminal multiplexer.

I mentioned this would be a web application, so I’ll grab Nginx, too.

Packages selection

What you cannot see from this menu is that image builder automatically added all the dependencies for tmux and Nginx to the image. That’s over 100 packages that it added to the list without any intervention.

All that is left is to give your image a descriptive name and review the choices. Image builder does the rest.

Image name
Review settings

Building an image varies greatly between how complex the image is, how large the actual image will be, and, like all shared services, how heavy of a load there is on the platform. In this demonstration, I saw between 10 and 18 minutes.

List of images

Once the images are done building, you can start deploying them. For the qcow2 image, I received a link to download the file directly from my browser. You can then upload it to a file share or hypervisor, or import it into your laptop for local use. Your options will vary depending on your choices above.

You receive an image name for the GCP image that you can use to copy the template into your GCP account. You can use it just as you would any other cloud image.

New images

Wrap up

This article may sound like an infomercial for image builder, but the process is that easy. I have used many different tools over the years: Documenting the process in text files, complicated Kickstart scripts, or VM templates. Image builder has been the easiest to incorporate into the workflow for my home lab and for the content I help develop for Red Hat Enterprise Linux.

With different platforms, formats, and combinations of settings, image builder quickly meets the needs of any number of operations projects.

Please don’t take my word for it, though. Try it for yourself. Either visit the hosted service or try out our two Image Builder labs. The first is web console-based and the second relies on the command line interface.

Here’s a demo video we made of the full process.

This article is based on “The new way to Install Red Hat Enterprise Linux: image builder service” from Red Hat Summit 2022 and was originally published on the EnableSysAdmin blog.

What is a technical marketing manager?

From creating technical labs, blogs, and videos to pairing customers’ problems with product features, technical marketers never see a dull moment.

Slide-deck builder, swag folks, booth dwellers, buzzword people… technical marketing gets a bad rap sometimes. Today, I want to set the record straight. Marketing can be a chaotic, challenging, yet rewarding space to work in… and there’s also some swag involved.

I’ve held several different roles before finding my home as a technical marketing manager (TMM), including support engineer, systems administrator, and solutions architect (technical sales), to name a few. None of those roles quite brought me the thrill and fulfillment that my current position does. What does a TMM do day-to-day? What skills and tools do you use? What traits do you need to succeed?

Want to catch the rest of this article? Head on over to the Enable Sysadmin blog!

Beginner’s Guide: How To Get Started With Element & Matrix

These days it can be overwhelming to select the best software to use because now more than ever, choices are abundant when it comes to software. Messaging and Communications apps are a great example of that because there are so many options out there. What if you’re looking for a messaging app that is scaleable and privacy-focused? It can be even harder.

Thanks to the Element team, I’ve got a great option to show you. Element, previously known as Riot.im, is a cross-platform client that works on the Matrix protocol. What does that mean? Is Neo the One? Well, let’s talk about the protocol and why you should consider using this great messaging platform.

What Is Matrix?

The Matrix team describes it as an “open standard for secure, de-centralized, real-time communication”. First, it’s open-source, more eyes equals better code. We all know how much I love open source…but for the uninitiated, that means more people can read and study the code, security vulnerabilities can be found and fixed faster, and other projects and contributors can build effective integrations into the source project.

Second, it’s decentralized. This is a little more complicated, but think of it this way, when you stand up an instance of a decentralized application, that is your space. This could be for a family, a meetup, or a company. Everything would be self-contained until you make your instance discoverable. At that point, you@yourhomeserver.com can reach out into the world and find say friend@anotherserver.com.

Thirdly, Matrix supports real-time communications. This includes collaboration, messaging, voice, and even video! Matrix provides a series of encryption algorithms and bridges to facilitate end-user applications to communicate with one another. You may use Etherpad for real-time collaborative document editing, Jitsi for video conferencing, and in today’s blog post, Element for messaging.

Some of the most popular bridges for Matrix are IRC and Gitter. The Open Source Community jumps in with some of their own too, including Telegram and Google Hangouts.

Matrix enables the communications between these platforms within an instance or throughout the interconnected network of Matrix instances across the Internet.

What is Element?

If Matrix is the network, then the Element client is the vehicle that allows you to traverse that network; Element is the interface for text, voice, and video conversations. Just like the Matrix protocol, the Element client is completely open-source!

With the ability to bridge between different apps like Slack right into the Element interface, you no longer need to install and maintain a dozen different apps just to keep in touch with friends, family, work, your volunteer group, your work’s other chat client…you get the idea.

Create an account, activate the needed integrations, and chat with anyone, anywhere on any number of different platforms. Enjoy a 1:1 conversation or hundreds of participants in public rooms.

Bonus: One of my favorite features? Notifications management. I can have every notification from every room, set it to only being notified if I am tagged, or never get any notifications…ever. But Element didn’t stop there, nope, they have one of my favorite notification settings I have ever seen: keyword notifications.

Let’s say I want to know any time someone is talking about dogs. I can add keywords to my configuration and get notified anytime someone says dog, dogs, cats drool, you get the idea!

Element has the option to join the central server at Matrix.org, host your own instance on your own server, or pay a monthly fee for a secure, hosted option. In fact, from their website, you can get up to 5 active users a month for as little as $2/month (USD).

Creating Your Account

It’s now time for you to enter the Matrix and get into your Element. See what I did there? Alright, to get started you will need to create an account. One of the best things about Element is that you can use it on all sorts of devices like your laptop, tablet, phone, or whatever.

For this guide, I’m going to show you how to do it on the Web client in your browser. So open up your favorite browser, such as Mozilla Firefox, and navigate to https://app.element.io.

Your browser will likely ask you to allow access to persistent storage. Accept it that way Element can store your keys, messages, etc. Next, we are going to create an account.

We could create our account on Matrix.Org, but here is a little pro tip: The central server in a federation usually is over-taxed and prone to lag. So, if you know of another public-facing instance, that would be a good bet.

Lucky for us, the community has some awesome members that manage LinuxDelta.com, a community-driven hub for information on Linux distributions, tutorials, and a Matrix server! Instead of using the Matrix.Org option, we are going to go to Advanced/Other:

In the ‘Homeserver URL’ field, type in: https://matrix.linuxdelta.com and click on the green next button. Next, it’s time to create a username. The username will be your display name as well so keep this in mind as you decide. This is what people will see you responding as and how they can tag or search for you! Then create a password, make sure it’s complex. No sense in skimping on security especially if you are utilizing a password manager, like Bitwarden for instance.

Me personally, I am a content creator and a community advocate. I want to be found in the open-source community, so, I would add an email so people can look me up via email. If you do, you’ll of course be sent the customary email confirmation link. For now, though, let’s go ahead and sign in.

Once you have filled in your username, password, and email go ahead and click the green Register button!

This next step is tricky but stay with me. One of the advantages of Element we discussed was end-to-end encryption. We need to generate a Security Key (that is different from our password!). I typically recommend using a system-generated key. Then you can use a secure note somewhere to store the key.

Disclaimer – I changed the security key after writing this blog post, so, don’t think you can get into my account that easily. 😀

Once you’ve saved your key somewhere safe, go ahead and enable notifications and read through some of Element’s recent announcements.

Getting Connected

You are sitting with a brand new, secured account. Now what? Well, Element is a communication platform, let’s find some people to communicate with!

In the middle of the window, there is the option to “Explore Public Rooms”. Let’s click there. Element will default to your home instance, in this case, LinuxDelta.com.

Get connected to The Geek Lab, for instance, by clicking join. That will put you in touch with hundreds of other technology enthusiasts like yourself who hang out, chat, and help each other fix technical problems.

Want to get connected to the broader world? Go back to the Explore button, next to the search bar. In the window we saw before, we have the option to create a new room or select a different server. Let’s hop over to Matrix.org.

There are literally thousands of public rooms covering a crazy number of different topics. Many open-source projects have communities on Matrix. There are HAM radio enthusiasts, D&D (Dungeon and Dragon) hangouts, and even region-focused rooms.

The join process is exactly the same though for a different server, just find a room you want, click join, and start chatting.

There is plenty more to do and discover. From 1 on 1 conversation, adding bridges, and initiating video calls. However, for now, that is all the deeper we will go!

Closing Thoughts

You may be surprised to hear that this is not paid content. I wrote this because I believe in Element. I believe that Matrix is going to have a HUGE part to play in the years to come. There are SO many (read too many) apps to keep track of. Many of them have ads or tracking built-in, or are limited to voice or text. Element, powered by Matrix, has it all. The integrations keep getting better. More and more bridges keep getting built (no pun intended, okay, maybe a little pun).

Open Source is the key. E2E (End to End Encryption) will ensure that your private conversations stay private… You know, I haven’t even mentioned the beautiful interface or that the Element Team releases new features on a frequent basis.

So go sign up and give Element & the Matrix protocol a try! When you get your account registered, be sure to look me up: itguyeric@one.ems.host

(This article was originally posted here and is used and updated with permission.)

The Origin of Eric the IT Guy

I was recently asked, “Why call yourself the IT Guy? Why not just use your name?” Great question! In the professional world, we are encouraged to “build a professional brand,” I just took it to an entirely different level.

There were a few minor reasons. One of which is privacy. I initially didn’t want my full name publicized all over the Internet. However, I eventually realized that anyone that wanted to figure out who I was badly enough could follow the breadcrumbs to LinkedIn. 

Logo - Linux Unplugged
Linux Unplugged

Another more humorous reason was that I used to hang out regularly on Linux Unplugged, a live podcast that features a Mumble room for guests to jump on and be a part of the hosts’ discussion. When I first joined, I was “erich1527”. Little did I know that there was an Erich who worked with an open-source project and frequently came to hang out on the show as well. Having two Eric’s made it confusing for the host!

When the IT Guy was born, I worked full-time as a Systems Administrator and part-time trying to start my own IT Consulting company in the Kansas City area. Granted, the consulting business withered away as life changed, kids came into the picture, and priorities shifted. However, it gave me the branding I wanted to create!

I had a client at the time who had me handling an office move. When I walked in the day of the move, the lady behind the front desk leaned into the main conference room and, to her boss, said, “Hey the IT Guy is here.” I was hooked!

I loved how simple the name was: “Eric the IT Guy”. It was generic but appropriate. The IT Guy could be any of us who deal a lot with technology and trying to get it to work. (Obviously, some of you might have to be the IT Gal…but I digress.)

I had colleagues in the technology space who helped me find a voice. I borrowed equipment from them, recorded sample episodes, started appearing on podcasts as The IT Guy. It stuck. It felt right!

When I realized that the brand was working, I was at a DevOps conference here in Kansas City. I introduced myself as Eric, sporting my GitLab work t-shirt at the time. The dude I was chatting with said, “Wait. Eric…Eric…The IT Guy?” My response was a huge smile and “The one and only!”

Previous Recording Space

Some of you may laugh at the name Eric the IT Guy, but hey, it works. As the IT Guy, I try to help educate my fellow technologists. I try to bring exciting technologies to the forefront. I try to teach methodologies and techniques that can save you time and trouble that I dealt with as a Systems Administrator.

Do you need to give yourself some cool nickname or create a personal logo? Probably not. Do you need to network, build connections, and share your knowledge? Most definitely!

If you aren’t sure how to grow your network, you can start by adding me! I am just about everywhere as @itguyeric. Find me, let’s chat; that’s all it takes to get started! One person, one conversation.

x  Powerful Protection for WordPress, from Shield Security
This Site Is Protected By
Shield Security